Inventory
One of the important modules in the Odoo platform, the inventory module allows you to manage all the inventory operations of your company in an organized manner. It is a difficult task to manage inventory of a company without a well-defined inventory software like Odoo. The Odoo Inventory module provides you an insight to manage and control all the purchases that we made from the distributor, arrange and keep the product stocks, organize the inventory tasks, manage the quantity of products for sale and also track orders.
This application is suitable for any type of business such as small, medium and large. Moreover the module can be integrated with all other modules in Odoo like Sales, Purchase, Point of Sale, Repairs, Manufacturing and many more.
Let us discuss the product configuration of the Odoo Inventory module.
Product Configuration
Product Creation
The product configuration in the Odoo Inventory module can be done by selecting the Product menu available in the home dashboard. The image of the product’s window is depicted below.
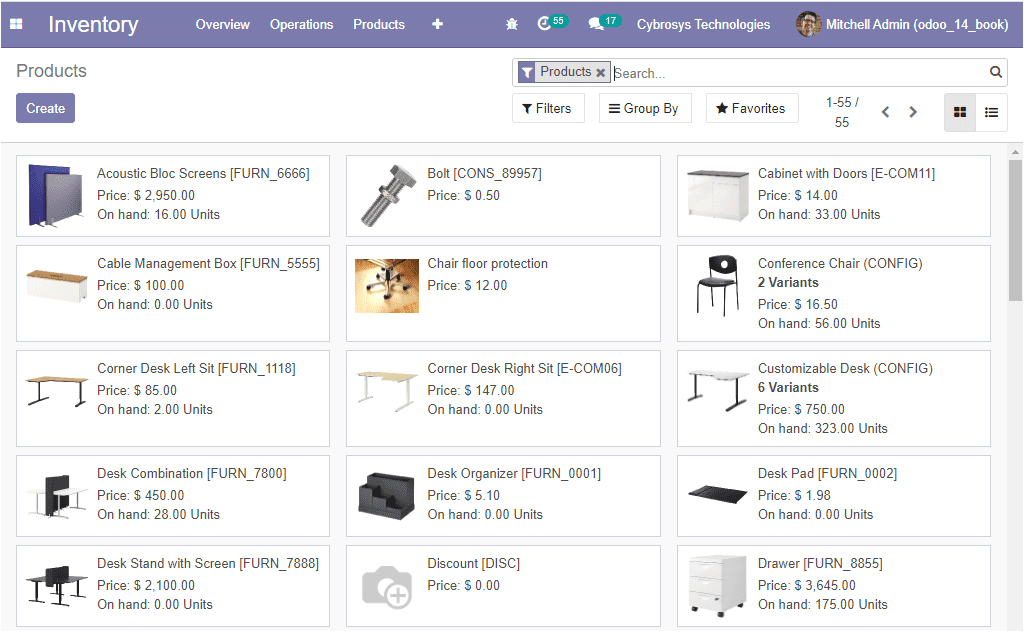
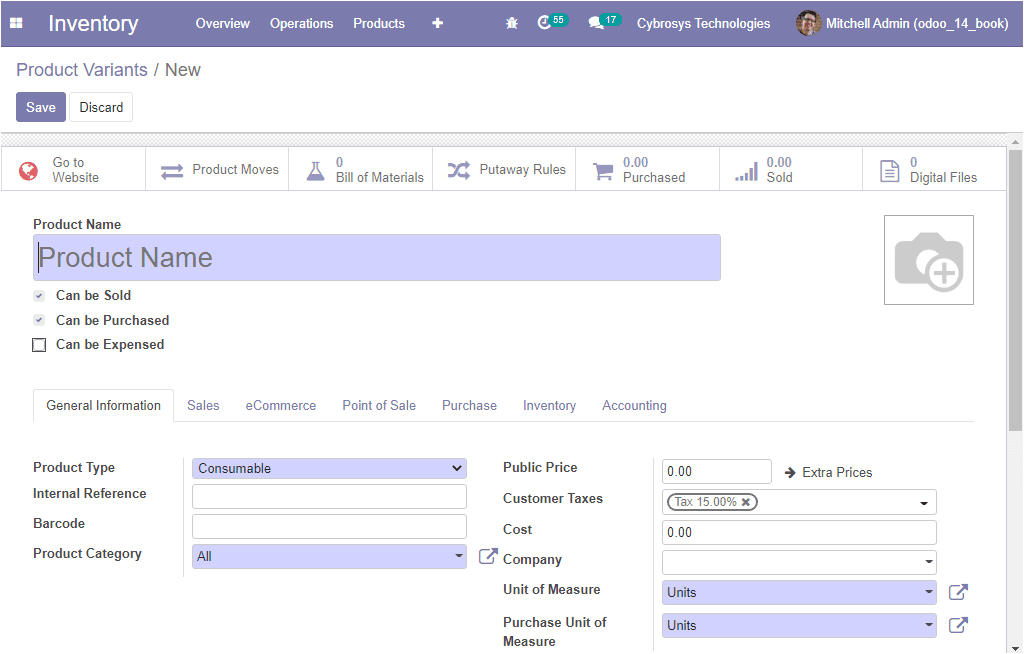
In this product window, you can view all the products described on the platform along with the product description. The product in the dashboard can be viewed in both Kanban and List view. Moreover, all the default and customizable features such as filters, group by, favourite search are available in the window. Additionally, this window provides you the provision to create new products. This can be done by selecting the Create icon available on the top left corner of this window. The image of the window is depicted below.
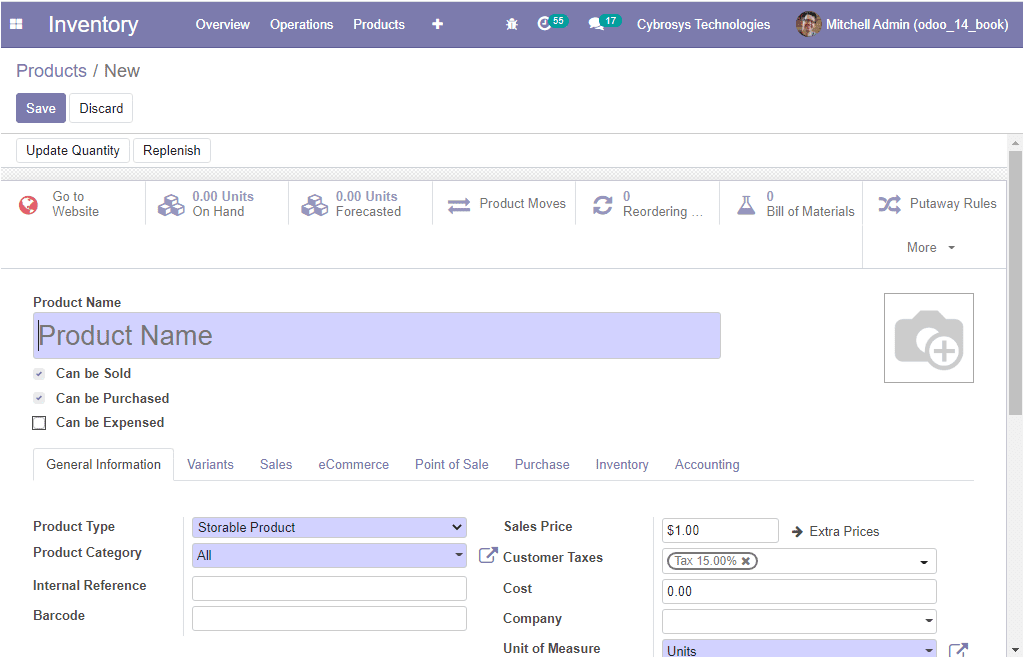
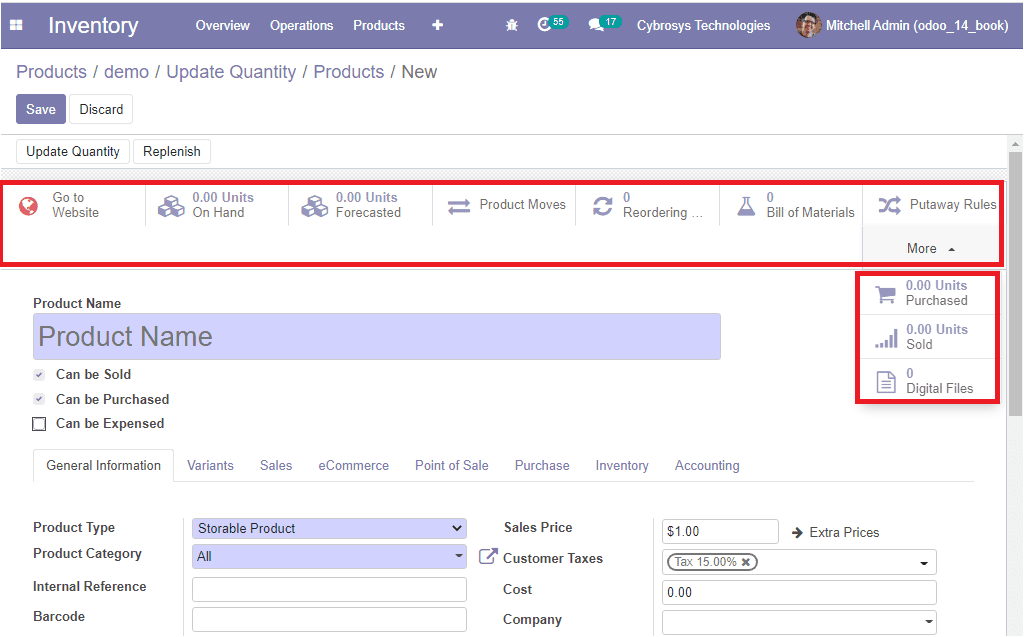
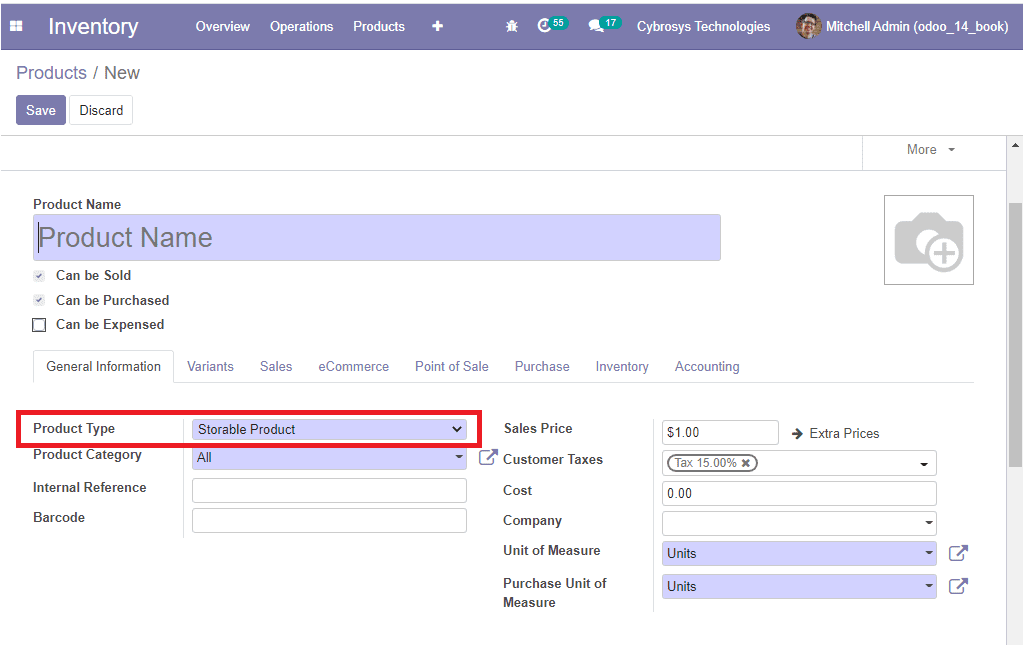
In the product creation window, you can provide the product name and then you can specify whether the product Can be sold, Can be purchased, Can be Expensed. Also, you can allocate the image of the product in the allotted space. There are various smart buttons available on the top of the window and these icons direct you to the Company Website, onhand quantity menu, forecasting menu, product moves, reordering rules, bill of materials, Putaway rules, units of measure purchased, unit of measure sold, and digital files.
Under the General Information tab, you can describe the Product Type, Product Category, Internal Reference, Barcode, and Sales Price along with the Customer Taxes, Cost, and the company under which the product is being sold. In addition, the default Unit of measure used for all stock operations can be mentioned along with the Purchase Unit of Measure. The purchase unit of measure is the default unit of measure used for purchase orders. It must be in the same category as the default unit of measure. Finally, you can describe the Internal notes in the allocated box.
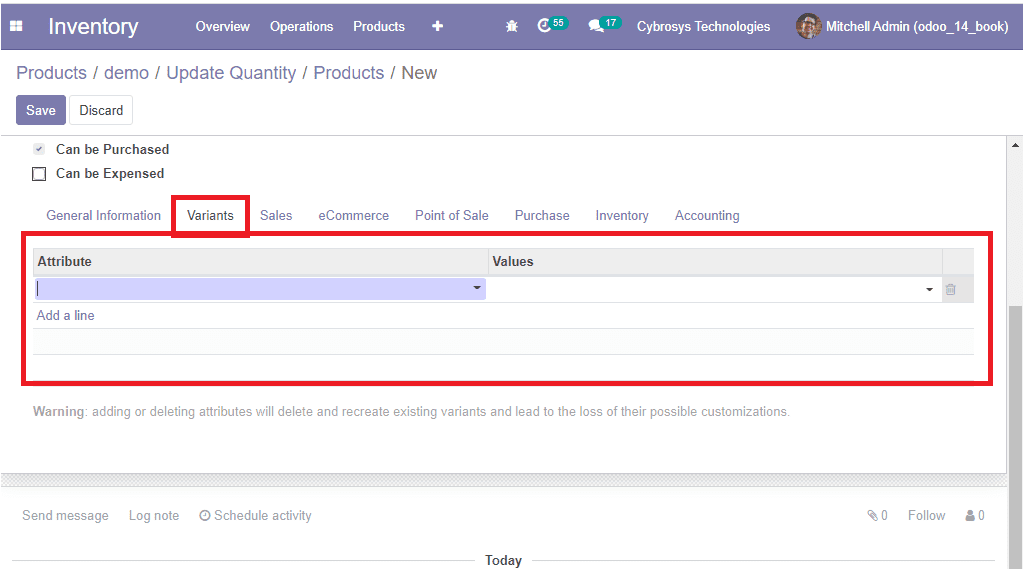
The Product variants for the respective product can be described under the Variants tab of the product creation window. For that, you can select the Add a line option available and allocate the product variant based on the various attributes accessible such as colour, size, material, and many more.
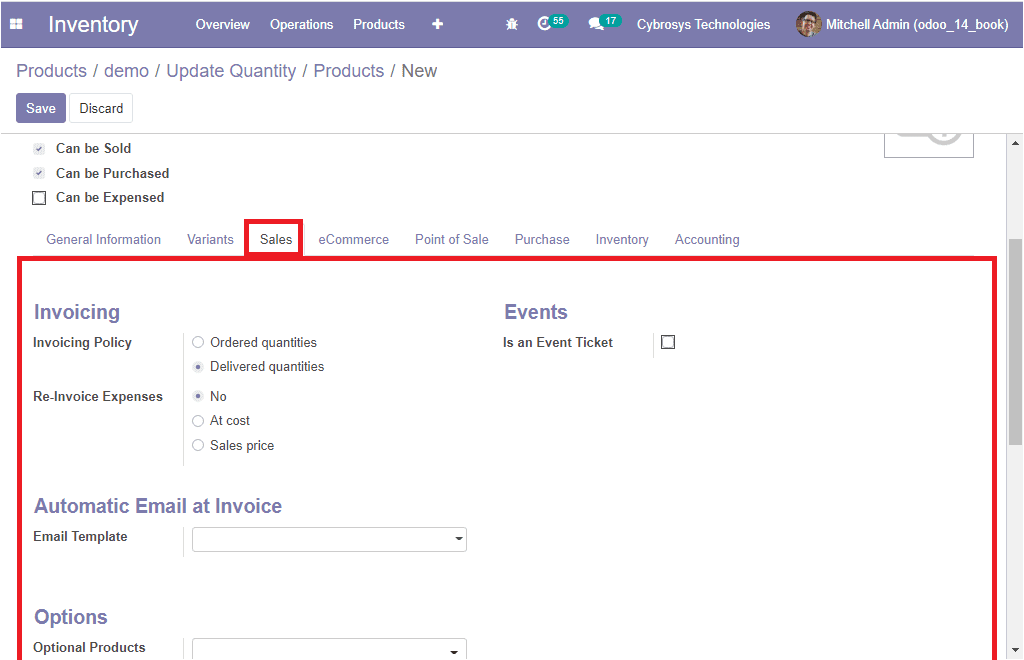
Under the Sales tab of the product creation window, you can describe the Invoicing Policy of the product operation as Ordered quantities or Delivered quantities and the Re-Invoice Expenses associated with the product can be enabled as No, At cost, and Sales price. Additionally, you can check the box near the option ‘Is an Event Ticket’ to automatically create an event registration at the sale order confirmation of the product associated. Moreover, you can specify the Email Template for sending a product-specific email once the invoice is validated. Also, the Optional Product can be provided for the website, and the Sales Description along with warning messages can be customized.
Under the ecommerce tab of the product creation window, the ecommerce website description of the product can be defined. You can allocate the Website, Website sequence, Categories, Availability, Alternative Products along with the Accessory products and Ribbon.
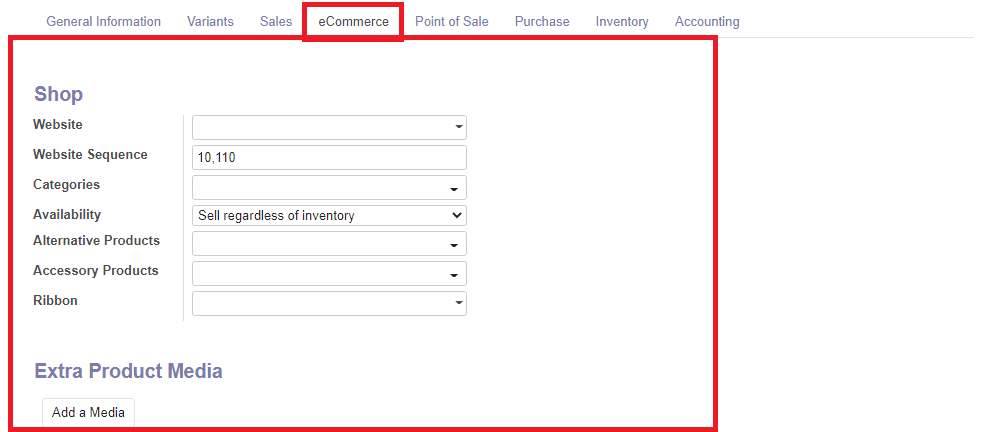
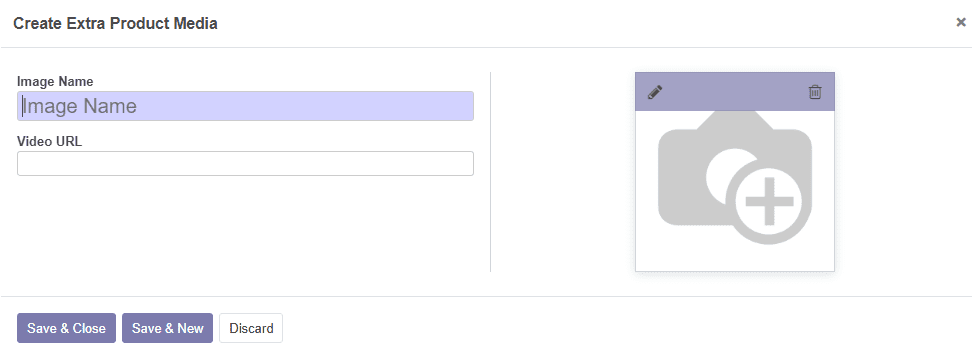
In addition, you can create Extra Product Media by selecting the Add a media button available. By selecting the Add a media button, you will be depicted with a popup window where you can provide the Image, Image Name along with video URL. The image of the window is depicted below.
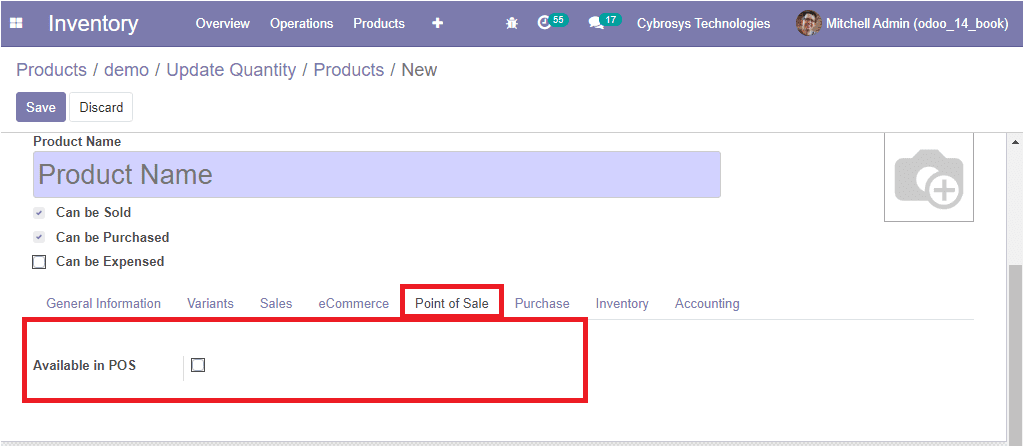
In the Point of Sale tab of the product creation window, the product can be enabled for the Point of Sale. The image of the Point of Sale tab is displayed below.
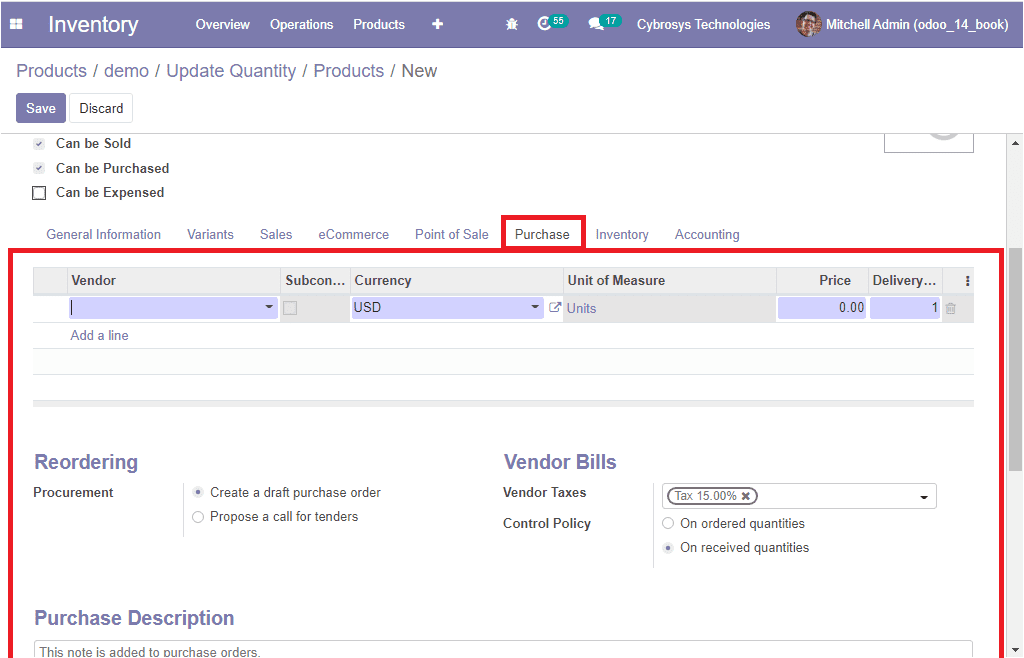
Under the Purchase tab of the product creation window, you can allocate the purchase details of the product. First, you can add a vendor by selecting the Add a line option available. In the reordering menu, you can describe the procurement either as Create a draft purchase order or Propose a call for tenders. In addition, the Vendor bills, Vendor Taxes (default taxes used when buying the product), and Control policy can be provided. The control policy can be made either in ordered quantities or received quantities. Moreover, the Purchase Description and Warning when purchasing this product can be defined.
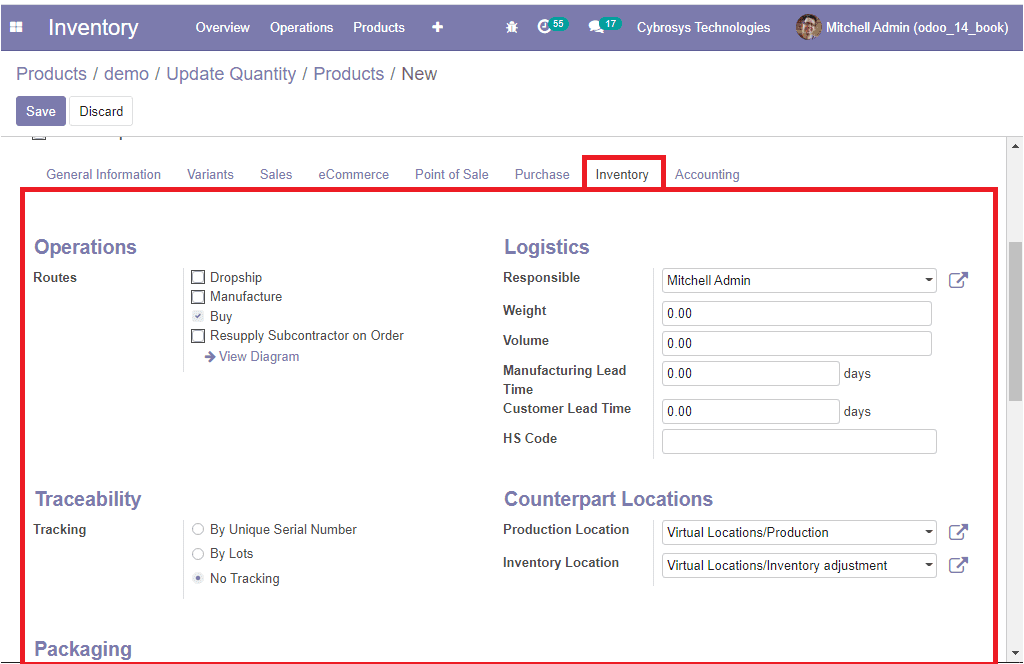
The inventory operations of the respective product can be allocated under the Inventory tab of the product creation form. First of all the Routes of operations can be defined and the tracking details based on the serial number and lot number operations can be specified. In addition, the Logistic details such as Responsible employee, Weight, Volume, Manufacturing Lead Time, Customer Lead Time, HS Code can be described. Moreover, the counterpart location aspects such as Production Location and Inventory Location can be defined. Additionally, you can provide the different ways to package the same product by selecting the Add a line option available under the Packaging tab. Finally, you can mention the custom-made description for Delivery Orders, Receipts, and for Internal Transfers.
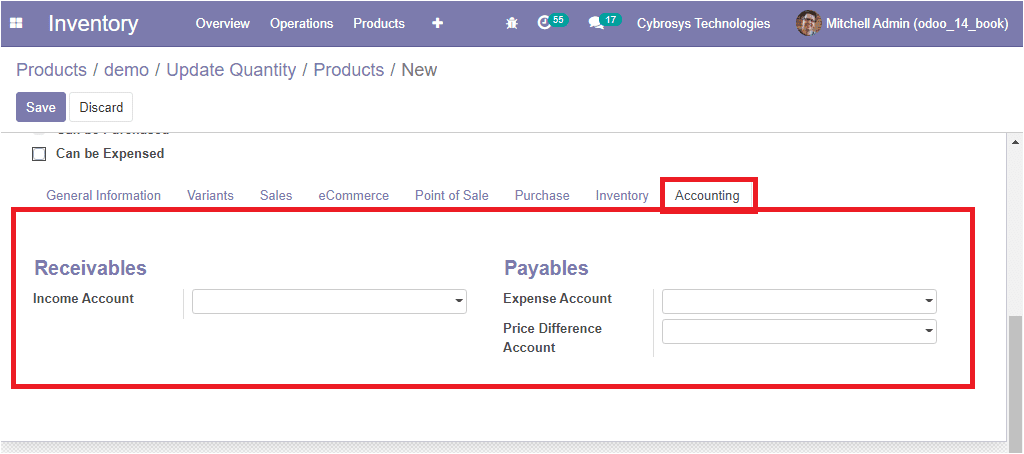
Now the Accounting aspects of the respective product can be defined under the Accounting tab of the product creation window. The financial operations of the product can be defined in both the receivable and payable aspects.
So far we were discussing the Product configuration in the platform and now let us discuss the Product Variants window available in the platform.
Product Variants
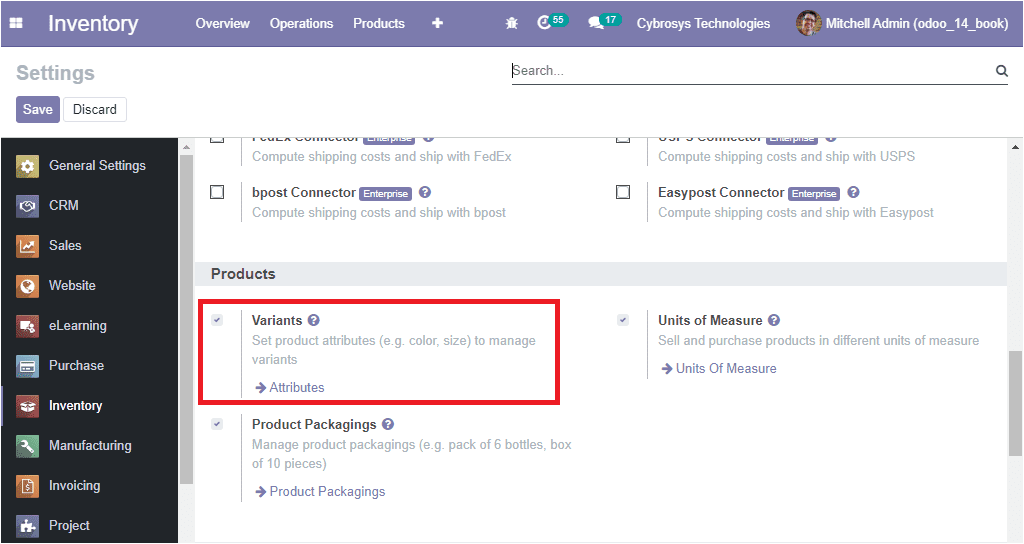
The product variants option in the Odoo purchase module will allow you to describe the variants of the same product in different attributes. For receiving the benefits of this feature you should enable the Product Variants option from settings.
Now the Product Variants option can be accessed from the Products tab of the Odoo purchase module. The image of the window is depicted below.
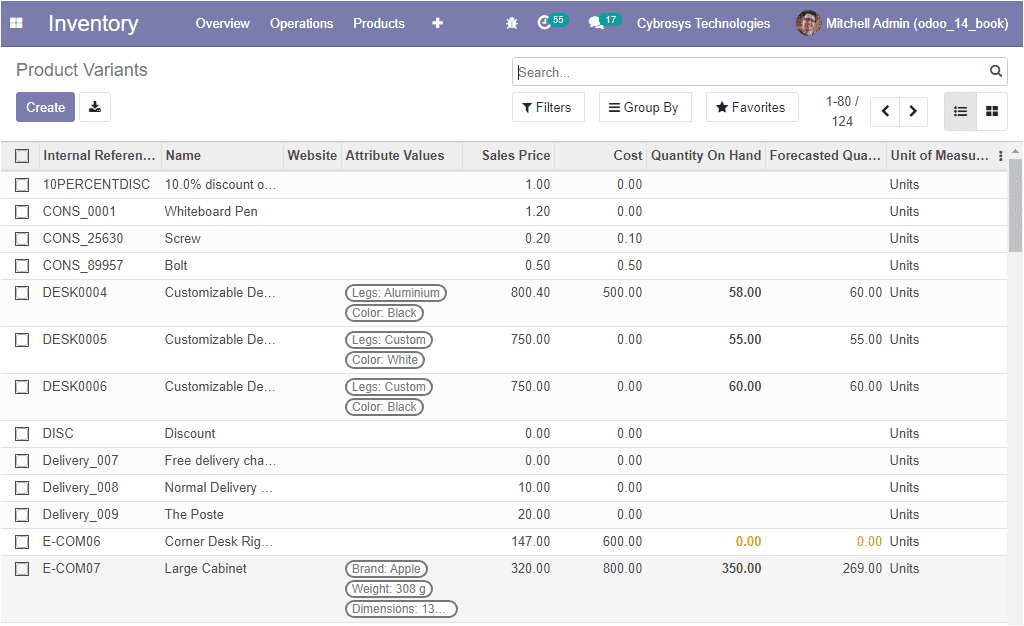
The Product Variants window will enlist all the product variants described in the platform along with the Internal Reference, Name, Attribute Values, Sales Price, Cost, Quantity On Hand, Forecasted Quantity, Unit of Measure, and many more aspects. You also have the provision to create new product variants by selecting the Create icon available. We discussed the product variants creation window in detail in the Sales module. The image of the Product variants creation window is shown below.
As we are clear on the product variants option available in the Odoo inventory module and now let us discuss attribute aspects of the product variant.
Attributes
The attributes of the product variants can be accessed from the configuration tab of the inventory module. The image of the window is depicted below where you can view all the attributes described in the platform along with the Attribute name, Category, Display Type, and Variants Creation Mode.

The Odoo platform allows you to create new attributes by selecting the Create icon available. Let us describe the Attribute creation window in detail and the image of the window is displayed below.
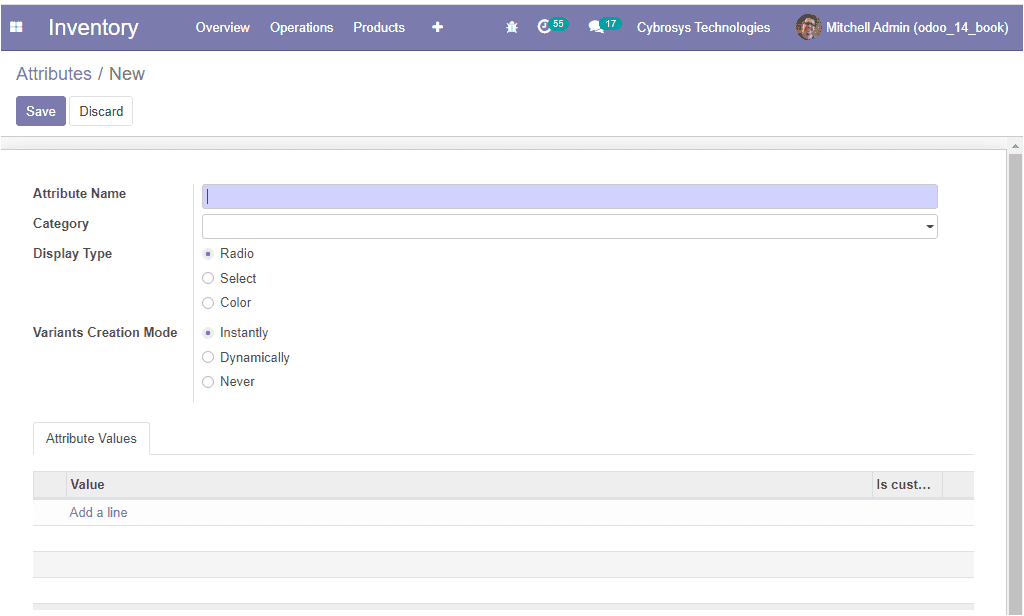
In this creation form, you can provide the Attribute Name, allocate Category to regroup similar attributes under the same section in the comparison page of ecommerce. In addition, you can select the Display Type used in the product configurator. This can be selected as Radio, Select, or Colour. Moreover, the Variants Creation Mode can be specified Instantly, Dynamically, or Never. Finally, the Attribute values can be defined by selecting the Add a line option available.
As we clear on the Product attributes window in the platform and now let us discuss the Unit of Measure window available in the platform.
Unit of Measure
When dealing with the different types of products, the unit in which the product is measured also needs to be different. In the case of solid products, they can be measured in kilograms, grams, pounds, or numbers. But in the case of liquids, it is always measured in litters or ounces. So it is important to use different units of measure for different products. The Unit of Measure aspect available in the Odoo platform allows you to create and manage various units of measure and also provides the provision for describing multiple units of measure for a product to define the units of measure.
In order to operate with this feature, first, you have to activate the unit of measure option from settings. For that you can go to Inventory -> Configuration -> Settings -> Products -> Units of Measure.
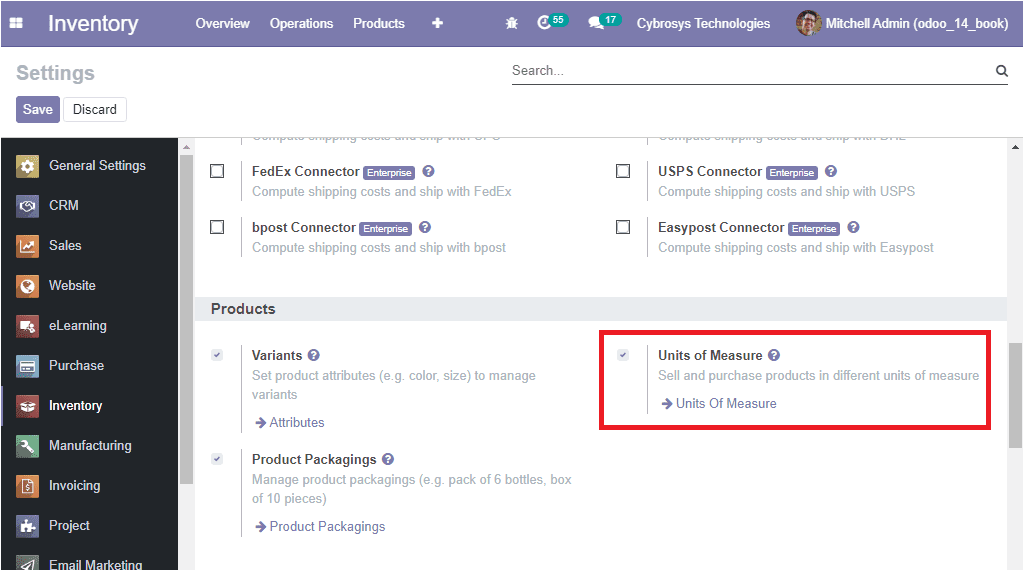
For activating this option, you can check the box near the option and save the changes by selecting the Save icon available. Now it is possible to go to the unit of measure menu directly from the settings. Also, you can access the window by taking the route Inventory -> Configuration -> Unit of Measure. The image of the window is depicted below.

The data in the Unit of Measure window can also be filtered and sorted out using various options available by default as well as the customizable options available. The Odoo platform considers this feature as a localization aspect and it gives the insight to measure the quantities based on the localization rules of the business operation. In this window, you can view all the units of measures defined in the platform along with the Category and Type. You can also create a new one by selecting the Create icon available. The image of the creation window is depicted below.
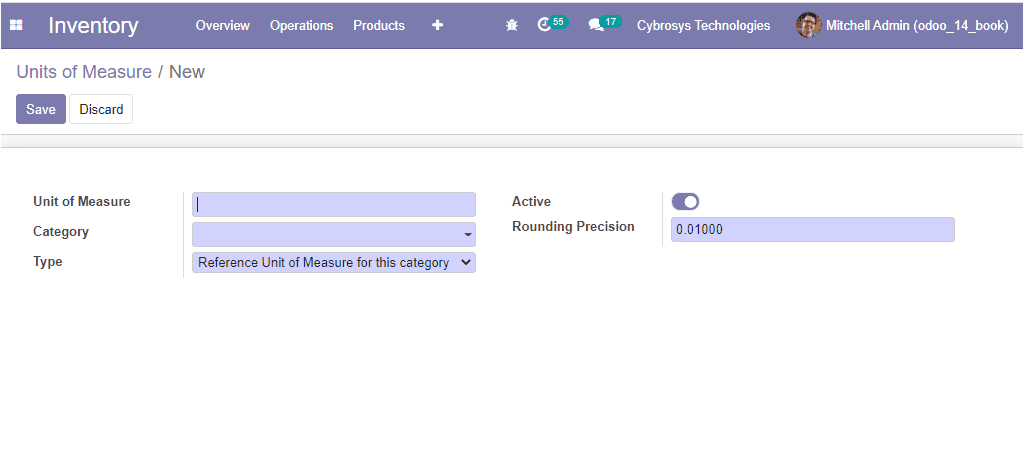
In this creation window, you can describe the Unit of Measure along with the Category of operation. Conversion between units of measure can only occur if they belong to the same category. The conversion will be made based on the ratios. In addition, you can allocate the Type and disable or enable the option Active. Finally, the Rounding Precision can also be allocated.
So far we were discussing the configuration of different units of measure in the Odoo inventory module.
Assigning Units of Measure to a product
The Unit of Measure can be assigned to a product at the time of product configuration. In the product description window, you can view the option Units of Measure and there you can assign the respective unit of measure from the ones defined in the platform.

Now let us discuss the product packing window available in the Odoo platform.
Product Packing
The Product Packaging window in the Odoo inventory platform can be accessed from the configuration tab of the module. For accessing this option from the configuration tab initially, you should enable the product packing option from the settings window of the Inventory module of the Odoo platform.
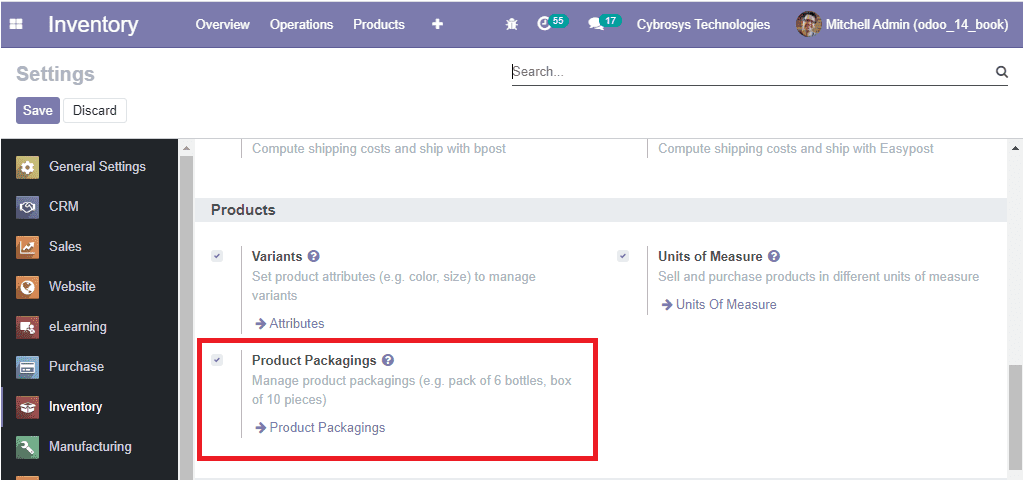
Now you can enter the Product Packaging window either by directly selecting the Product Packaging menu available in the settings or you can access it from the Configuration tab of the inventory module. The image of the window is depicted below where you can view all the product packaging’s defined in the platform along with the details of Product, Packaging, Contained quantity, Unit of measure, and Company.

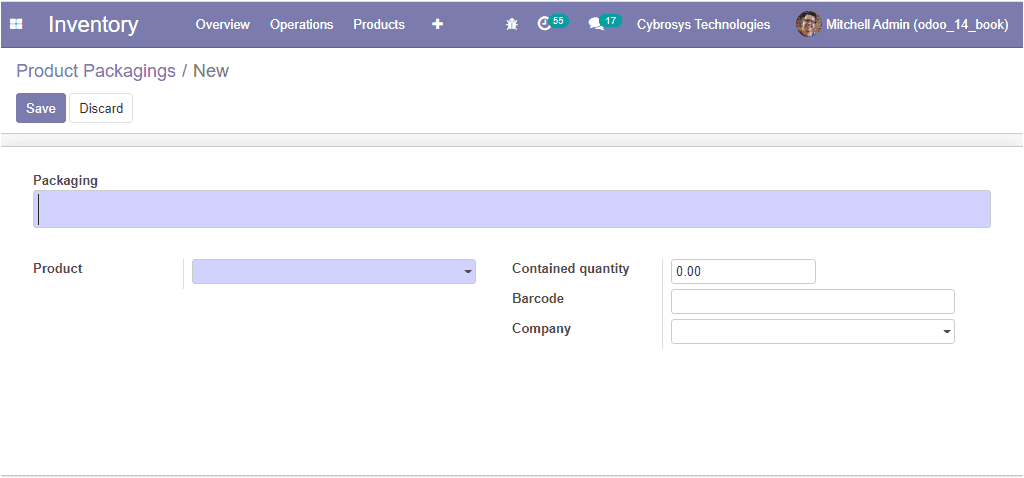
You also have the provision to create new packing by selecting the Create icon available. The image of the creation window is depicted below and where you can define the Package type, allocate product, the quantity of products contained in the packaging and the barcode used for the packaging identification, and the Company related to this operation if the platform handles multiple companies.
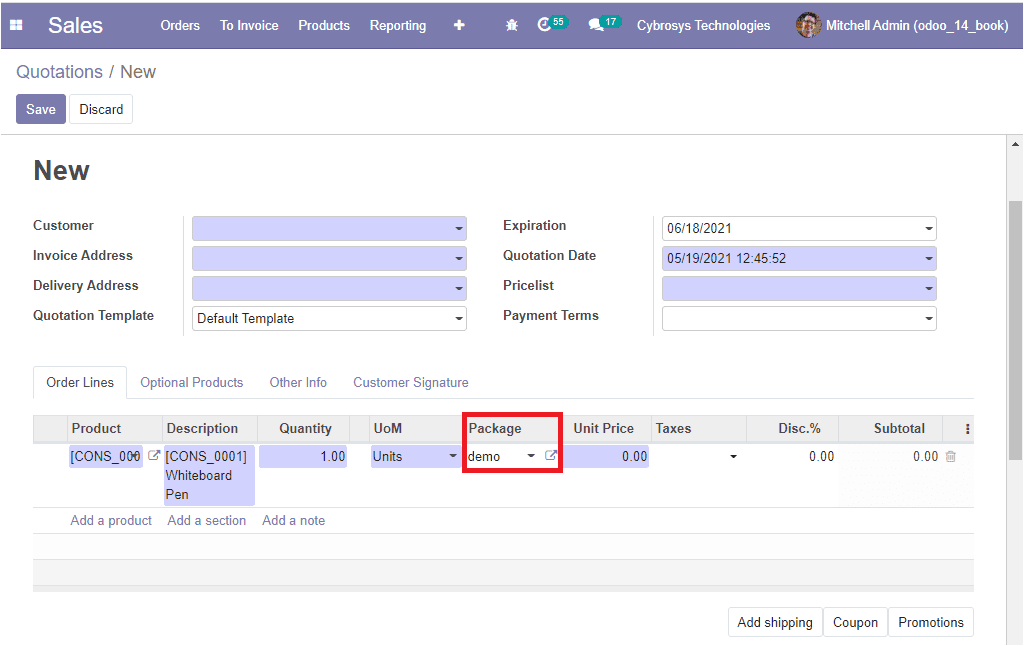
As we created the product packages and now you can perform the sales quotation as well as the internal product transfer in packages. In the time of creating a sales quotation in the sales module, you will be depicted with the package information while describing the product under the Order line’s tab. The product package can be chosen from the package window as depicted in the below image.
As we clear on the product packing aspects of the module and now we can move on to the Product Traceability features available in the module
Product Traceability
The Odoo platform recognizes the importance of the tracking and traceability needed for the internal as well as the external operations of the company. So the platform allows you to assign serial as well as lot numbers in the aspects of traceability into the products being purchased in the platform. The serial number and the lot number can be defined based on the custom-made description and the Odoo platform enables to automate the operations. For enabling these options, you can go to the settings window of the inventory module.
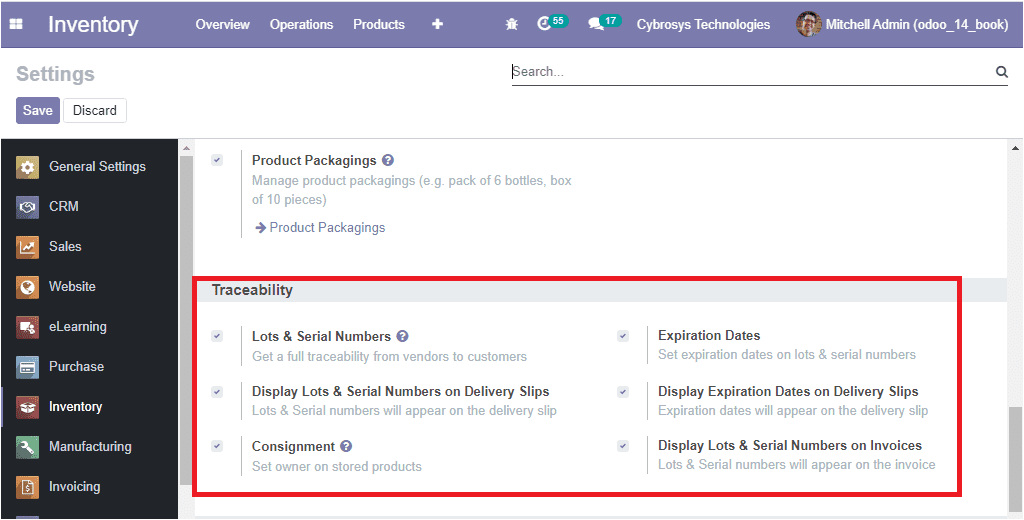
You can use the serial and lot number in the platform after enabling the Lots & Serial Numbers option available under the Traceability tab of the Odoo inventory module settings.
Now let us discuss the Operations Types option available in the Odoo Inventory platform.
Operations Type
The Operations Type window in the platform can be accessed by taking the route Inventory -> Configuration -> Operations Type. In this window, you can define the types of operations that are used in the case of transferring goods from one location to another. The image of the window is depicted below.
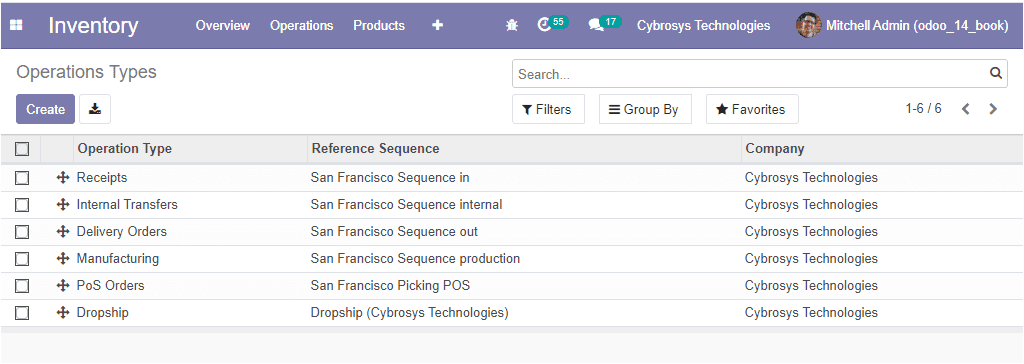
In this Operations Type window, you can view all the operations types described in the platform along with the Reference Sequence and the Company related to this operation. Upon selecting the create icon available, you can create a new operations type. The image of the window is depicted below.
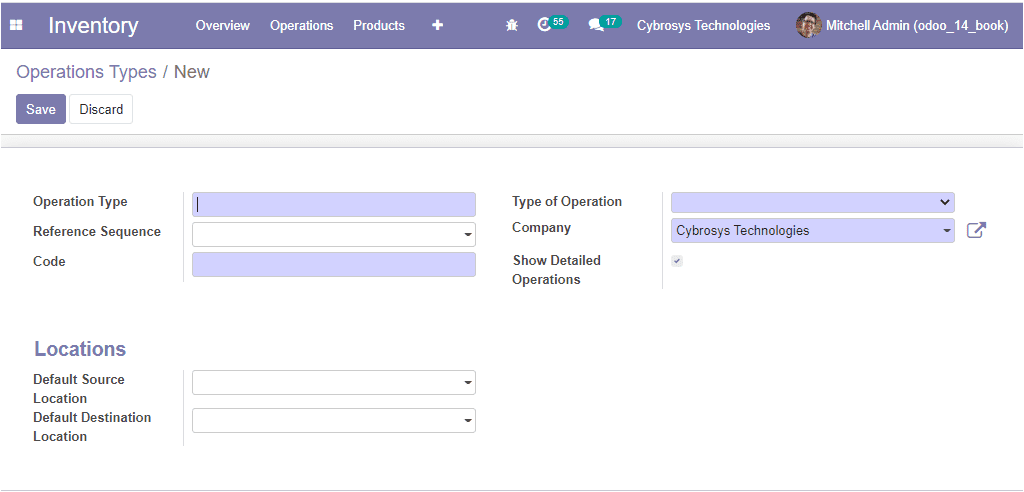
In this creation window, you can describe the Operations Type, Reference sequence, and Code along with the Type of Operation, Company related to this operation if the platform manages multiple companies. In addition, you can enable the option Show Detailed Operations. If enabled, the pickings lines will represent detailed stock operations. If the option is disabled, the picking lines will represent an aggregate of detailed stock operations. Moreover, the location details such as Default Source Location and Default Destination Location can also be allocated.
Tracking and Traceability based on lots and serial numbers
The Lot /Serial number menu can be accessed from the Product tab of the Odoo inventory module. The image of the window is depicted below.
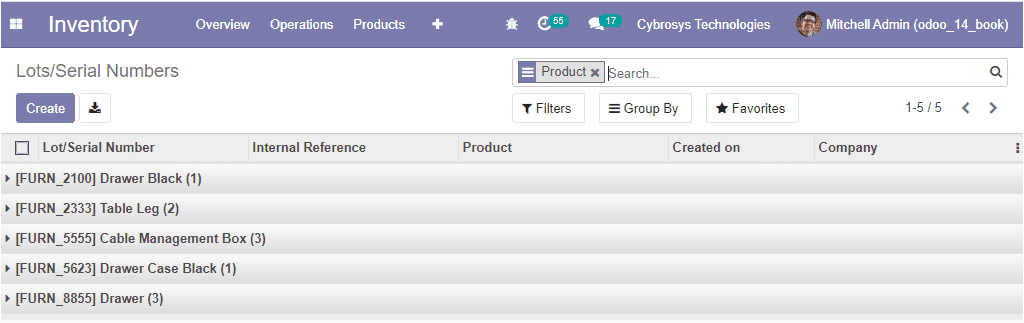
In this window you can view all the lot and serial number allocations made in the platform and on selecting them, you can view how the serial number has been defined in the company and the operations defined and conducted with it.
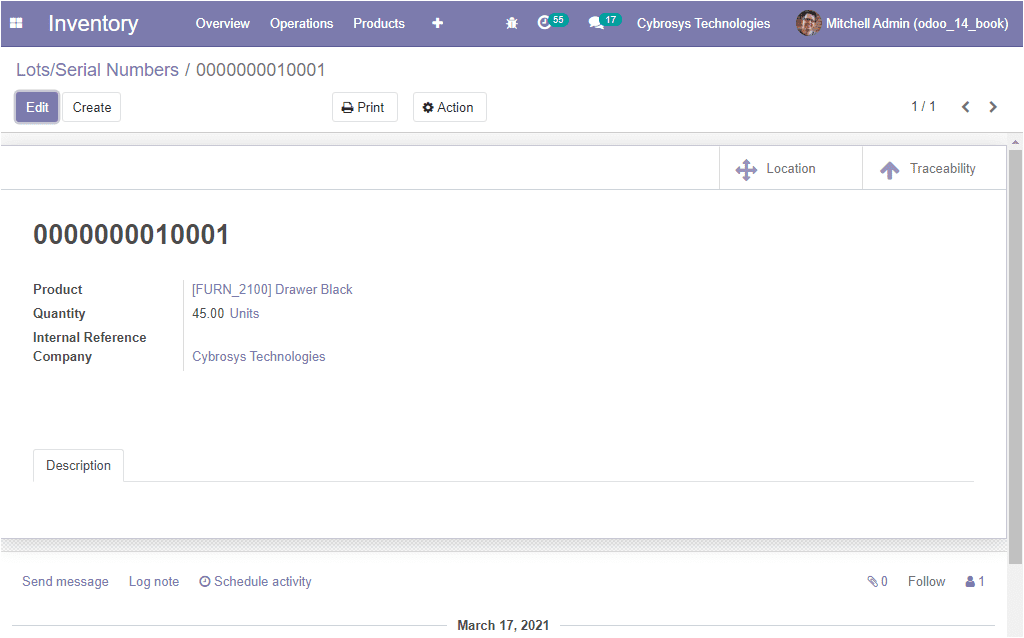
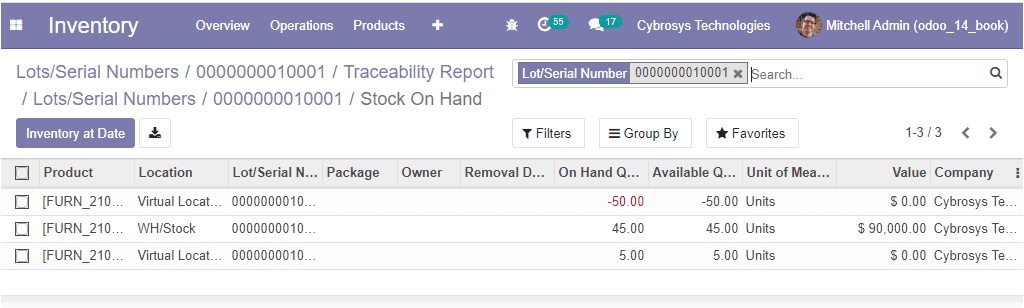
In this window, you can view the smart buttons such as Locations and Traceability on the top right corner of the window. On selecting the Traceability button, you will be navigated to the traceability report window of the respective serial number as shown in the below image.

In addition, the Odoo platform allows you to track the exact location of the product by selecting the Location button available from the serial number window.
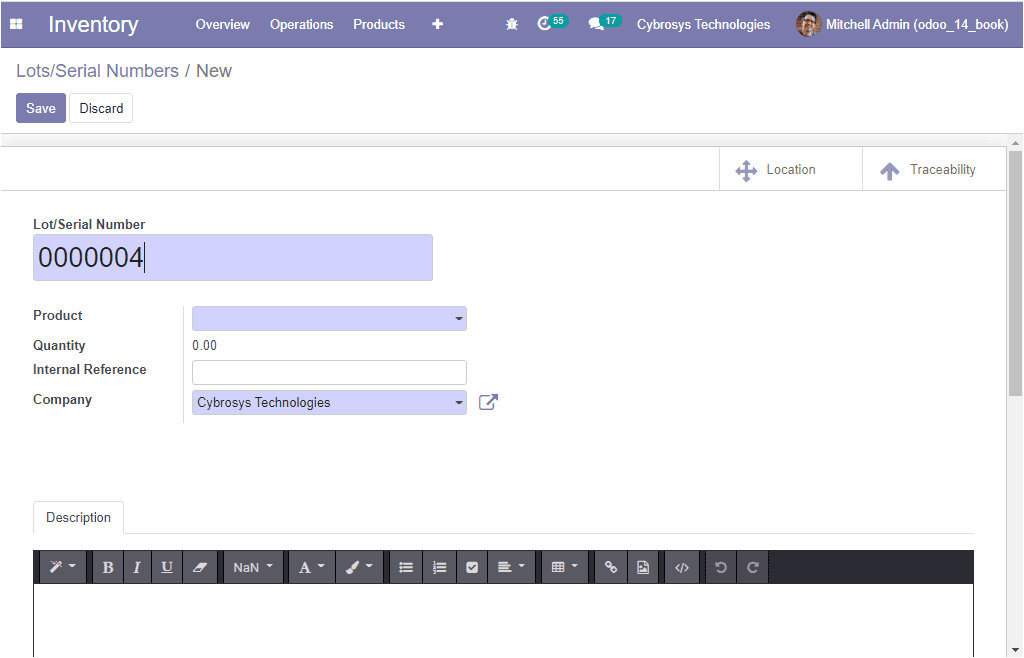
Moreover, the Create icon available in the top left corner of the Lots/Serial number of the window will allow you to create new lots and serial numbers. The image of the window is depicted below
So far we were discussing the Lots and serial number window available in the platform and now let us move on to the next part product expiry.
Product Expiry
There must be an expiry date for all the consumable or storable products. So every company must be required to manage the products based on their expiry dates. Otherwise, the product will become undesirable. In the Odoo platform, you will be able to set up the expiry date on the purchase of the product.
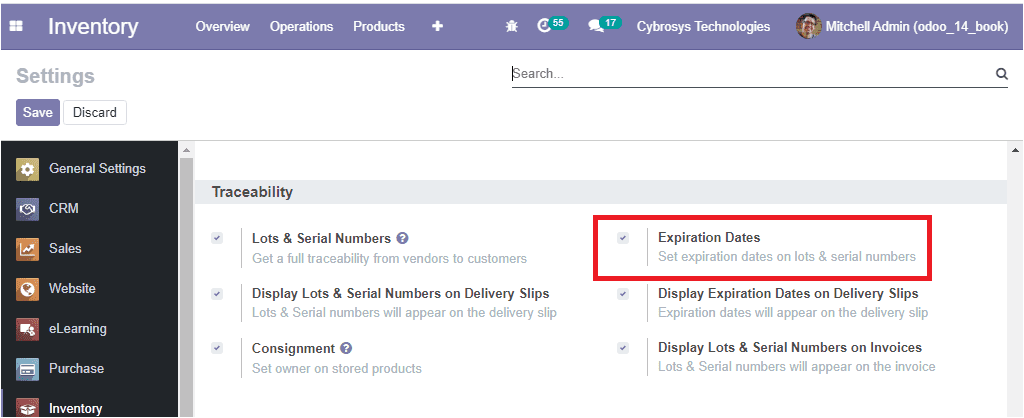
The Odoo platform allows you to set expiration dates on lots and serial numbers based on the operation. This can be done by enabling the Expiration Dates option available under the Traceability tab of the Inventory settings window. The image of the option is depicted below.
As we are clear on the product expiry option available in the platform and now let us discuss the various inventory operations available.
Inventory Operations
You can perform various inventory operations with the Odoo inventory management system without much difficulty. This effective inventory management system will allow your company to increase productivity and efficiency by eliminating unwanted losses.
Transfer
The Transfer is one of the key features available in the Odoo inventory module which will deal with the internal transfer operations such as the product movement features of the company within the company warehouses. The Transfer window can be accessed from the Operations tab of the Odoo Inventory module.
Inventory -> Operations -> Transfers
The image of the Transfers window is depicted below.
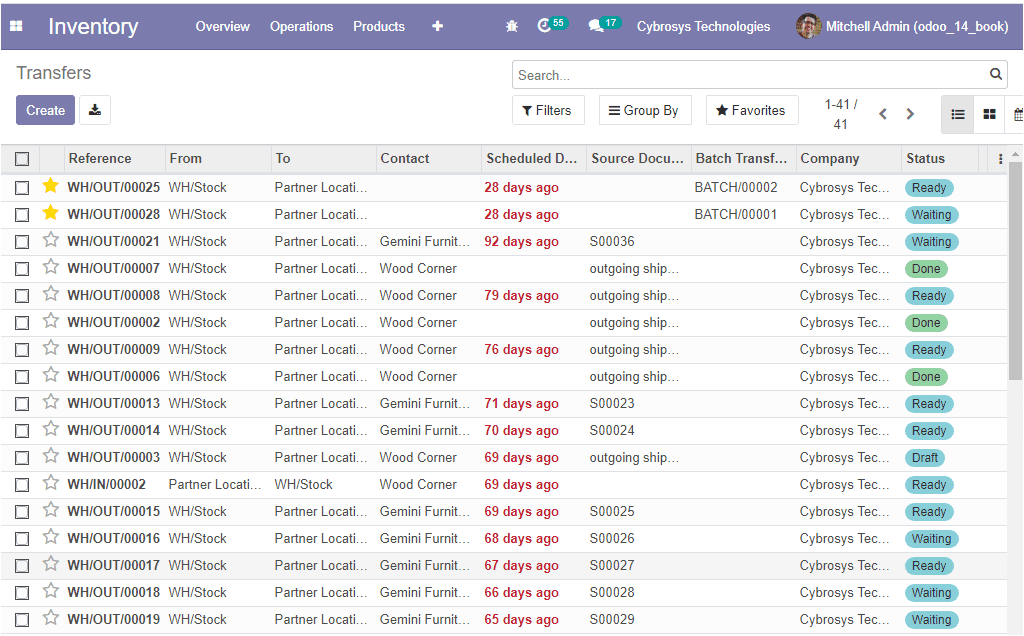
On this Transfers window you can view all the internal transfers described in the platform along with the Reference, From, To, Contact, Scheduled Date, Source Document, Batch Transfer, Company related to this operation, and status of each of the transfer operations. All the data in the transfers window can be filtered, sorted out using the default and customizable options available. Moreover, if there are multiple warehouses operating under the company, you have the provision to view that based on the filtering and group by functionalities available. For creating new internal transfers you can select the Create icon available. The image of the creation form is depicted below.
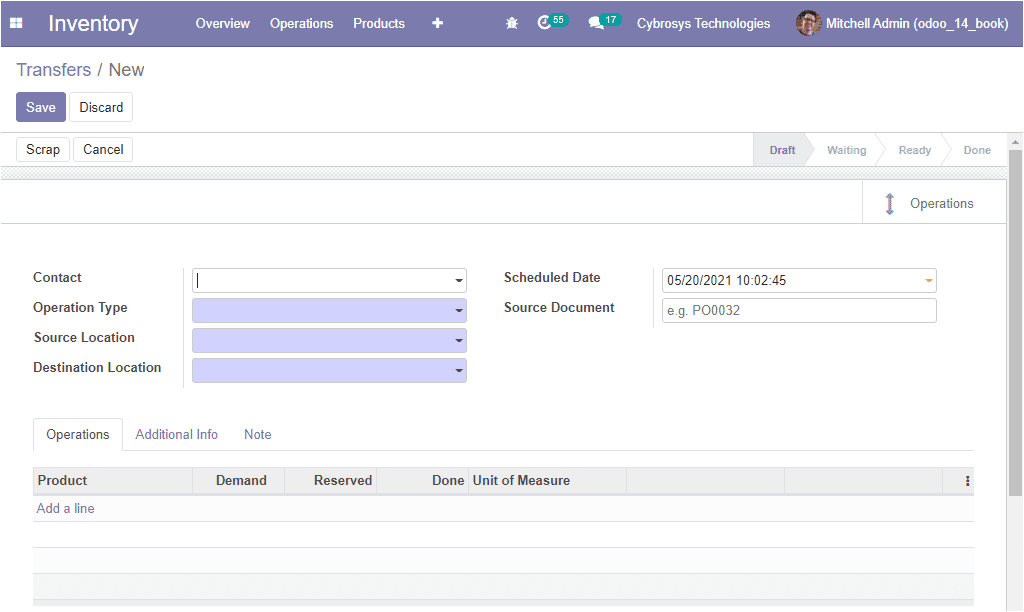
In this creation form, you can describe the Contact, Operation Type, Source Location, Destination Location along with the Source Document and Scheduled Date. Under the Operations tab, you can specify the product by selecting the Add a line option available.
The shipping information and other information can be allocated under the Additional Information tab. The shipping information such as Carrier, Tracking Reference, Weight, Weight for shipping and the Other information such as Shipping policy, Responsible person, Procurement group and company associated can be allocated. The image of the Additional information tab of the transfer window is depicted below.

So far we were discussing the transfer option available in the inventory module and now let us discuss the batch transfer option available.
Batch Transfer
The Batch Transfer option available in the Odoo Inventory module allows you to conduct group transfers. This effective time management solution helps you to reduce the processing time for the operations. Using this feature, several individual transfers can be regrouped to the same batch transfer and can be conducted in the validation process with ease.
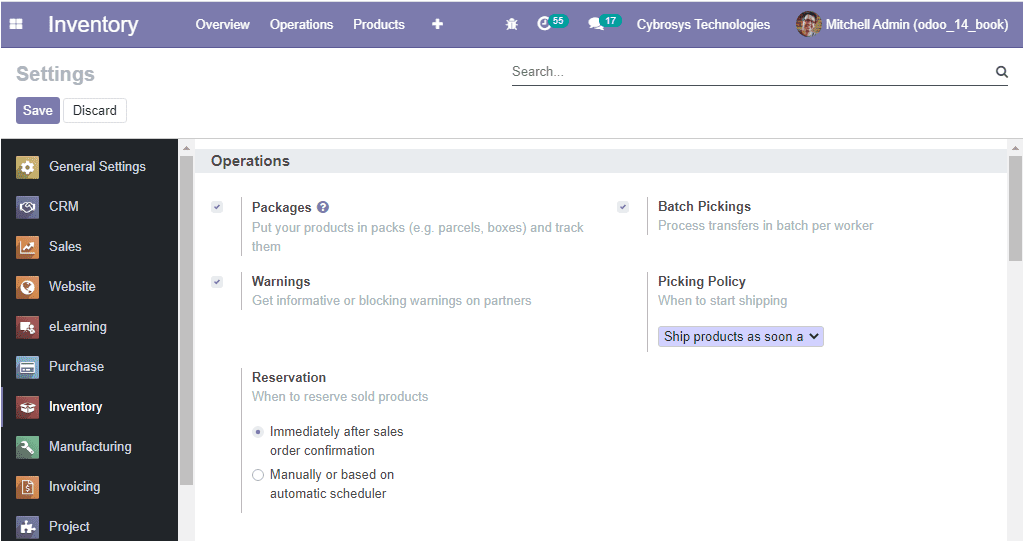
For enabling the Batch Transfer feature, first, you need to activate the option from the settings window of the Inventory module. The image of the window is depicted below.
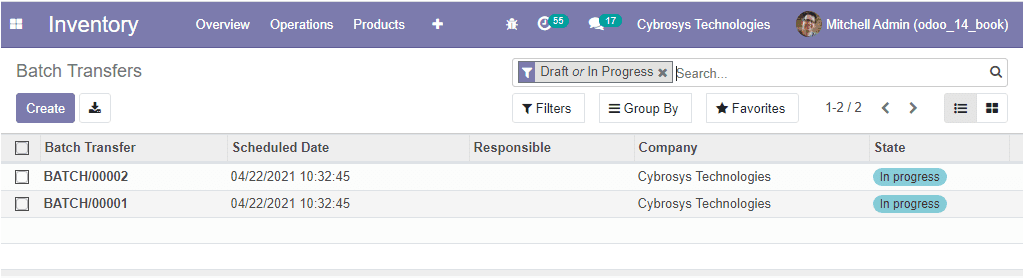
Now you can access the batch transfer window under the Operations tab of the Inventory module and the image of the window is displayed below where you can view all the batch transfers performed on the platform along with the details of Scheduled Date, Responsible Person, Company associated, and the Status of the operation.
You can create a new batch transfer by selecting the Create icon available. The image of the creation window is shown below where you can allocate the person responsible for this batch transfer, define the Operation Type along with the Company associated. In addition, you can mention the Scheduled date.
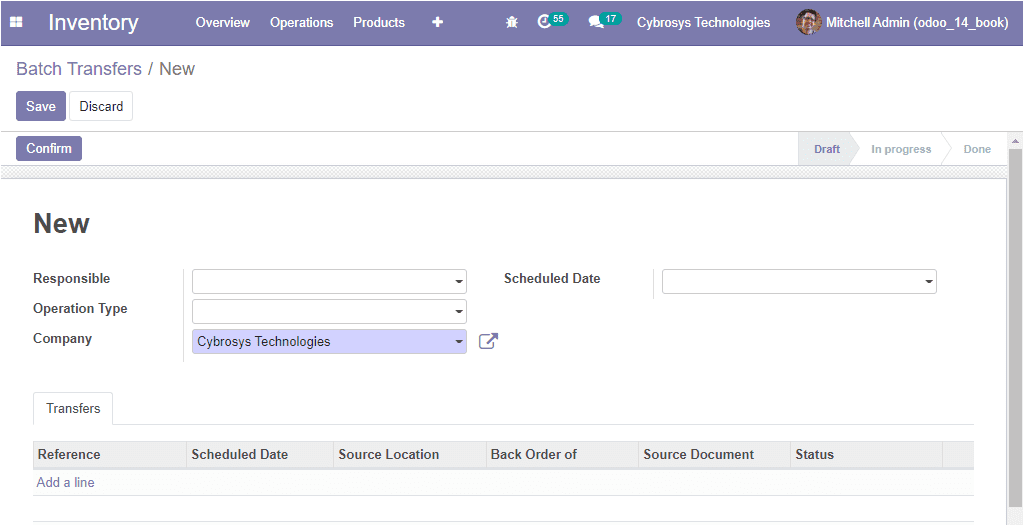
Under the Transfers window, you can add the transfers to the batch by selecting Add a line option available. On selecting the Add a line option you will be depicted with a pop-up window as depicted below.
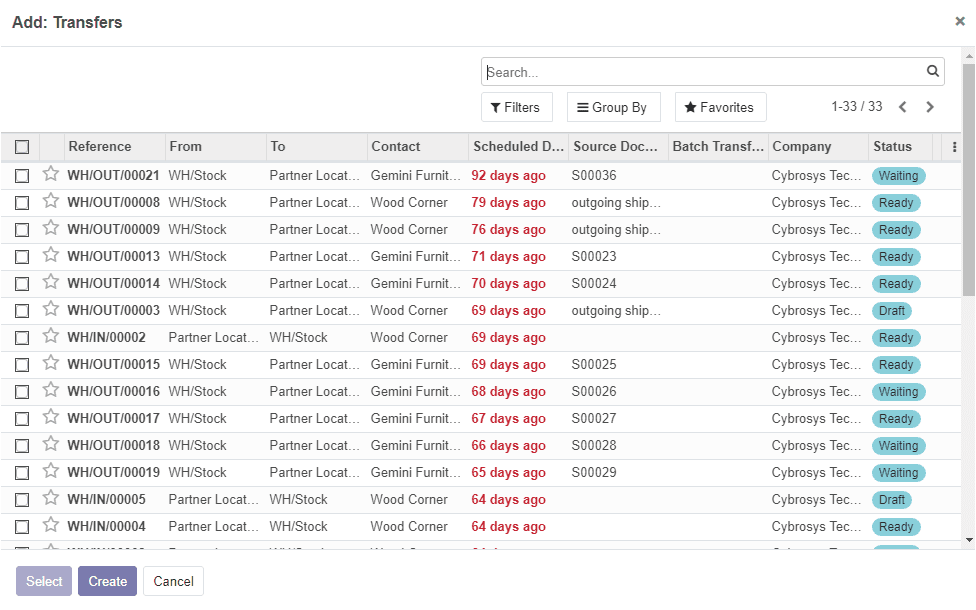
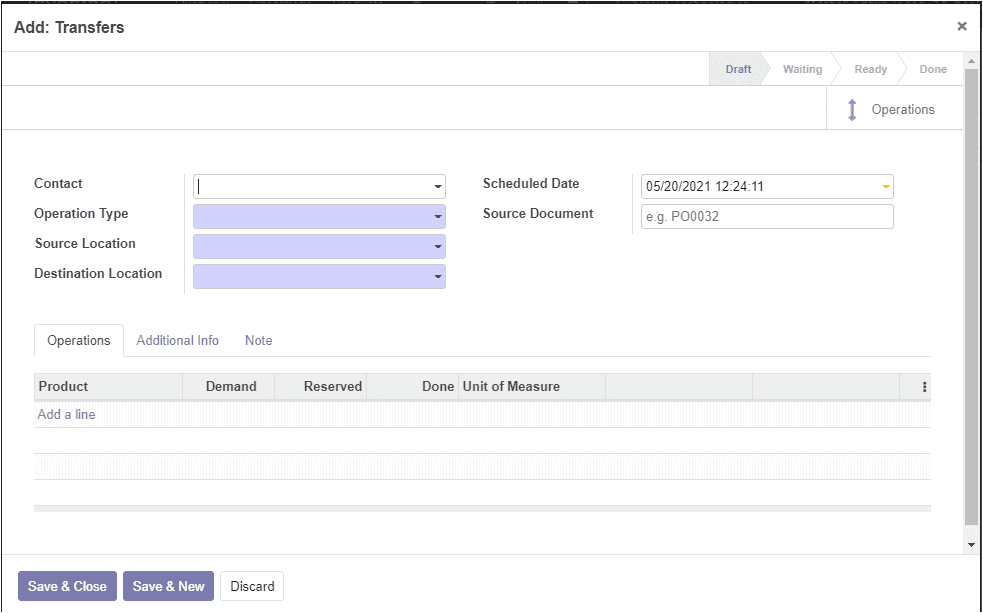
In this pop-up window, you can view all the transfers enlisted, and also you can create a new one by accessing the Create icon. On selecting this icon you will be directed to a transfer creation window as depicted below.
After giving all the required details in the batch transfers window, you should save the details by clicking on the Save icon available. Now the batch is in the Draft state and now you can click on the Confirm button available on the top left corner of this window for confirming the batch transfer, this action will change the status to In Progress.
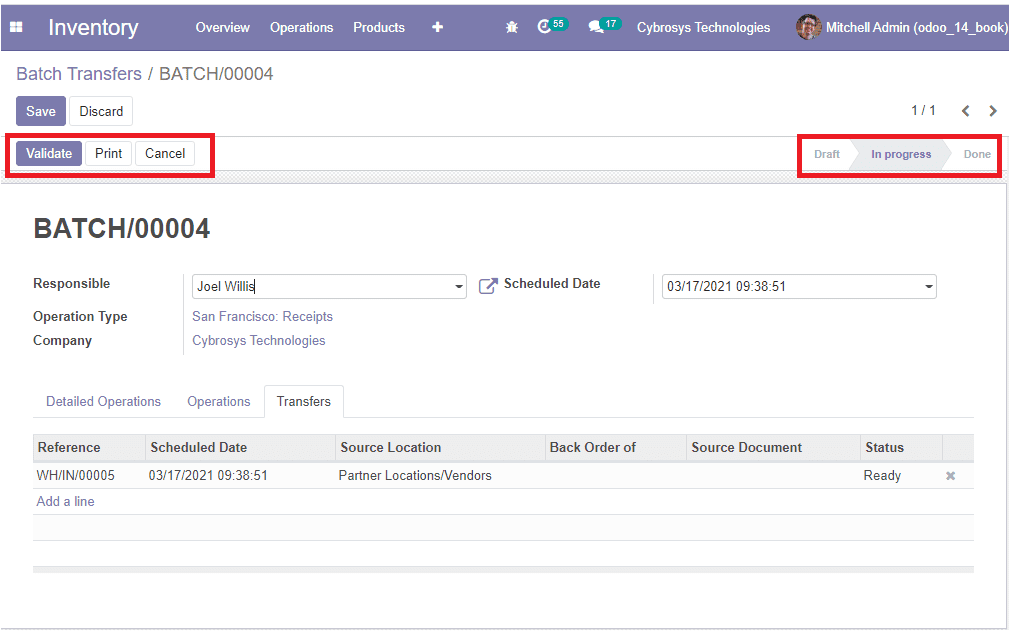
You can also cancel the batch by clicking the Cancel button available.
As we are clear on how the Odoo platform helps you to manage all the internal transfers using this batch picking option. Now let us discuss the Incoming features available in the module.
Incoming Transfer
The Incoming Transfer available in the Odoo Inventory module will let you receive the products in the inventory stock of the company. The transfer will activate the process of receiving the purchased products that are awaited for receipt confirmation. This technique will allow you to confirm the receipt based on the cross-check before adding it to the inventory.
This inventory operation might be conducted in the storable product and therefore in the product description, you should mention it as a storable one before conducting the receipt operation.
Now we can go back to the Inventory overview menu where you can view two types of delivery orders icon on selecting the side menu. These are the immediate transfer and planned transfer. Using these options you can manage the operation of the product transfers in the menu.
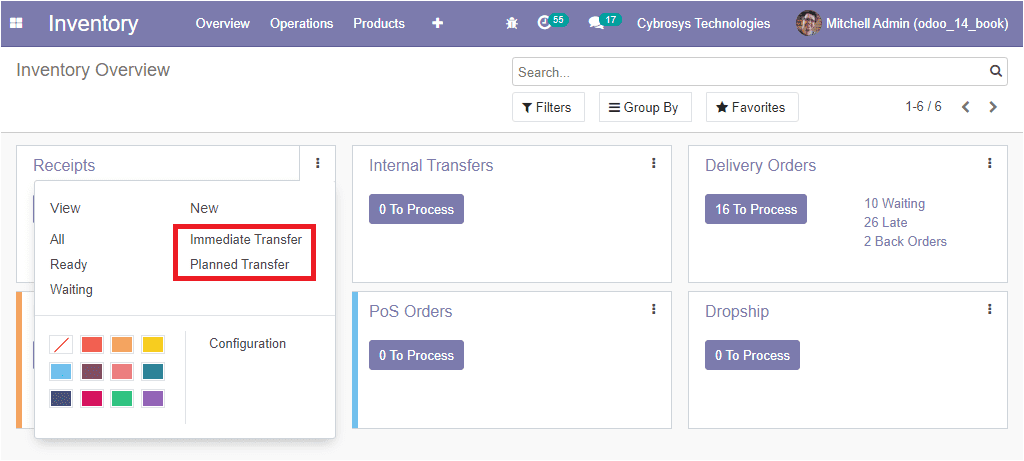
These options are the two delivery transfer options available in the Odoo platform which will allow you to handle the operation of the product transfers in the menu.
Inventory Adjustment
The inventory adjustments option is also available in the Odoo inventory module. The menu can be accessed from the Operations tab of the Odoo inventory module and this option allows you to keep the inventory on the right track.
Update quantity
You can update the product quantity in Odoo straightly from the product window. This can be done by selecting the Update Quantity button available in all the products window and you are able to update the number of units or the product quantity directly from the product window as depicted below.
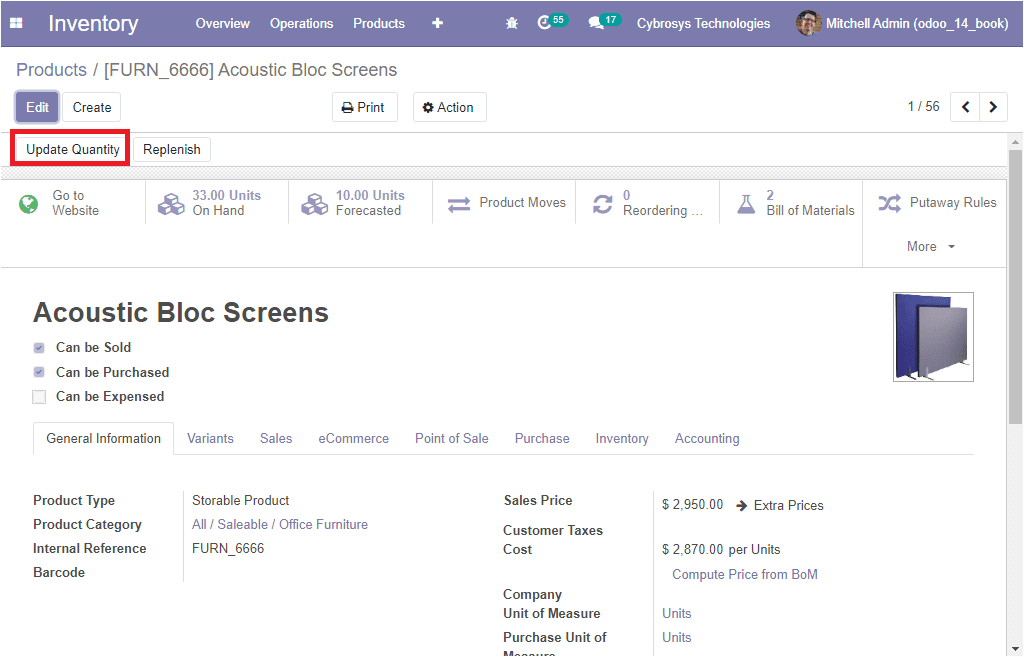
If you are selecting the Update Quantity button, you will be navigated to a new window where you can adjust the number of units.
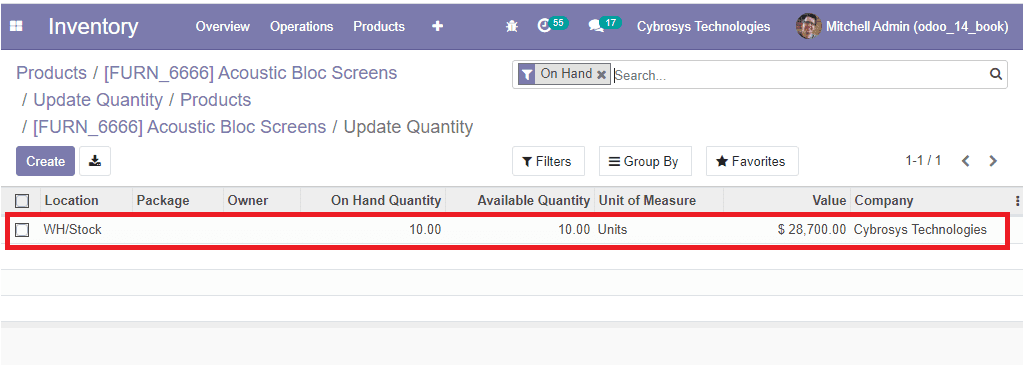
On updating the quantity on hand stock in the product menu is changed to the newly updated value.

Inventory Adjustments for multiple products
The inventory adjustments for multiple products operation can be done by selecting the respective menu from the Operations tab of the Odoo Inventory module. The image of the window is depicted below.
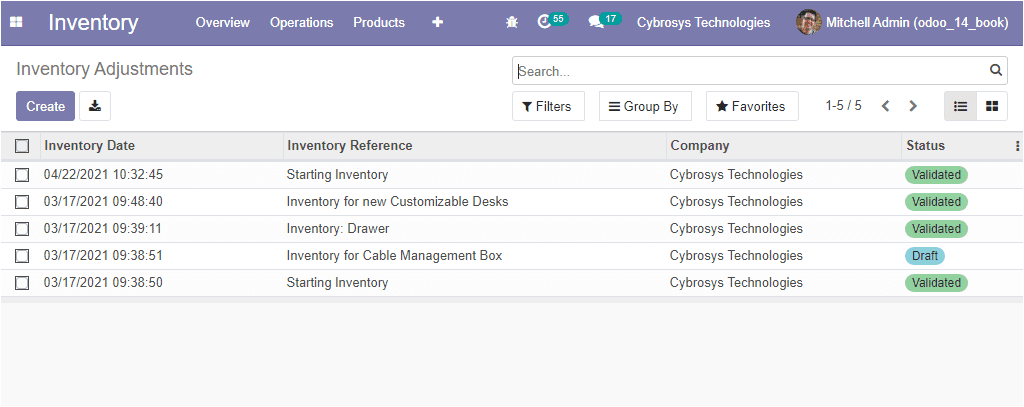
In this window, you can view all the inventory adjustments created in the platform along with the Inventory Date, Inventory Reference, Company and Status. The new inventory operations can be created by selecting the Create icon available in the window. The image of the creation window is depicted below where you can provide the Inventory Reference, Locations can be allocated from the list of inventory locations mentioned in the platform. Then you can specify the products to focus your inventory on particular products. Also you can enable or disable the option Include Exhausted Products for including the products with zero quantity. In addition, you can provide the Accounting date along with company associated and also the Ounted quantities.
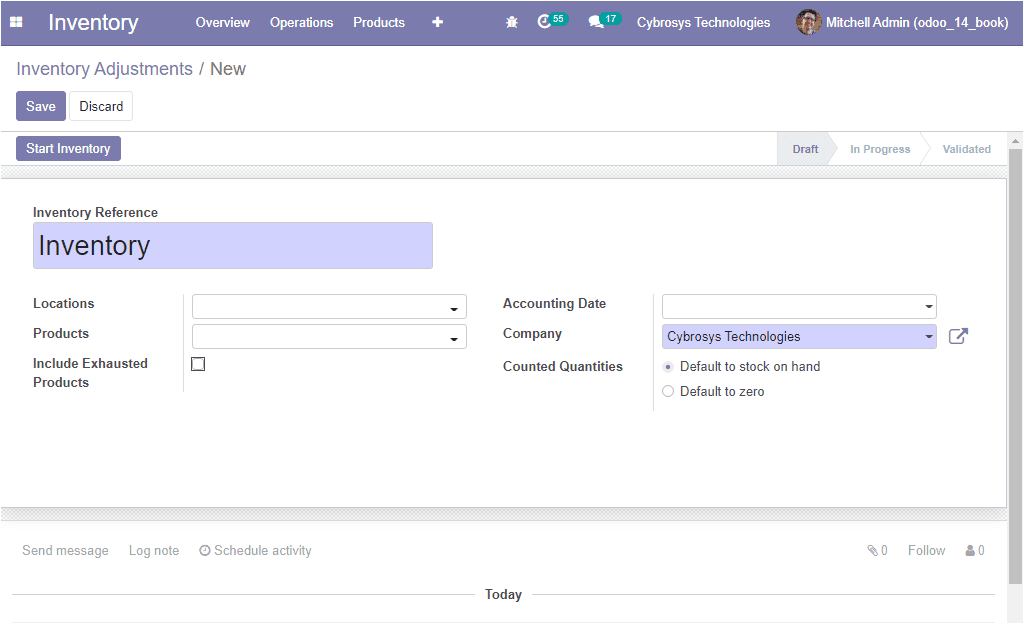
After providing all the required data, you can select the Start Inventory button for starting the inventory adjustment operation. Now you will be navigated to the inventory lines menu as mentioned earlier.
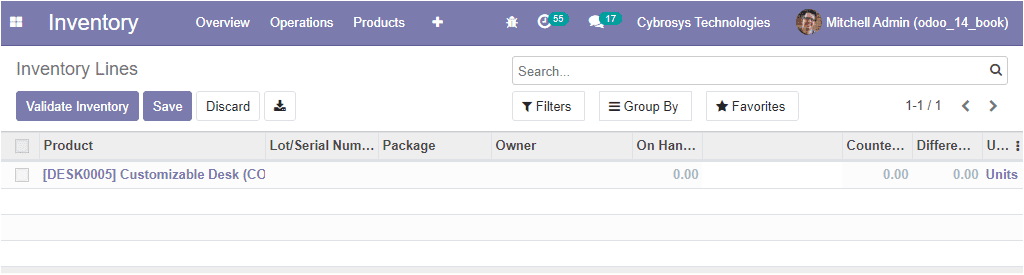
The inventory adjustment can be validated by selecting the Validate Inventory button available.
So far we were discussing the Inventory Adjustment option available in the platform and now let us discuss the Scrap management option available.
Scrap Management
In an organization or company, especially a production company will have an immense quantity of scrapped products or damaged products. It may be the wastage, unusable, damaged or date expired materials that could be generated during the different stages of production or business activities. The Odoo platform offers an effective scrap management tool that will help you to handle these scraped materials that come across the various phases of the business operation.
There is a separate location in Odoo to store and manage the scraps. For creating a scrap location in Odoo, you should enable the feature name Storage Locations from the settings menu of the Odoo Inventory module.
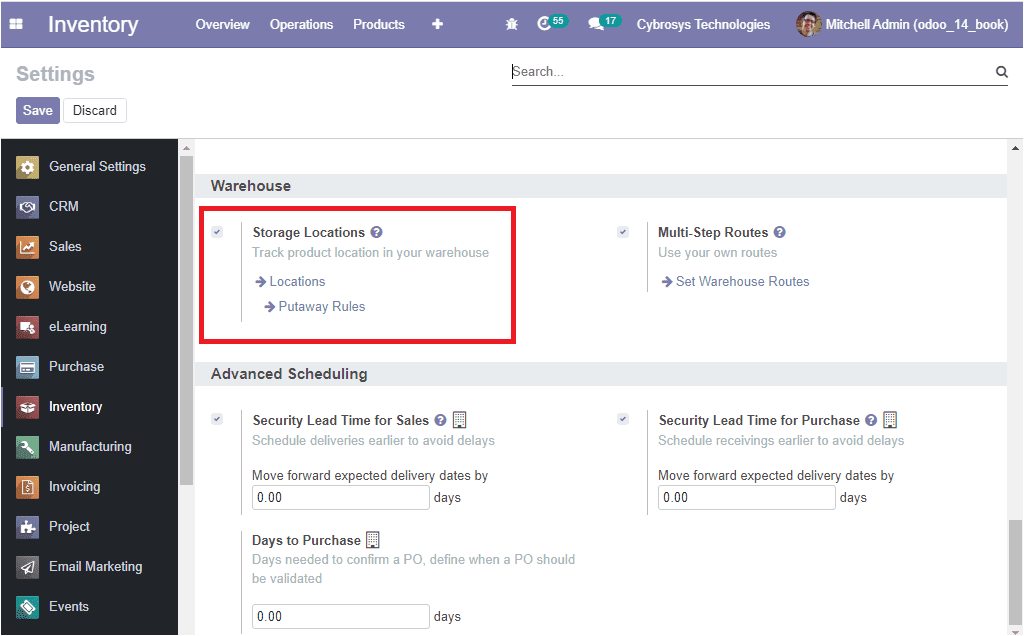
Now you can set new locations either directly from the settings menu by selecting the Locations arrow available under storage locations or can choose from the configuration tab of the Inventory module. The image of the window is depicted below.
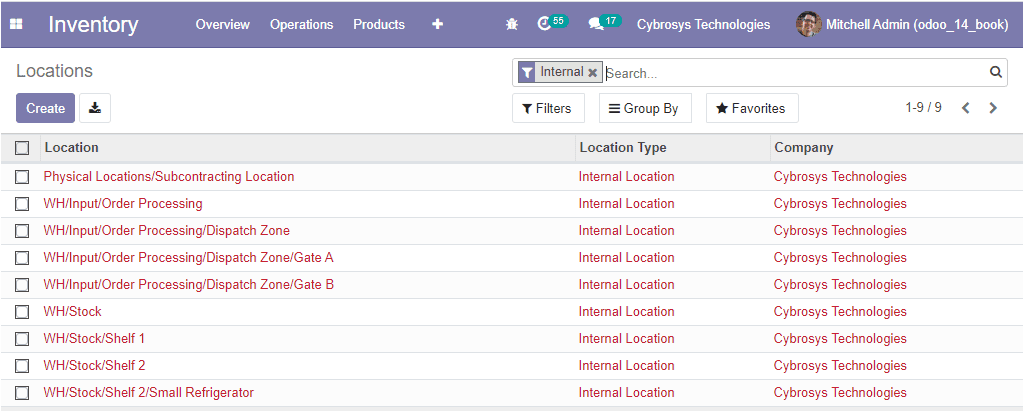
In this Locations window, you can view all the Locations defined in the platform along with the Location Type and the Company associated with this operation. The Create icon available on the top left corner of the window will allow you to create new locations. The image of the Location creation window is displayed below.

In this window, you can describe the Location Name, along with the Parent Location. Then you can allocate the Additional Information such as Location Type, Company and you can enable the options Is a Scrap Location and Is a Return Location. In addition, the removal strategies for the location can be defined from the default options available in the logistics menu.
Scrap the Products
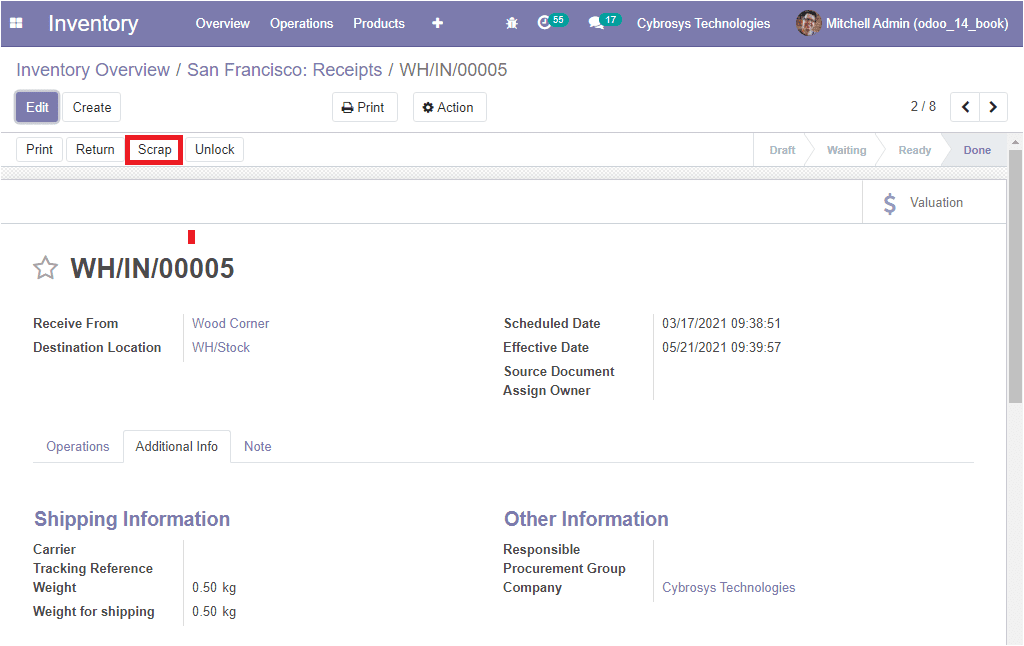
The Scrap icon in the Odoo platform can be viewed under each operation of the inventory such as Receipts, Delivery Orders, Internal Transfers, Manufacturing, POS orders, and many more situations. The icon to scrap can be accessed from the top left corner of the respective window together with the other icons such as Unlock, return, and Print.
Let us check it under the Receipt window. You can get access to this Receipt window by going to the Inventory dashboard and can simply click on the Process button available under the Receipts menu. You can open the Receipt and Validate the picking. Now the A scrap icon will be depicted on the window as shown in the below image.
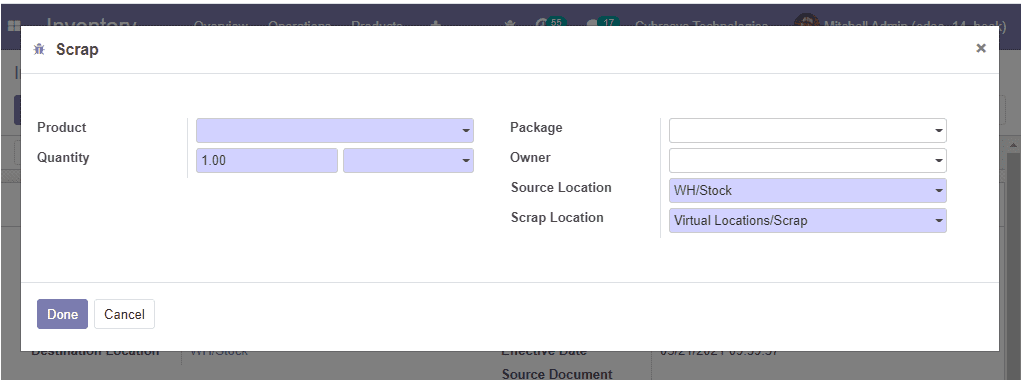
Now you have the provision to move the product from the stock to the scrap location by selecting the Scrap icon available. On selecting the Scrap icon, you will be depicted with the scrap window where you can mention the product details along with the quantity with respect to the order. The Source Location and the Scrap Location are auto-assigned and in which the Source location can be changed according to the need of the user. In addition, you can allocate Package type. The image of the Scrap window is depicted below.
The Odoo platform allows you to manage the scrap product at any stage of the production line and it is applicable for any type of industry. Now let us discuss the landed cost option available.
Landed Cost
The landed cost of a product is the total amount of the product after completing all the procedures which are necessary for getting the product to the buyer’s hand. This will include the purchasing costs such as the purchase amount, amount of the product shipment, insurance, tax, service charges, currency conversion, transportation fee, and many more aspects before receiving the product.
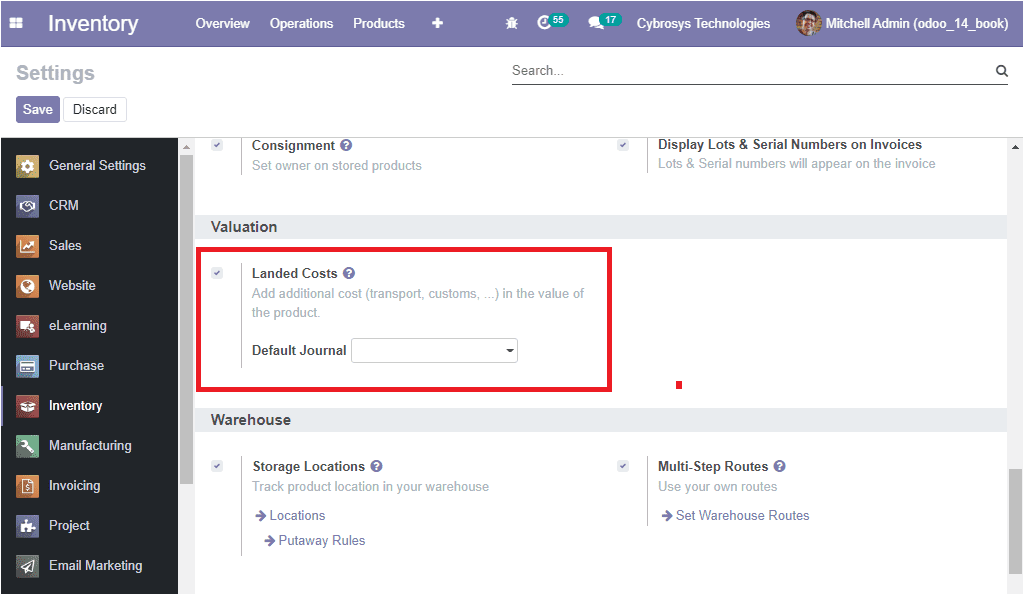
The Landed costs are calculated on the basis of the company operation. So this will vary from one company to another as per the company policies and product type. You can activate the Landed cost option in the Odoo platform by enabling the Landed cost option available in the settings of the Inventory module.
For enabling the option, you can go to the settings menu by taking the route Inventory -> Configuration -> Settings -> Valuation -> Landed Cost
After enabling the landed cost option in the settings, you can describe the various landed costs in the landed costs menu available in the Operation tab of the Inventory module. The image of the window is depicted below.
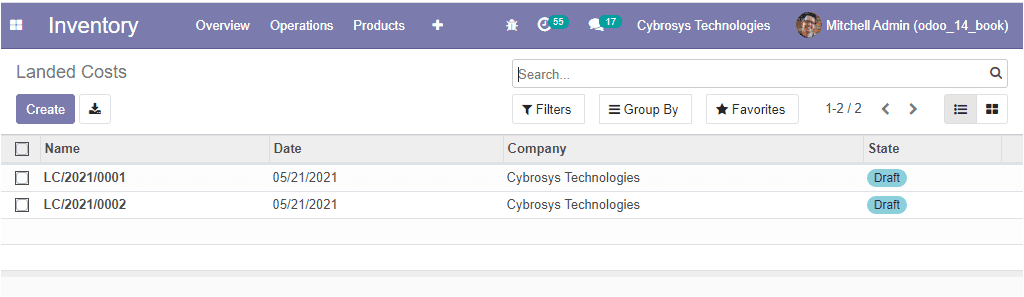
In the Landed Cost window, you can view all the Landed costs defined in the platform along with the Name, Date, Company associated, and Status. You can make use of the Create icon for describing new Landed Costs in the platform. The image of the creation window is depicted below.
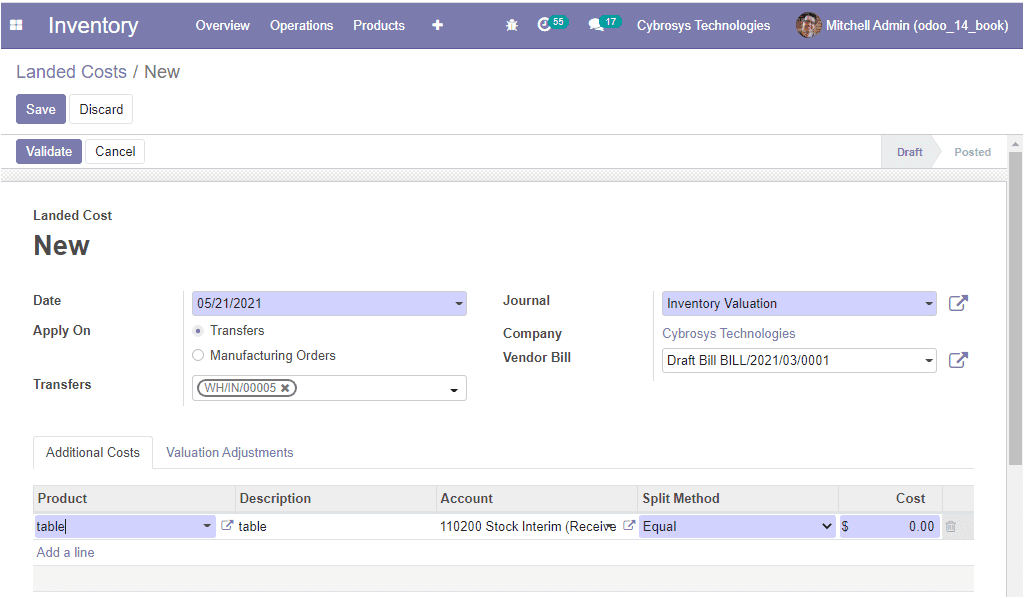
In this creation window, you can mention the Date, and you can apply the landed cost on Transfer or Manufacturing Orders. In addition, you can allocate Transfers, Vendor bills along with the respective journal can be selected.
Under the Additional Costs tab, you can define the products for which the landed cost type wants to be described by selecting the Add a line option available.
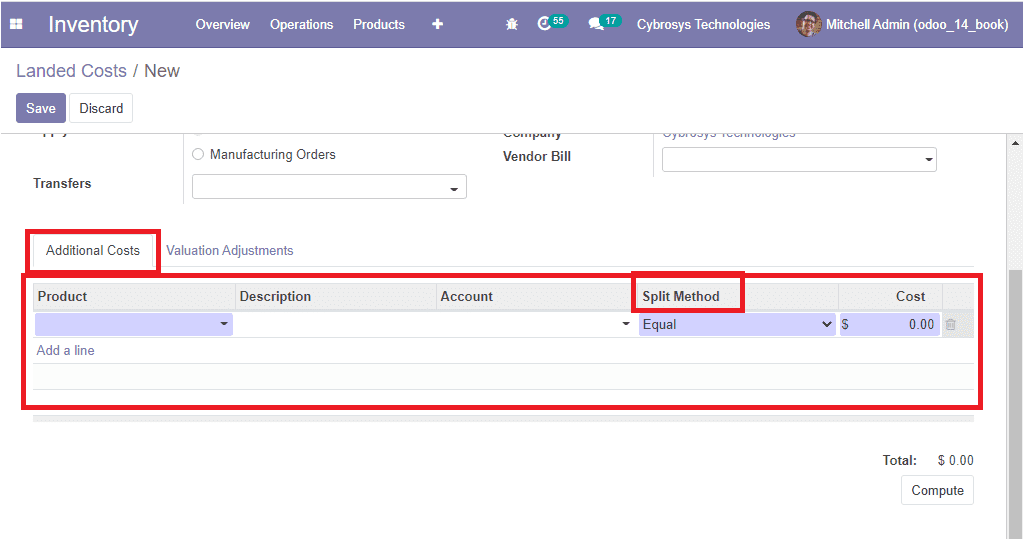
The Split method of landed cost in the Odoo platform can be described on the basis of the following attributes.
- • Equal: Selecting the option enables to equally divide the landed cost.
- • By Quantity: Selecting this option enables cost division based on product quantity.
- • By Current cost: On selecting the by current cost option leads to dividing the costs based on the product’s current cost.
- • By Weight: Using this option for dividing the cost based on the product weight.
- • By Volume: In this option, costs will be divided depending on the product’s volume.
So far we were discussing the Landed cost terminology available in the Odoo platform and now let us discuss the Warehouse management of the platform.
Warehouse Management
The warehouse’s Management is one of the important aspects of the inventory. It is the actual building where the inventory stocks are being stored. The Odoo inventory management system allows you to perform all the warehouse management operations such as multiple warehouse management, transfers between warehouses, and many more aspects related to this operation.
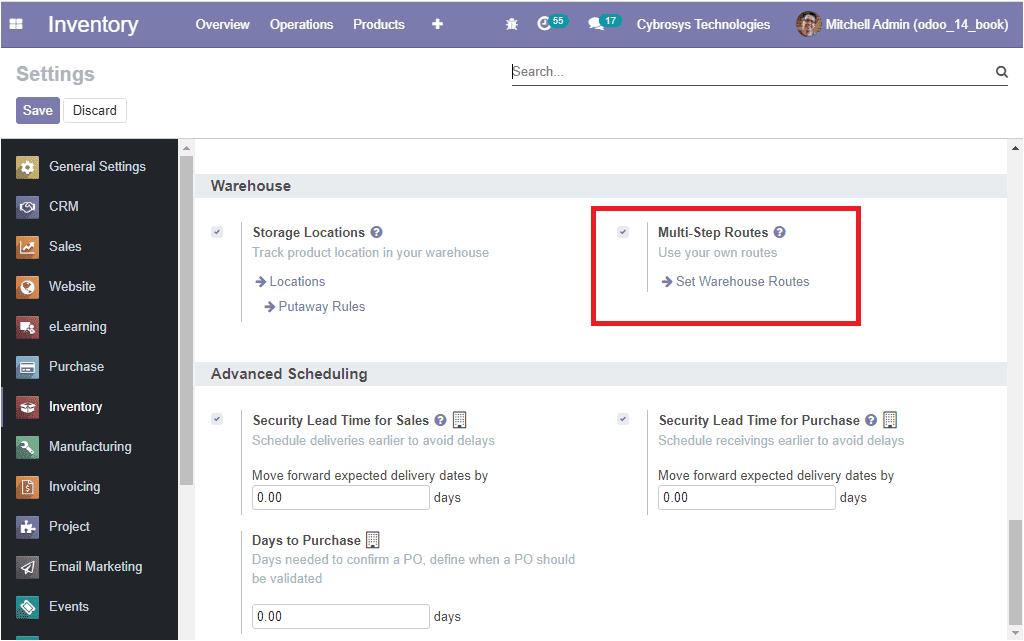
For initiating the Warehouse operations in the Odoo platform you can go to the settings menu by taking the route Inventory -> Configuration -> Settings -> Warehouse -> Multi-Step Routes.
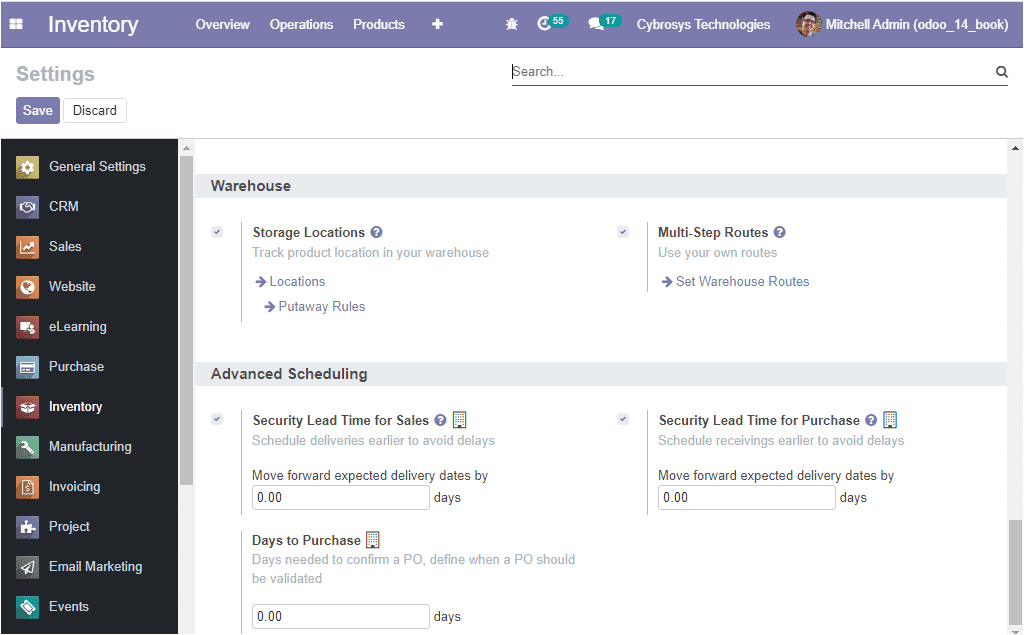
If you enable the option Multi-step routes, you can view an arrow to Set warehouse routes. On selecting this icon you will be directed to the Warehouses window. You can also access the window from the Configuration tab of the Odoo inventory module.
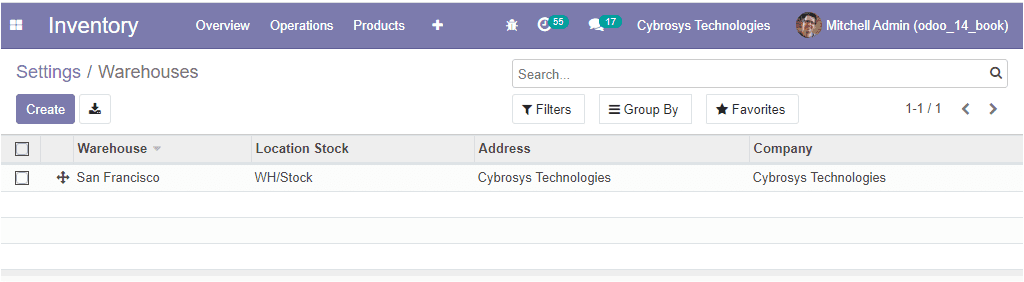
In this Warehouses window, you can view all the warehouses created in the platform along with Location stock, Address, and Company associated with this operation. You also have the provision to create new warehouses by selecting the Create icon available. The image of the creation window is depicted below.
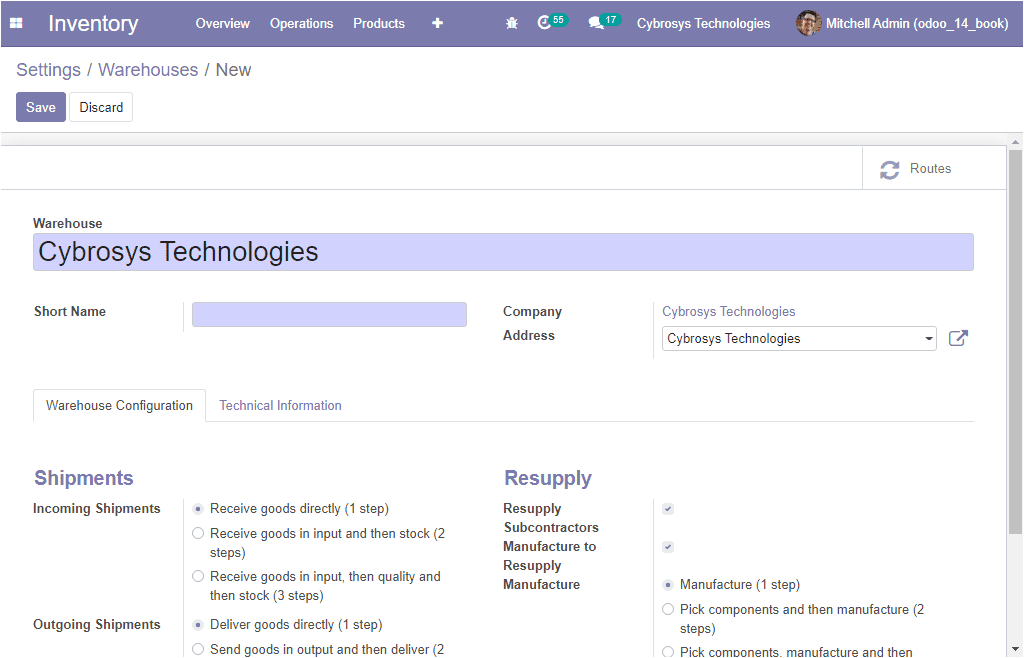
In the Warehouse creation window, you can describe the warehouse Name along with the Short Name for it, which is used to identify your warehouse. The Company details are automatically set from your user preferences.
Under the Warehouse configuration tab, the Incoming Shipment, and Outgoing Shipment can be selected from the default routes available. The Resupply information about manufacturing can also be selected along with how the process could be done. Moreover, you can access a smart button called Routes on the top right corner of the window. On selecting this icon you can configure the routes of warehouse operations.
As we clear on the Warehouse management option in the Odoo inventory module, now let us discuss the Locations of warehouse management.
Locations
The Locations option available in the Odoo Inventory module allows you to describe the locations of the product in the warehouse. The location menu in the Odoo platform can be accessed from the configuration tab of the Odoo inventory module after activating the option from the settings menu available. The image of the Location window is depicted below.
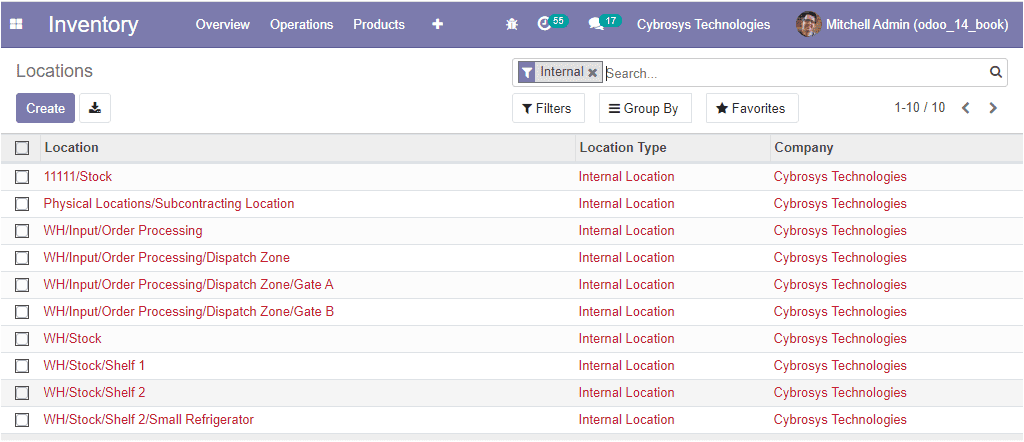
In this Location window, you can view all the locations described in the platform along with the Location Type and Company. You can create new locations by selecting the Create icon available. The image of the creation window is depicted below.
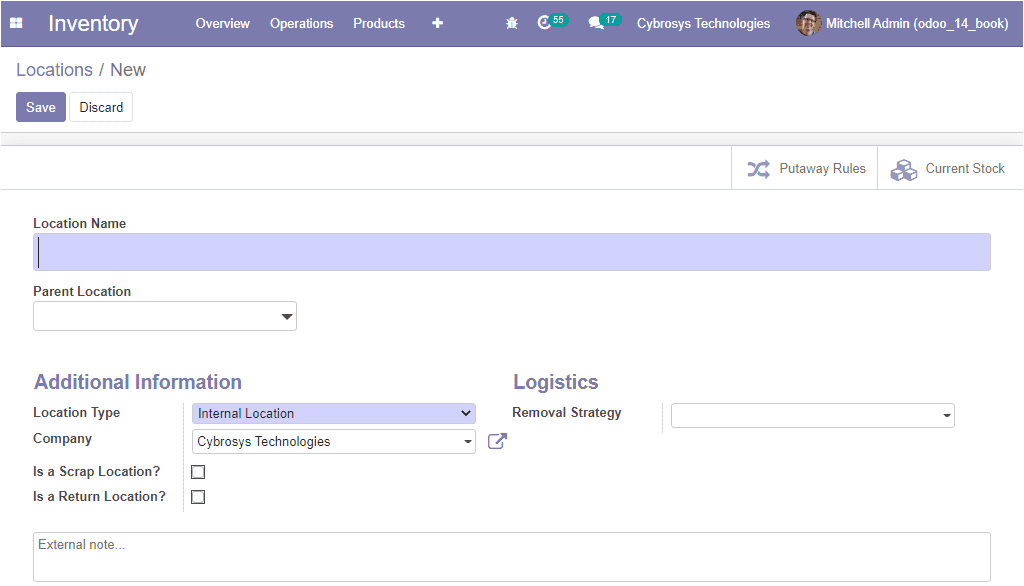
In this creation window, you can provide the Location Name along with the Parent Location. Then you can allocate the additional information Location Type and the Company to which the location is associated. The location can be enabled as a scrap location or a return location. The Removal strategies of this location can be selected based on the default options available in the window. This can be done based on the first in first out (FIFO), last in first out (LIFO), and first expiry first out (FEFO).
So far we were discussing the location window available in the platform and now let us discuss how to create rules and routes in this module.
Rules and Routes
The Odoo Inventory module provides you the provision to create various rules and routes to handle the inventory of an organization. This customizable feature allows you to configure the product movements of the platform based on the routes of operations that have been specified. These rules and routes can be defined at the beginning of the operation or they can be created and added during the process of operation. In the Odoo platform, these product movements which are configured based on the routings are strictly controlled and monitored until the user defines any changes.
The routes are created based on the rule of product movement defined. The push and pull rules are used to create the routes of product movement inside a company. The push and pull rule mentioned for each route and the locations of the product movements would add up to the efficient product movement and removal in the company inventory.
For configuring the routes in the Odoo platform, initially, you should activate the multi-step routes option from the settings menu of the Odoo platform.
Let us discuss the configuration of rules in the Odoo Inventory module.
Rules
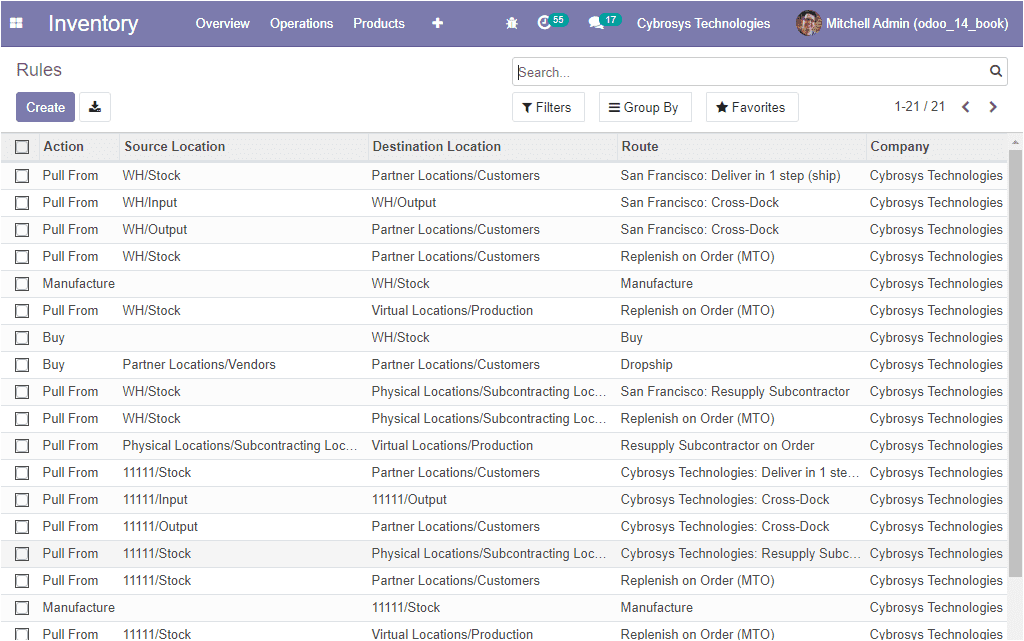
The rules in the platform can be defined in the rules menu available in the platform which can be accessed by taking the route Inventory -> Configuration -> Rules. Now you will be directed to the Rules window where you can view all the rules defined in the platform are listed out along with the details of Action, Source location, Destination Location, Routes, and Company. The image of the window is depicted below.
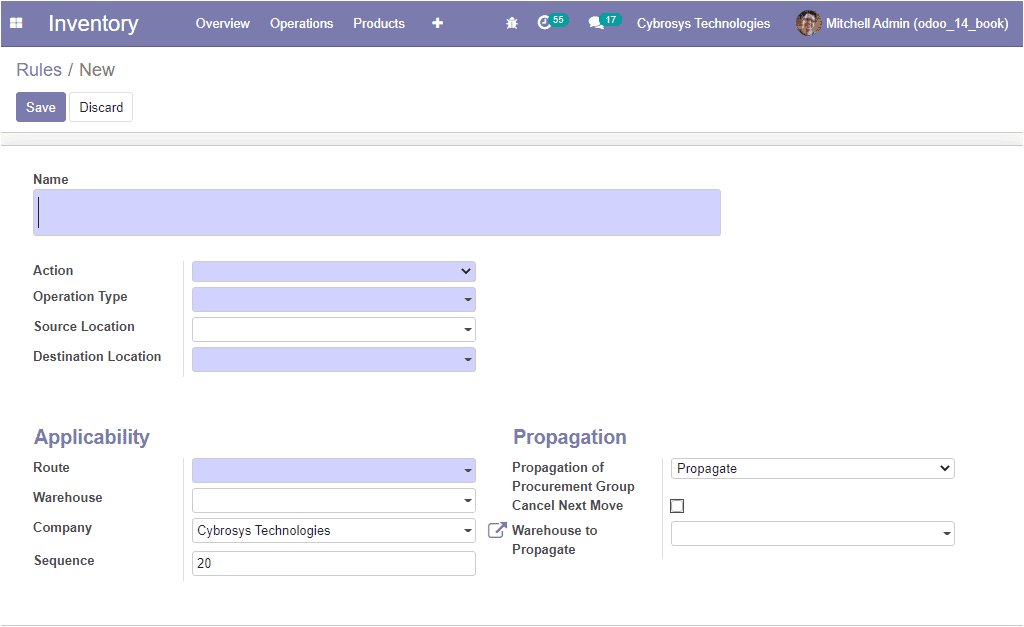
The existing rules can be selected and can be edited according to the requirements. The new rules can be created by using the creation tab. On selecting the creation tab, you will be depicted with a window as shown below where you can provide the name of the Rule, Action, Operation Type, Source location, Destination location. In addition, you can define the Applicable route along with the Warehouse, Company associated with, and Sequence. Moreover, you can define the Propagation of Procurement Group, and Warehouse to propagate.
Now we are clear on the Rule aspects of the Inventory module and now we can move on to the next part which is the configuration of Routes.
Routes
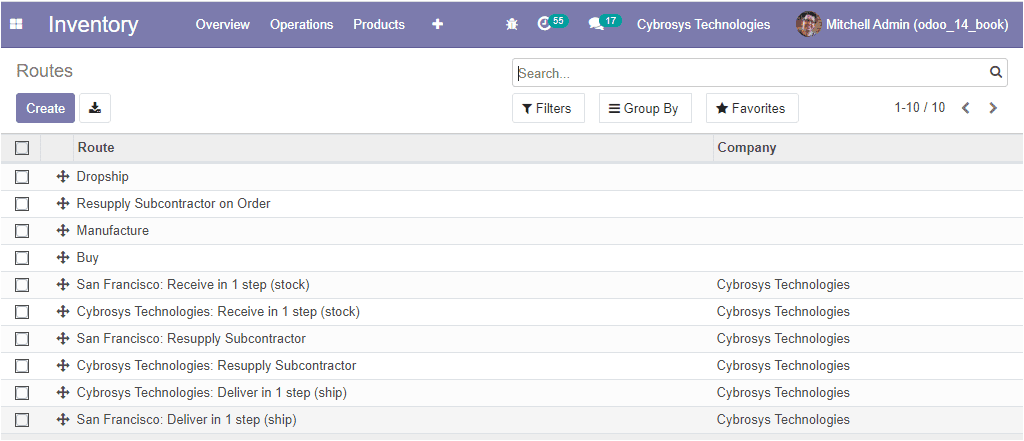
The Routes window in the Odoo platform can be accessed from the configuration tab of the Odoo inventory module. The image of the window is depicted below where you can view all the routes described in the platform.
You can create new routes by selecting the Create icon available. In this creation form, you can provide a new Route name, Sequence, Company specific to this operation. Then you can select the places where this route can be selected. This can be assigned to the Product Categories, Products, Warehouses, and Sales Order lines. The image of the creation window is depicted below.
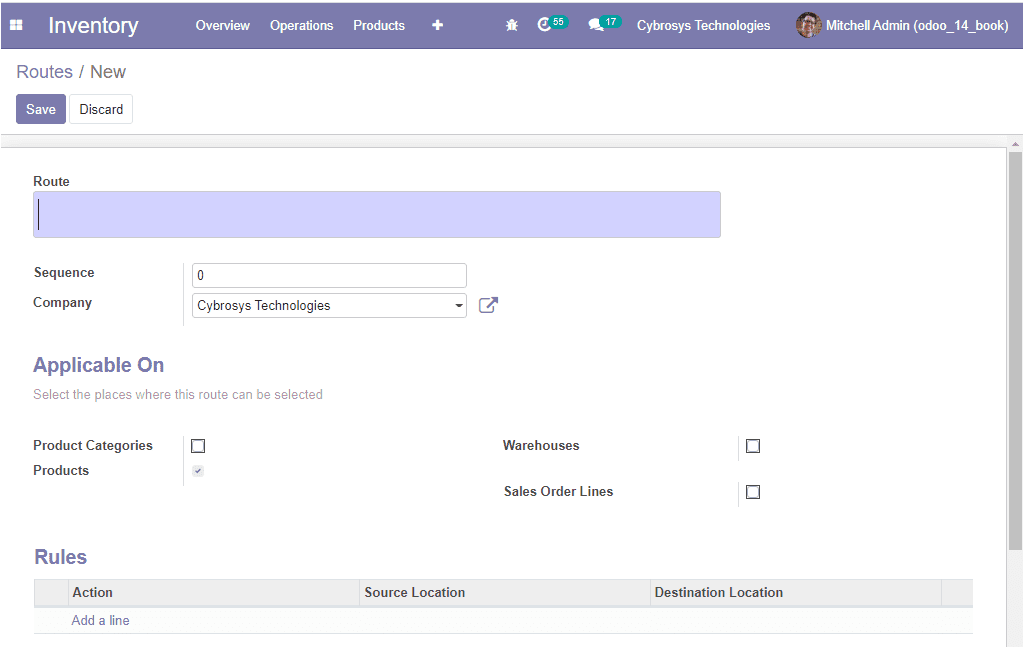
Moreover, the rules of the product movement can be assigned in the Rules tab available by selecting the Add a line option available. On selecting the Add a line option you will be depicted with a pop-up window as shown in the below image.
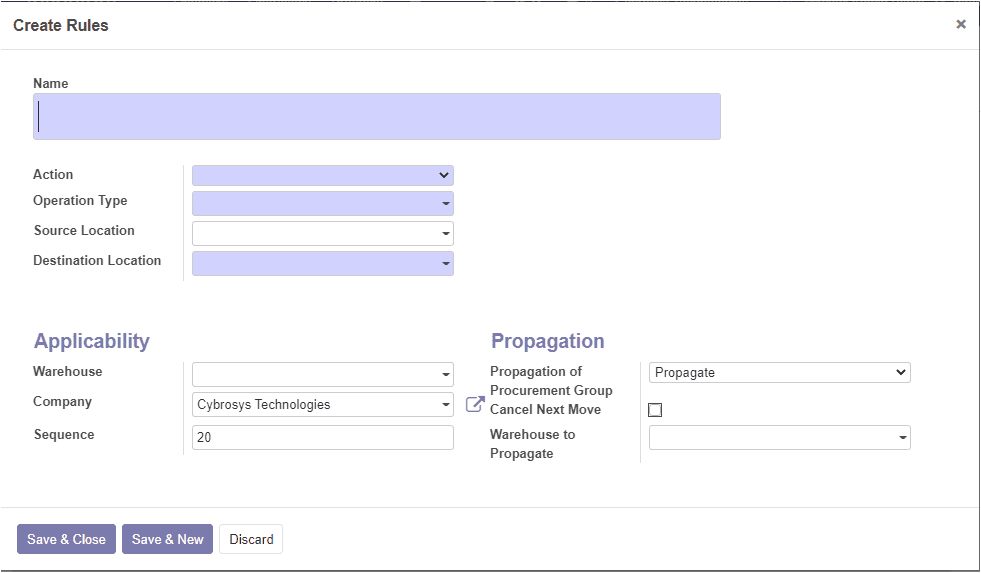
In this Create Rules window, you can provide all the required data as described earlier. You have the provision to create more rules to the route by using the Add a line option available. This can be done in the same way by defining the rule. As we clear the rules and routes configuration in the platform and now let us discuss the putaway rules menu available in the platform.
Put away rules
In some situations of company inventory operations, the product cannot be stored together. However, they have to be put in different aspects of inventory. There must be some products for example chemicals and precision components that should be needed to store in containers which are suitable for the products for remaining fresh and not damaged.
The put-away rules window can be accessed from the configuration tab of the Odoo inventory module. The image of the window is depicted below.
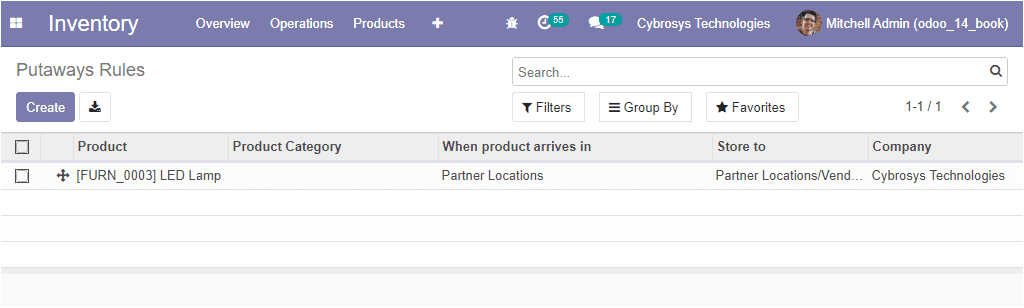
In this window, you can view the Putaway Rules defined in the platform along with the details of the product, Product category, When products arrive in, Stored to and Company associated with this operation. The Create icon available in the window allows you to create new Putaway rules in the platform. The image of the creation form is depicted below.
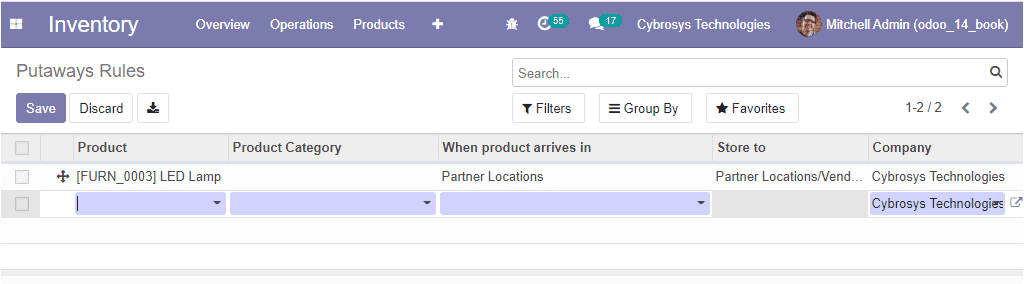
In this creation form, you can assign the product to which you want to apply the putaway rule and you can provide the Product Category. In addition, you can specify the storage location and the source location.
The Putaway rule can be configured in the storage locations available as depicted in the below image where you can view the smart button named Putaway Rules.
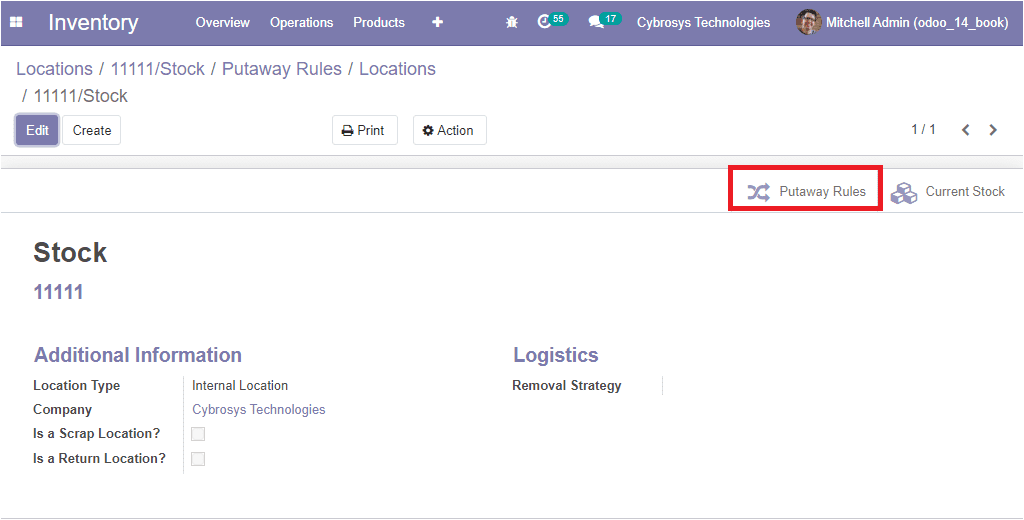
So far we were discussing the configuration of putaway rules in the Odoo inventory module and now let us discuss the product categorization aspects of the platform.
Product Categorization
Product Categorization is possible in the Odoo platform and this will make it easier to manage the product operations. The product categorization option allows you to list out the products based on the sales categories and purchase categories. In addition, the option will help in the department-wise allocation of the different aspects of the company.
The Product category menu in the platform can be accessed from the configuration tab of the window and the image of the window is displayed below.
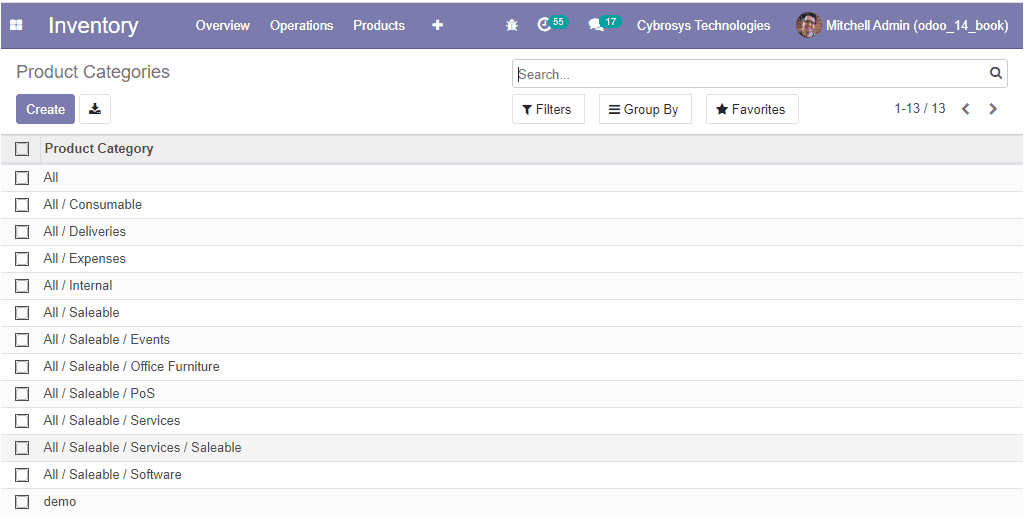
In this Product Categories window you can view all the product categories described in the platform and these can be selected and can be edited by selecting the respective one. You can also create a new one by selecting the Create icon available. The image of the creation window is depicted below.
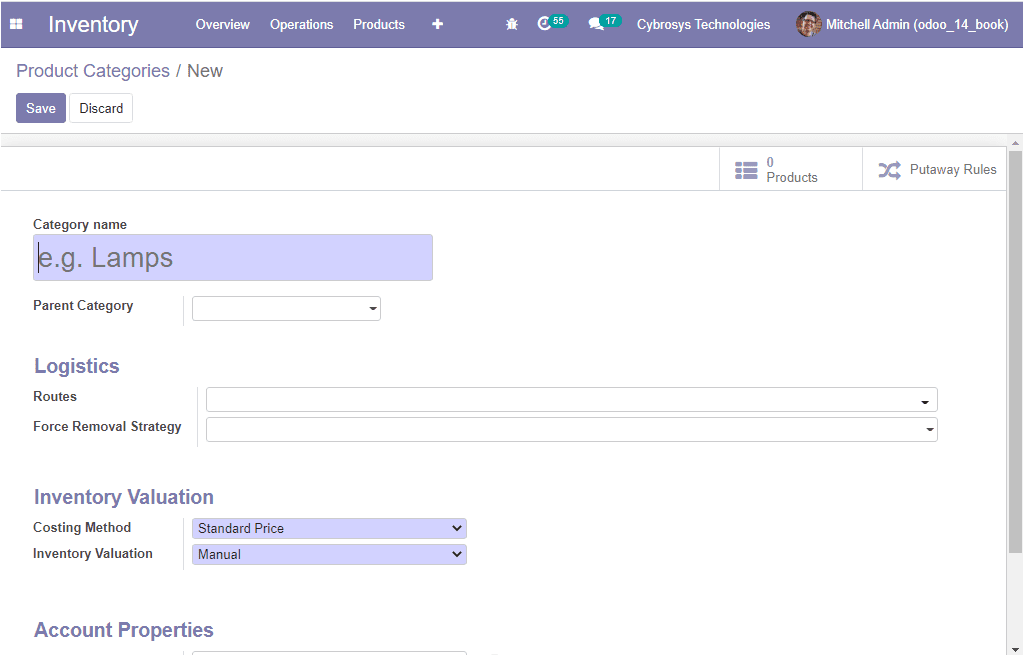
In this product creation form, you can specify the Category name, Parent category, and the inventory operation details such as Routes and Force Removal Strategy. Moreover, the Inventory Valuation principles can be specified based on your requirements. Finally, you can describe the Account properties.
As we are clear on the configuration of product categorization options available in the Odoo inventory platform and now let us discuss how Odoo manages the delivery of products.
Delivery
In the Odoo platform, the delivery of the products which are purchased by the customers is configured on the basis of various shipping methods being defined in the platform. Odoo can efficiently manage all the delivery procedures of the company with the help of various features available.
Shipping Methods
The shipping methods window in the platform can be activated by enabling the shipping method options available in the settings menu of the Odoo inventory module.
If you are enabling the shipping methods option, you can access the shipping methods menu from the configuration tab of the Odoo inventory module. The image of the window is depicted below where all the delivery methods defined in the platform will be listed out along with the details of the provider, Is published option, Website, and Company. These already created shipping methods details can be edited by selecting the respective one. The new shipping methods can also be created by selecting the Create icon available. The image of the creation window is depicted below.
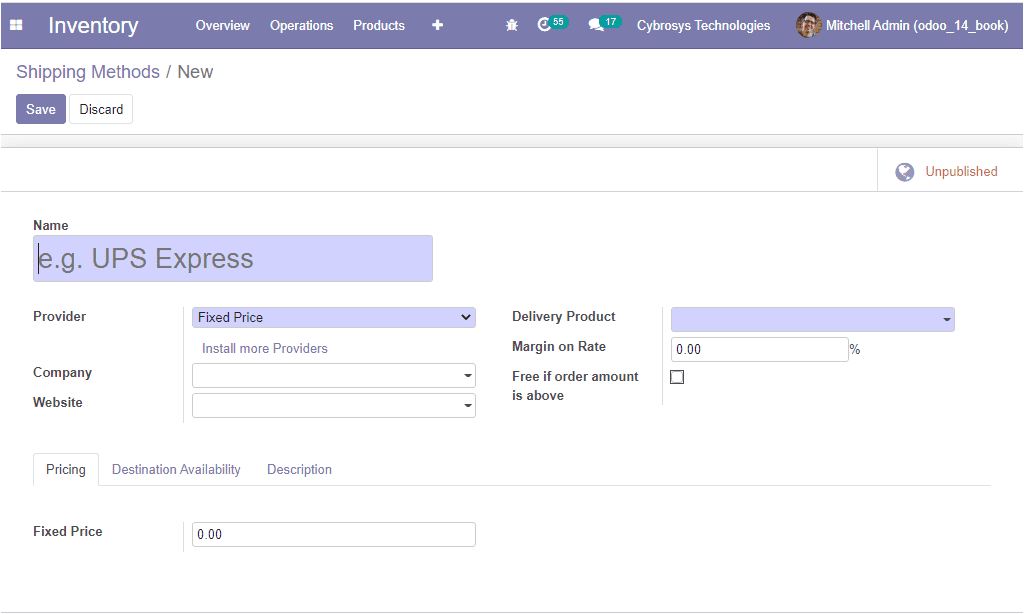
In this creation form, you can provide the Name for the delivery method, allocate Provider based on fixed Price or Based on Rules. If it is based on rules the rules can be defined in the pricing window. On the other hand, in the case of Fixed price, it can be described under the provider tab. After that, you can specify the Company related to this operation if the platform has multiple companies. In addition, the delivery products can be mentioned along with the margin rate of the operation. Moreover, if the user wishes to give the delivery free of cost over a fixed amount, he or she can mention it in the option, Free if the order amount is above. You can describe the amount in terms of company currency.
As we clear on the various shipping methods available in the Odoo inventory module and now let us discuss the Delivery packages option available.
Delivery Packages
Deliver Packages is one of the important features available in the Odoo inventory module that provides you the provision to place the products in different packages such as parcels, boxes, and many more aspects on the basis of their weight or volume and also allows you to track them.
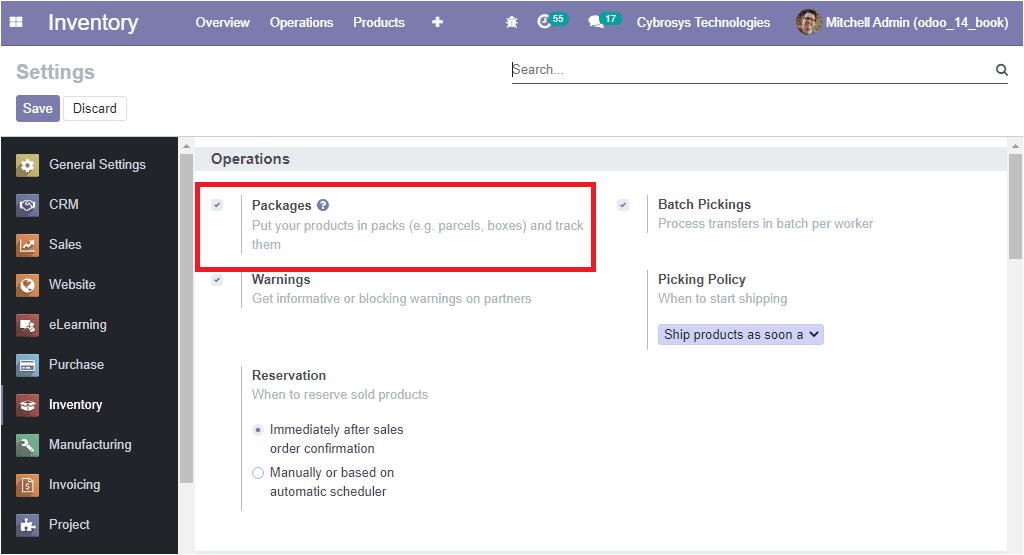
You can assign the delivery packages for each delivery order after enabling the packages option from the settings window of the inventory module.
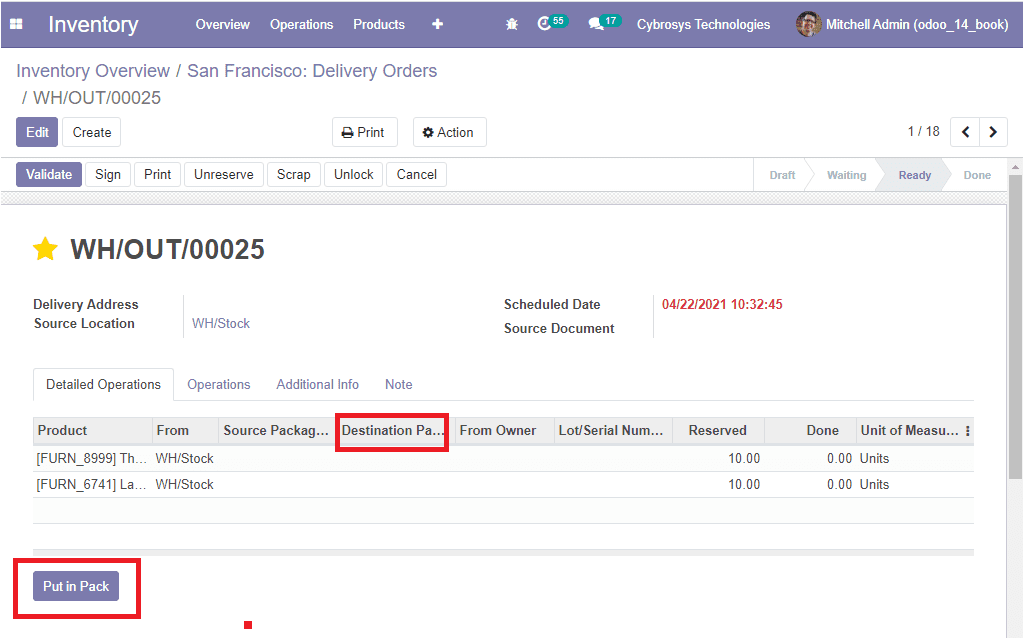
In the delivery order, now you can view the option of the destination packages in the product description menu. You can provide the details by selecting the respective menu. Moreover, the option to put the products in a pack is also available. By selecting this option all the products of the delivery order will be put in a packet.
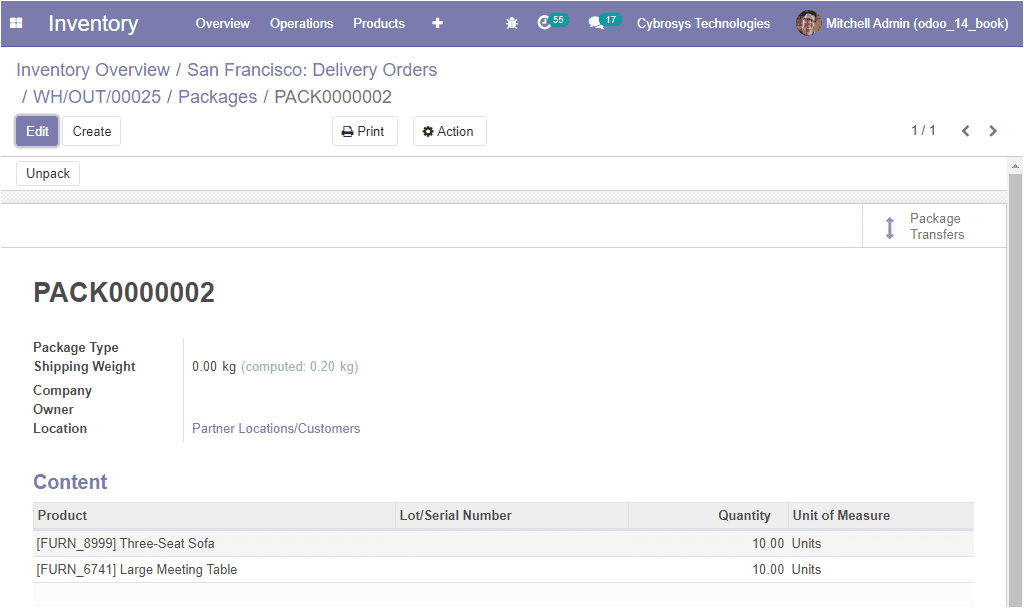
After validating the order, you can view the package by selecting the smart button Packages available on the right top corner of the window. On selecting this button, you will be directed to the packages window where you can view all packages described in the platform. By selecting the respective product you can view the details and here you have the option for Unpack. The image of the window is depicted below.
We discussed the delivery packages option in the platform and now we can move on to discuss the email confirmation available on delivery.
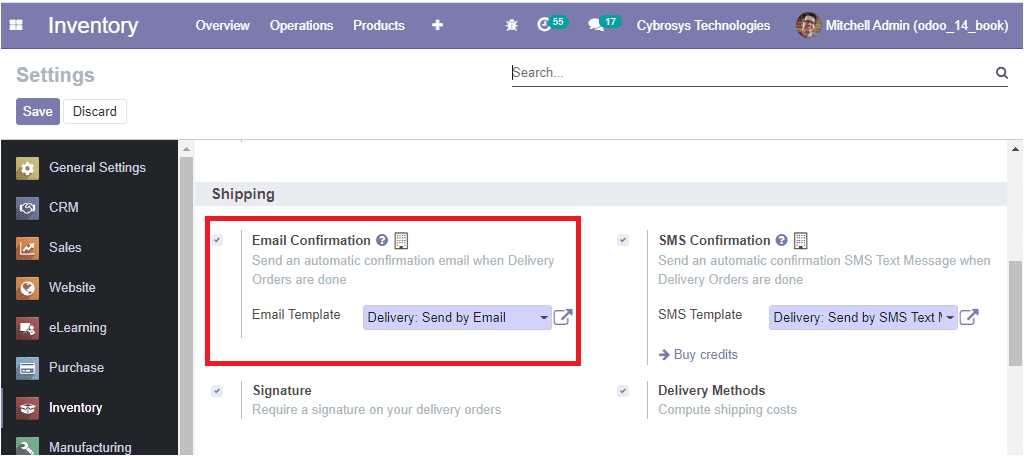
Email confirmation on delivery
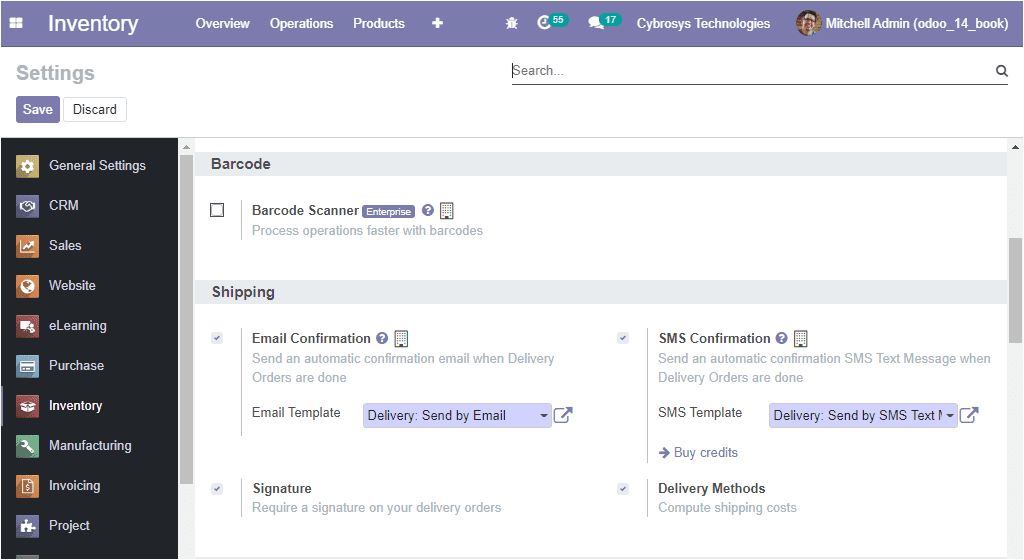
The Odoo platform allows you to send auto-generated emails for the confirmed delivery of products. Moreover, the platform provides you the advantage to make desirable editing’s in the emails. For accessing this feature, initially, you should enable the option email confirmation from settings. This option is available under the shipping tab of the settings module.
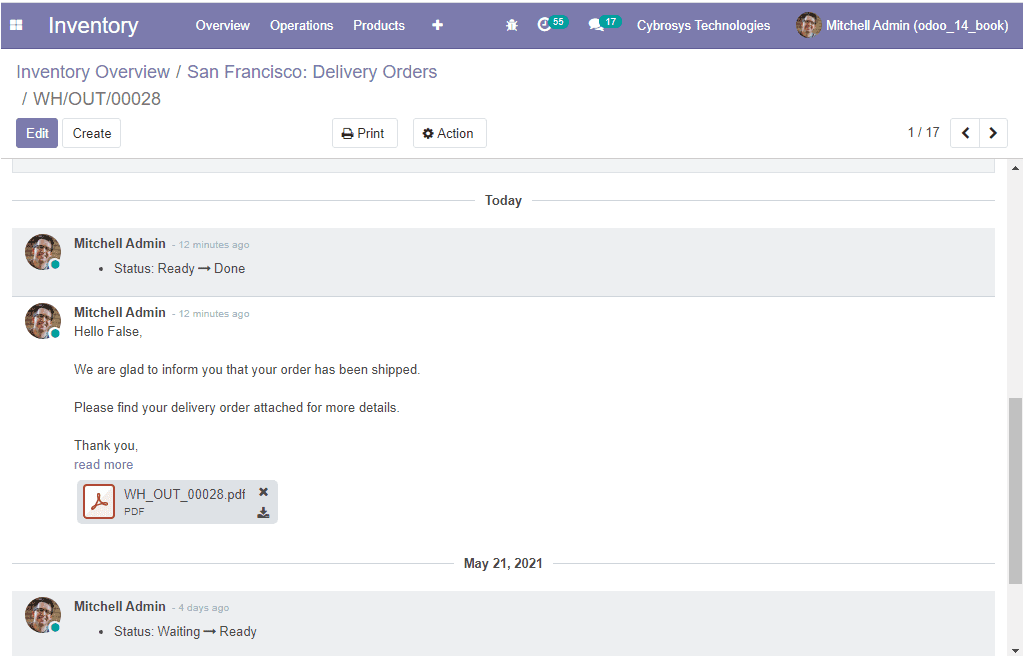
In a delivery order when the delivery is done after completing all the verifications an email message will appear to the customer on behalf of the details provided in the customer description window as depicted below.
Now let us discuss the SMS confirmation available on delivery of products in the Odoo inventory module.
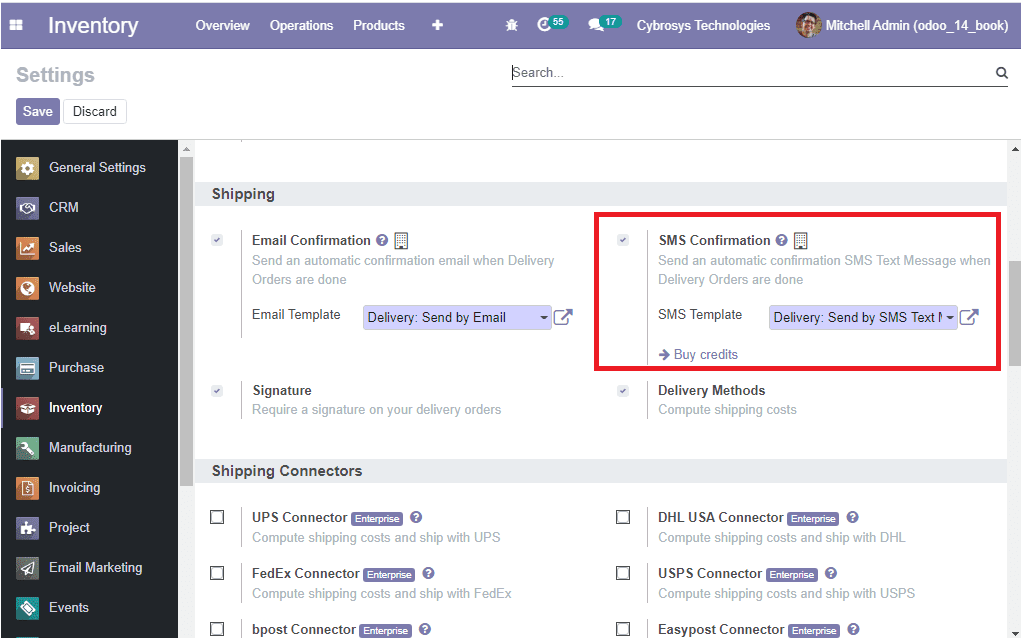
SMS Confirmation on Delivery
Likewise the Email confirmation on delivery, Odoo allows SMS confirmation on delivery of the products to the customer. These auto-generated text messages will reach rapidly to the customer and will gain more results. For accessing this feature first, you should activate the option from the settings window of the Odoo inventory module.
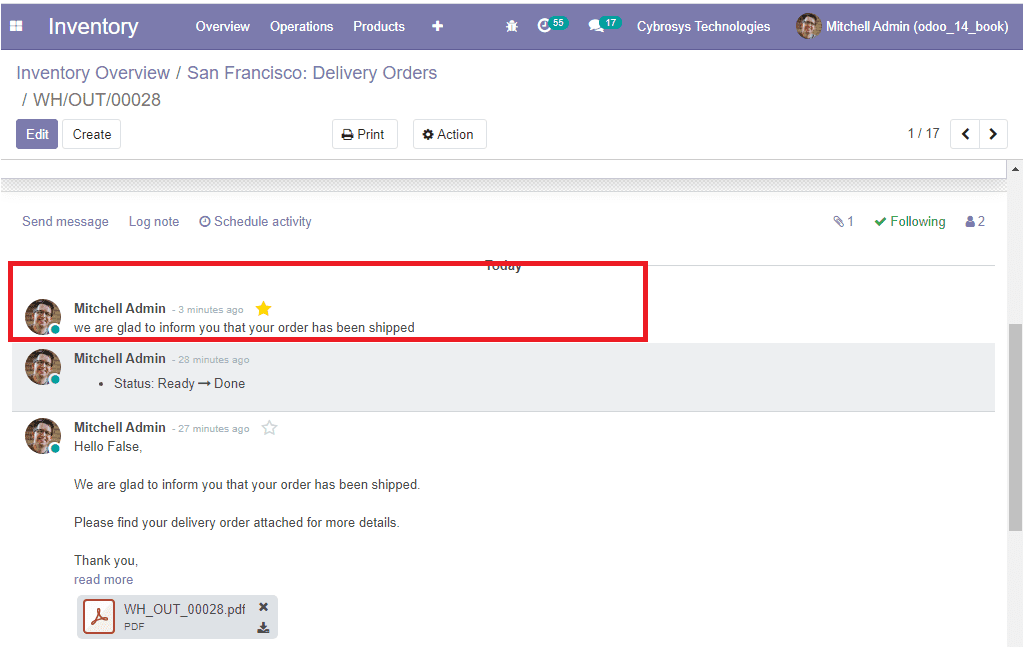
After completing the order confirmation, the text message is sent to the customer informing the delivery. The text message is created based on the template chosen in the settings menu.
Now let us have a glance at the scheduling time feature available on the platform.
Scheduling times
The scheduling time option available in the Odoo platform will certify that you have sufficient time in the product planning activities. You can access this feature by activating the option security lead time for sales and security lead time for purchase available under the Advanced scheduling options available.
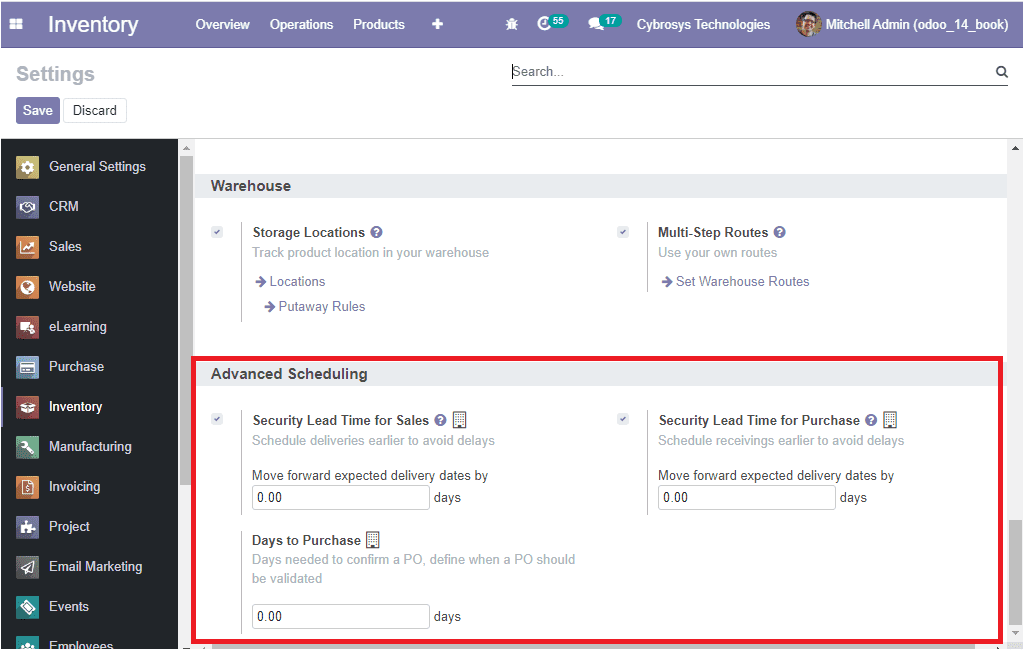
You can effortlessly plan and schedule the time required for the confirmation of the purchase order and the time needed for the fulfilment of delivery. The first option, Security Lead Time for Sales used to schedule and manage deliveries for avoiding unwanted delays. By using this feature you can gain the confidence of your customers. The second option Security Lead Time for Purchase also allows you to assign the days for the purchase order earlier. This will be helpful for avoiding delays.
So far we were discussing the scheduling times options available in the platform and now we can discuss how to generate warning messages in the platform.
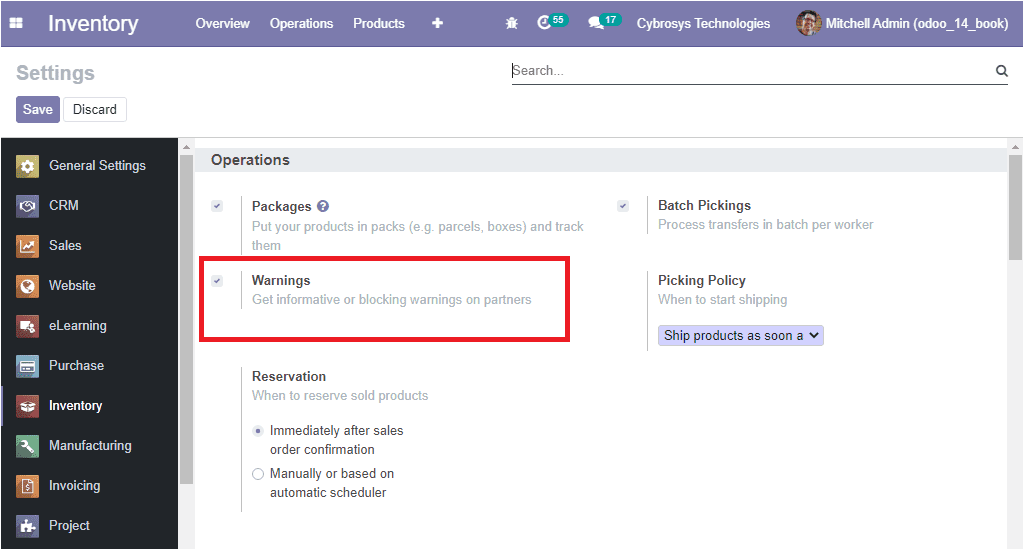
Warnings
The Odoo platform permits you to generate automated warning messages. This option definitely helps you to create warning messages in the time of various activities in the inventory. The warning messages option is only active if you enable the option from the settings menu of the inventory module.
Reporting
The Odoo Inventory reporting menu allows you to create analytic and quantitative reports of the various operations conducted in the platform. This is a great advantage for you to understand the details at a glance. Moreover, the Odoo platform provides you the provision to generate reports based on default as well as customizable sorting options available in each reporting window. You are also able to create graphical, analytical, descriptive, and informative reports on your inventory operations.
Inventory Reports
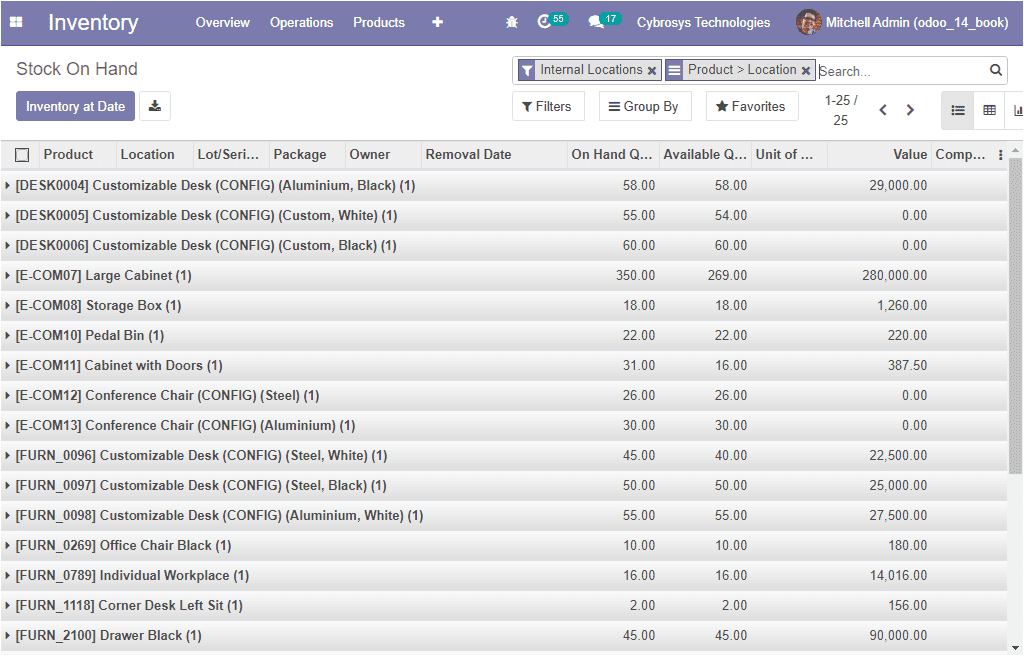
The Inventory Reports window of the Odoo inventory management module is depicted below where you can view all the available inventory product details along with the On Hand Quantity, Available Quantity, Value, and many more aspects. The details can be viewed in different views such as List view, Pivot view, and Graph view. The below image shows the list view of the Inventory Reports.
Next we can discuss the forecasted inventory option available under the Reporting tab of the Odoo Inventory module.
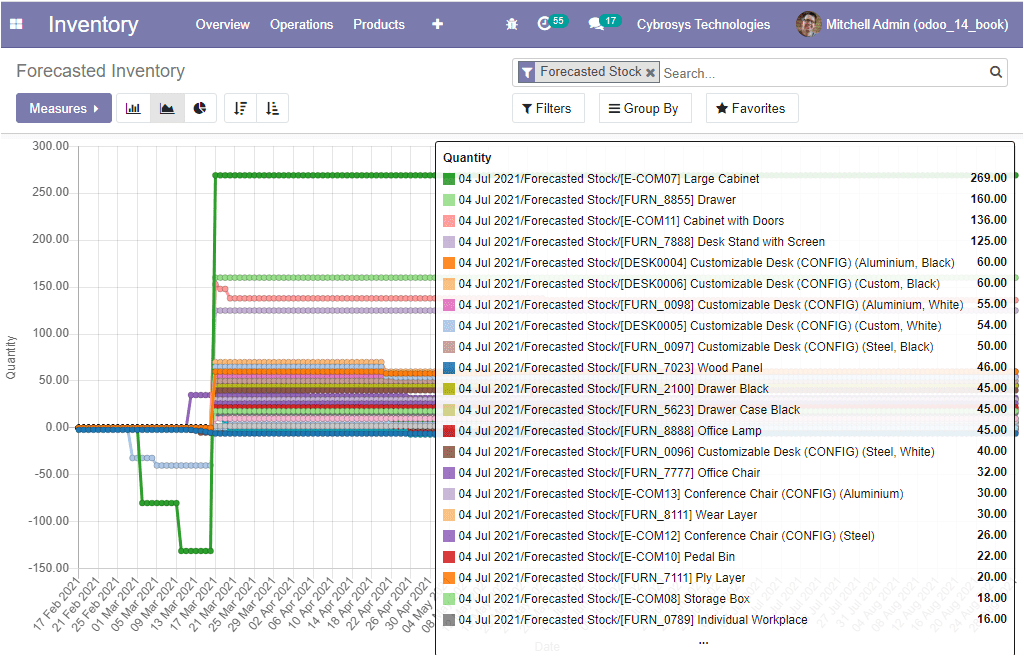
Forecasted Inventory
The other menu available under the reporting tab of the inventory module is Forecasted inventory. This window allows you to forecast the product operations. This reporting feature will help you to create various reports on forecasting operations conducted in inventory, sales, purchase, manufacturing operations of the company. As any other window in Odoo, all the customizable and default options such as filtering, group by, and favourite searches are available with this window. Moreover, the various measures in the window can be viewed in Bar, Line and Pie charts.
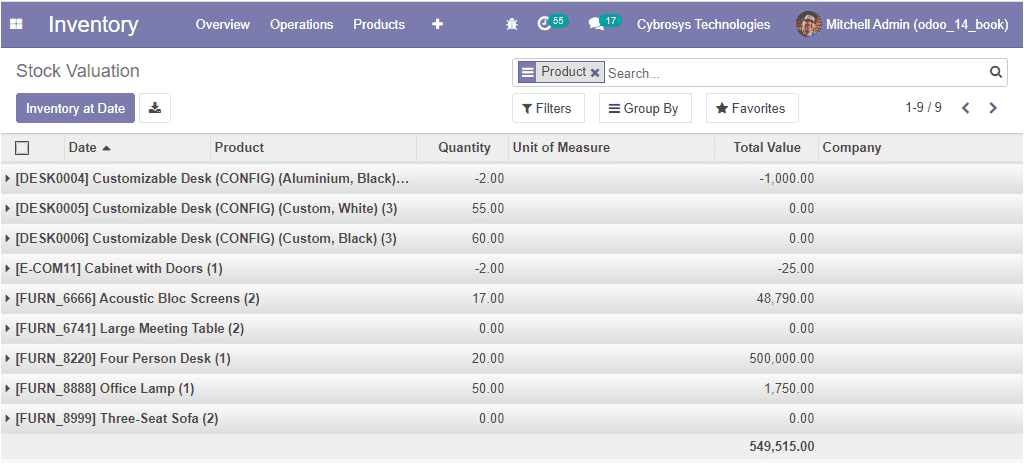
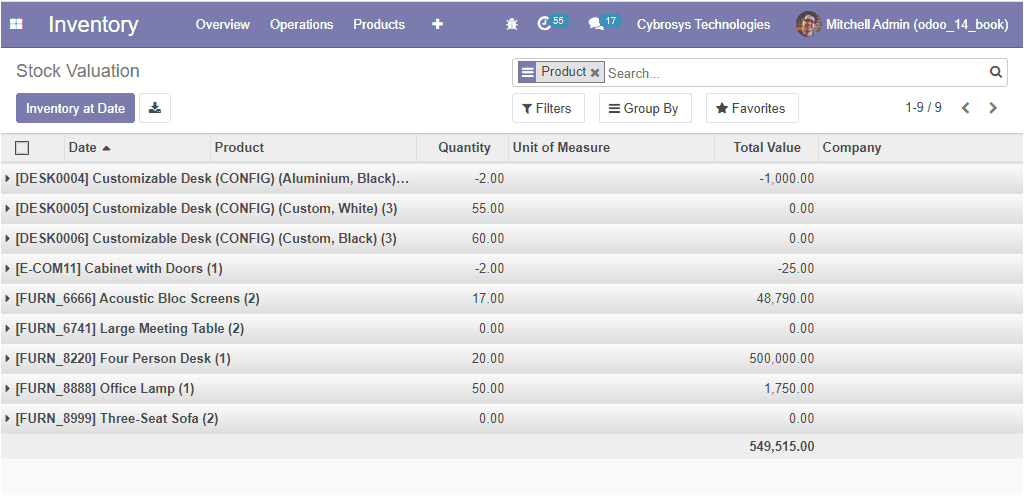
Inventory Valuation
In the Odoo platform, you are also able to conduct the various inventory valuation of the company warehouses and inventory operations. The image of the inventory valuation window is depicted below.
Product moves
All the product movement operations in the Odoo platform will be recovered in the product moves window available under the Reporting tab of the Odoo Inventory module. The image of the product moves window in the platform is depicted below where you can view all the data regarding this operation.
This is all about the Odoo inventory module and we are clear that the Odoo inventory module will manage all the inventory and internal operations of a company in a professional way. By using this module you can save your unwanted expenses as well as your time and also will create more satisfied customers.