CRM
Odoo CRM
Odoo Customer Relationship Management module is one of the important modules available in the Odoo ERP which suits all types of businesses to manage relationships and interactions with existing customers and potential customers. With the help of a CRM system, the organizations can increase their sales, services, profitability and build up more customer relationships.
Let us discuss the advanced features of the Odoo CRM module,
Advanced dashboard
The advanced Odoo CRM dashboard will provide a better overview of the activities and the eminent features such as filters, sorting, group by, and favorite search by default and customizable options are available. Additionally, this can be viewed in different views such as Kanban, List, Calendar, Pivot, and Graph views.
Activity scheduling
The activities such as meetings, calls, emails, and others can be organized and scheduled in each stage. In addition, the platform will track, log, analyze the activities of the teams.
Prioritizing
The Odoo CRM platform allows you to prioritize the follow-up activities in the pipeline and gain your targets successfully and you can prioritize the various contacts and leads available in the platform based on a star marking system.
Get in touch with customers
The module will help you to keep in touch with customers through email, phone, chat, and social media.
Customize stages
The Odoo platform provides provision to customize your pipeline by adding descriptions and various options on different stages.
Pipeline management
In the Odoo CRM module, the opportunity pipeline is arranged in a perfect and informative manner. The leads and opportunities are organized at different stages and it is also possible to create sub-stages for better organization. Moreover, the drag and drop functionality helps to work faster.
Email templates
This platform allows you to create templates of emails for communicating with your customers or opportunities.
Analyze lost reasons
The Odoo platform provides provision for analyzing the lost reasons on your opportunities and it will help you to improve your business.
So far we were discussing the importance of the Odoo CRM module in a business and some features of the module. Now let us discuss the activities in the module.
Activities in CRM
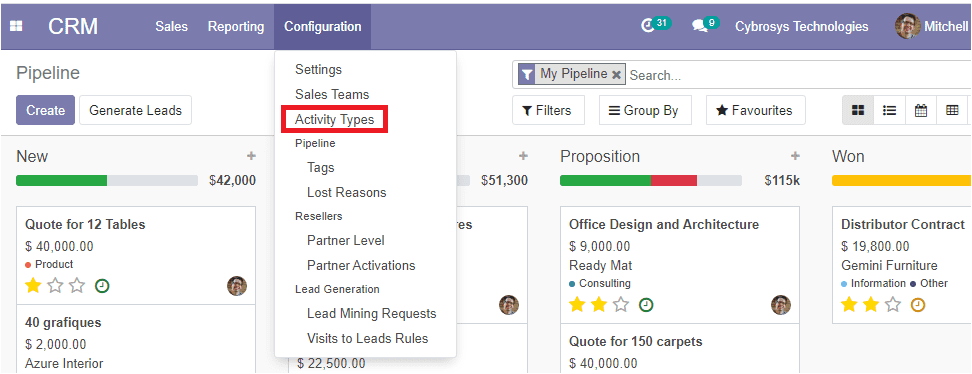
Planning activities provide a guide for your actions and it will help you to reduce wasteful activities and uncertainties. The Odoo platform allows you to create and configure various activities of the CRM module. This can be done in the Activity types window which can be accessed from the configuration tab of the CRM module.
CRM -> Configuration -> Activity types.
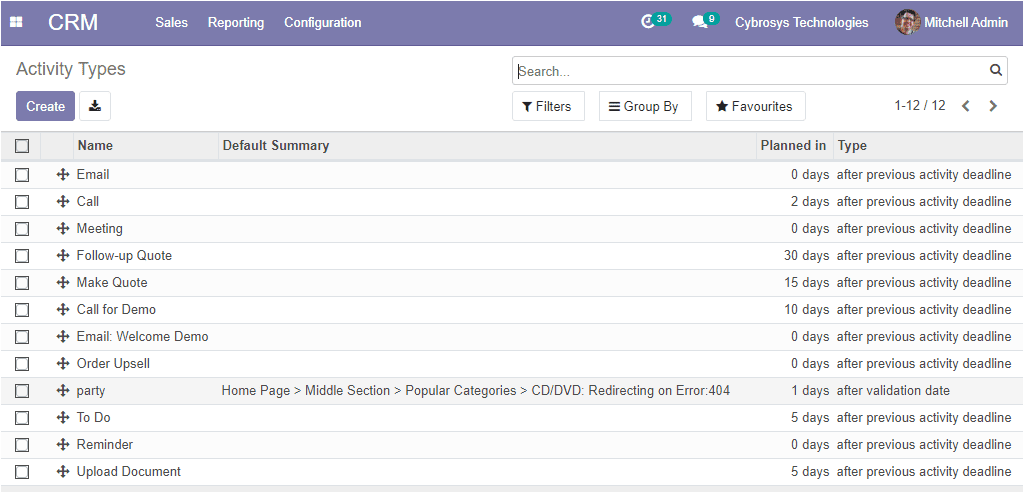
The image of the Activity types window is depicted below where you can view all the activities described in the platform along with the Name of the activity type, Default summary, Planned date, and the Type.
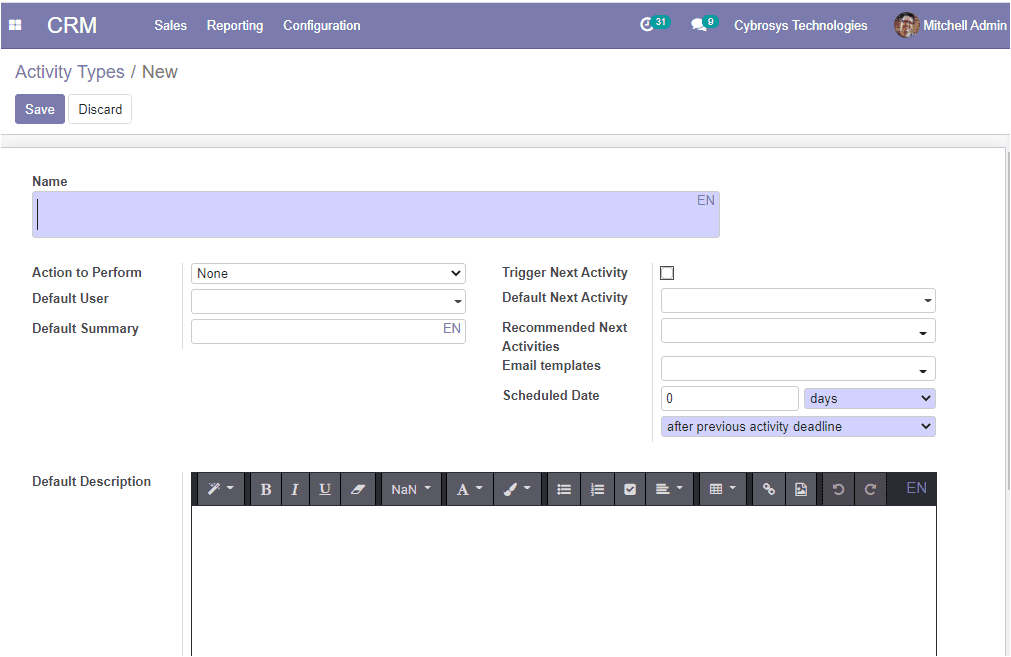
You can also have the choice of creating new activities by clicking the Create icon. The image of the creation window is depicted below.
In this creation form, you can provide all the required information for creating an activity type. First of all, you should provide a Name for the activity. Allocate Default User, action, summary, next activity trigger, email templates along with the default description. Moreover, you can assign a scheduled date and it allows you to plan the action deadline, it can be the number of days/week/month before executing the action.
After entering all the details, you can save the details by selecting the save button available on the top left corner of the window.
Now let us discuss how to schedule different activities on the platform.
Schedule Activity
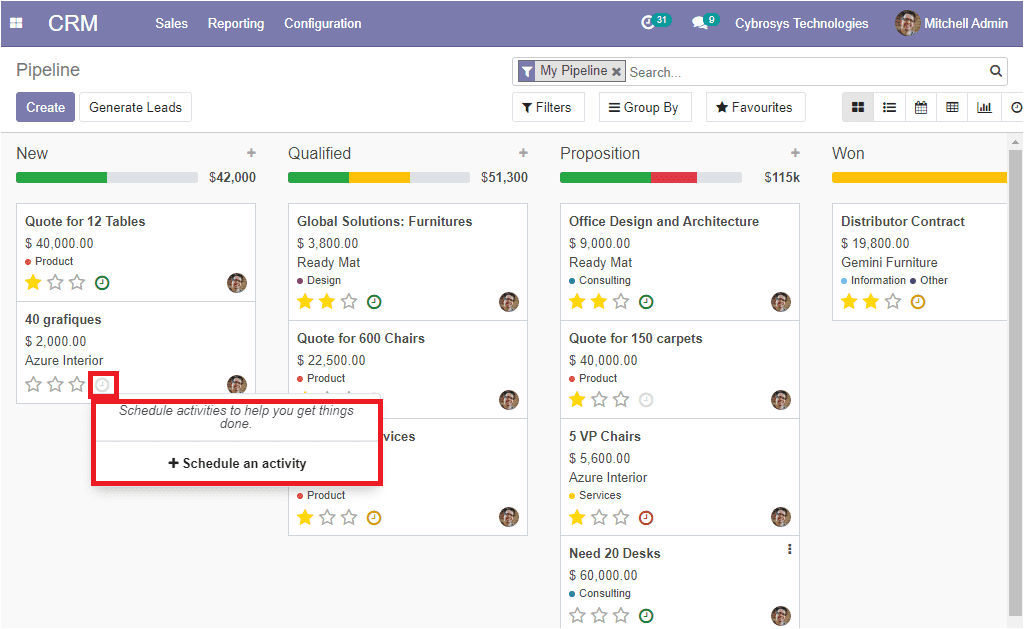
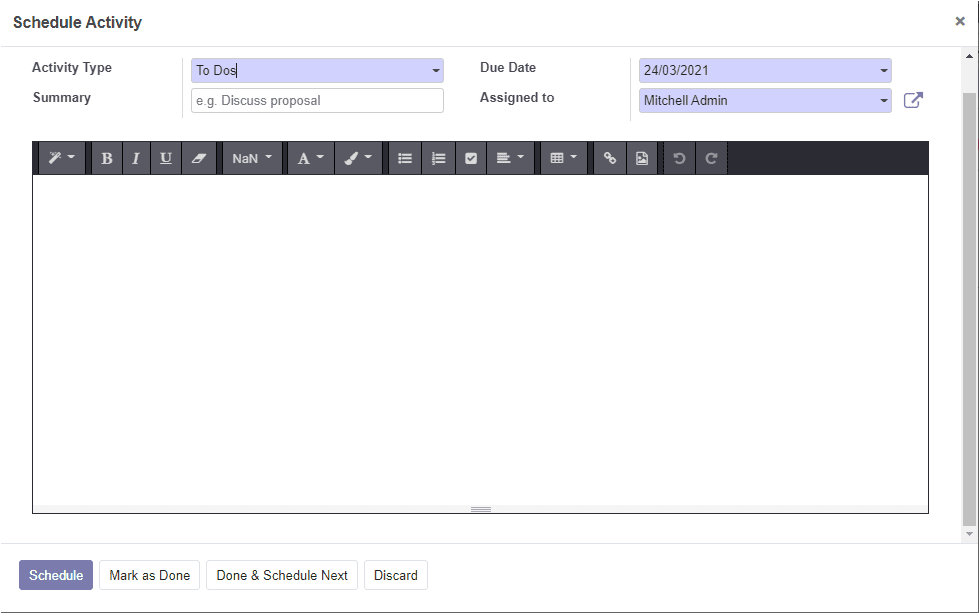
It is possible in Odoo to view all the scheduled activity that comes under a lead directly from the CRM dashboard. This feature allows you to track the scheduled activity. You can schedule an activity directly from the CRM dashboard where you can view a clock icon in each of the opportunities and lead present. If you click on this icon you will get the Schedule Activity window.
Now you can click on the Schedule an activity tab and you will be navigated to the schedule activity window as the image of the window is shown below. In this window, you can allocate the Activity Type, Summary, along with the Due date and responsible person.
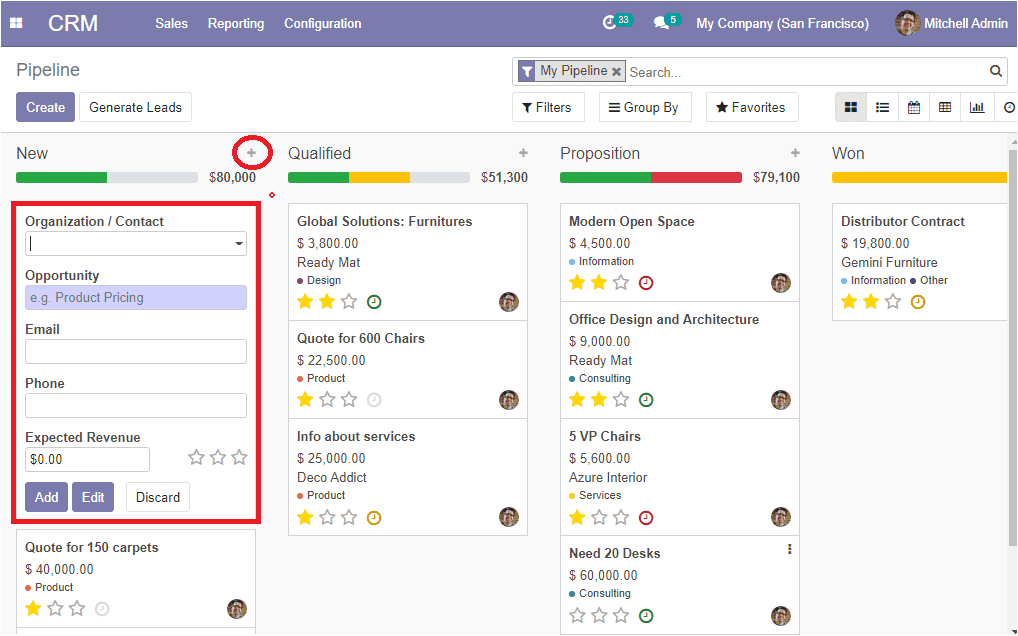
The new leads can be added to the Odoo CRM dashboard by clicking on the + icon available on the top right corner of each stage in the pipeline. The image of the pop-up window is depicted below where you can allocate the contact information along with the expected revenue and priority. Then you can select the Add button.
So far we discussed the various operations of the CRM module and now let us have a look at how the platform manages the lost opportunities.
Managing Lost Opportunities
There may be some situations where you lose opportunities in business and you should keep an eye on the reasons for losing. The Odoo CRM has a separate feature for managing these situations. You have the provision to define various lost reasons for the opportunities under the lost reasons menu available in the configuration tab of the platform.
CRM -> Configurations -> Lost reasons.
The image of the window is depicted below
Here in this window, you can view all the created lost reasons and you are allowed to create new reasons by selecting the create icon. Moreover, you can discard the reasons from the menu if needed.
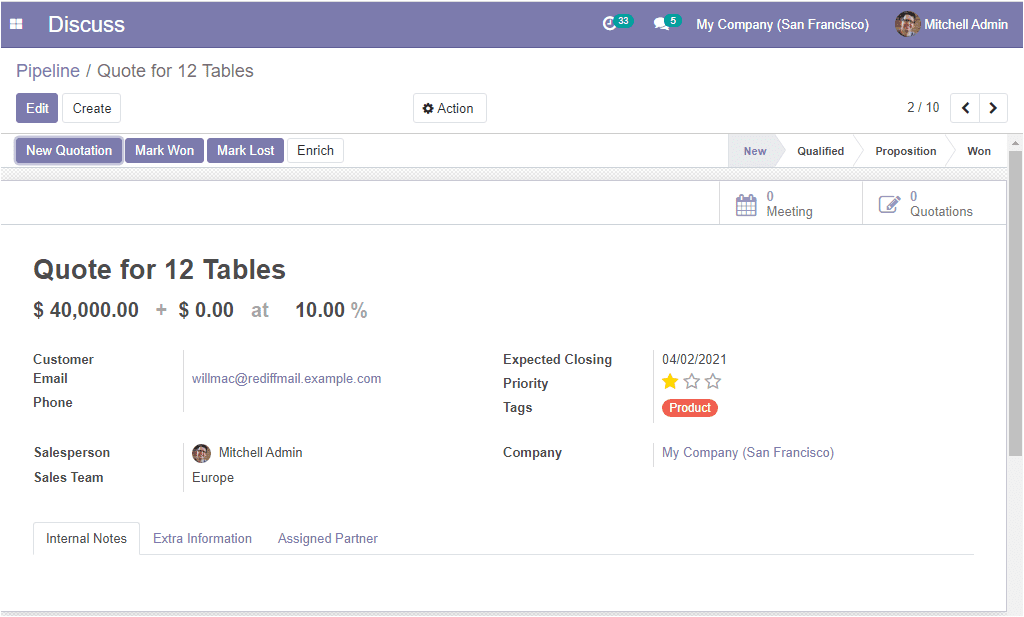
In the Odoo CRM pipeline, you have the provision to mark the lead as won or lost in every lead or opportunity that you created. If you open each lead or opportunity available in your pipeline, you can view the Mark won and Mark lost options as shown below.
Via selecting the Mark lost button you will be depicted with a pop-up window where you can provide the reason for the loss.
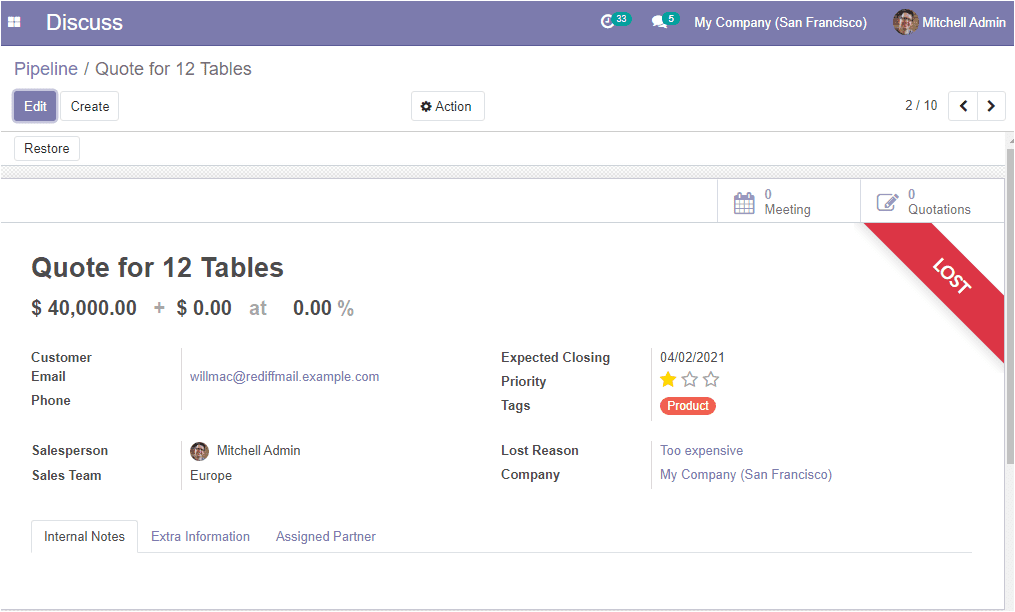
Now you can click on the submit button to mark the lead as lost and the respective lead will be marked as lost under the opportunity menu. You also have the provision to restore the opportunity when it is regained.
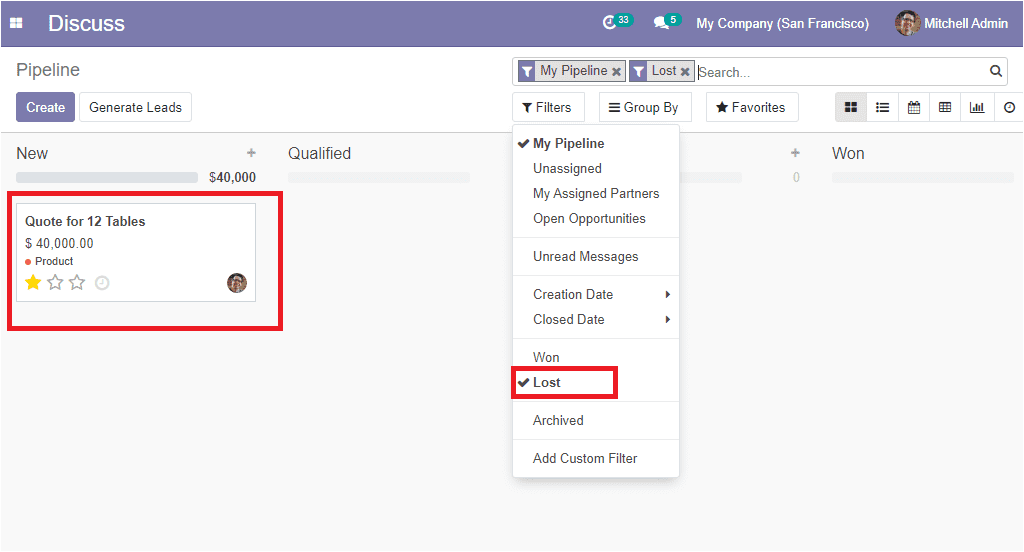
All the lost opportunities in the platform can be viewed separately by filtering in the dashboard and it will help you to easily analyze the lost opportunities.
As we clear on how to manage lost opportunities in Odoo and now we can go to the lead acquirement feature in the module.
Lead Acquirement
Lead acquirement feature in Odoo CRM will be a great help for the managers and employees of the sales team and it is the right solution for bringing down the worries about organizing your lead. Also, It will help you to increase the profit margins of the business.
Now let us discuss the functionality of automated lead assignation.
Automated lead assignation
As we know that manually allocating new leads to specific representatives of the sales team can be a confusing and time-consuming task. We can manage these types of difficulties by implementing the Odoo CRM module. This platform allows you to automate the operation of the lead assignation to the various sales representatives of the team based on various criteria such as location, languages, company size, and many more.
Let us move on to the lead mining feature.
Lead Mining
Lead mining is an essential tool in Odoo CRM that allows a company to generate various leads based on various criteria such as country, size of the company, technologies applied, and the products produced.
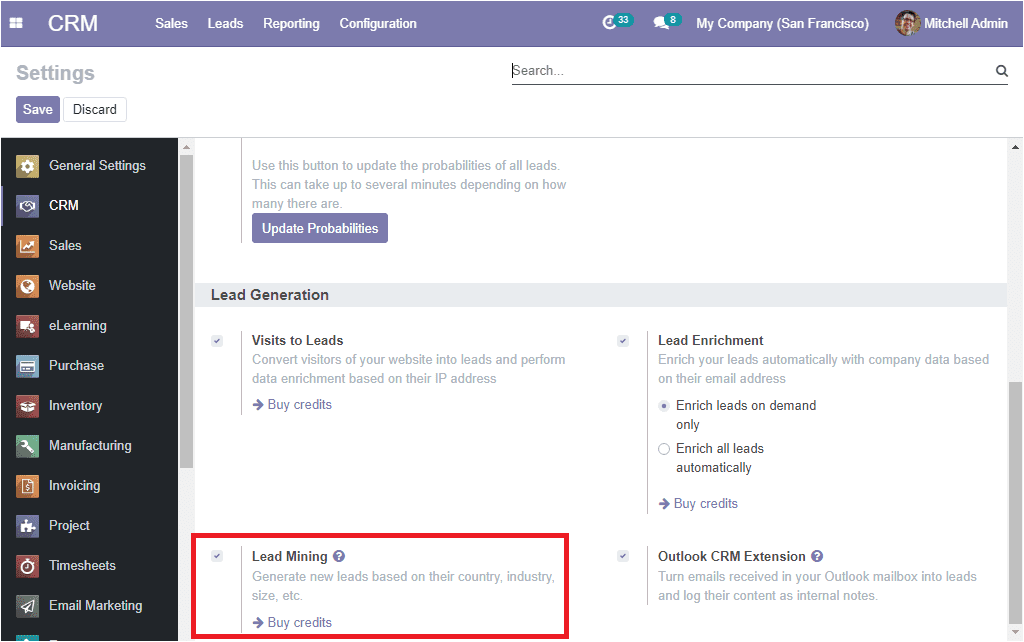
For accessing this feature you can go to CRM -> Configuration -> Settings and you can activate the lead mining feature. Moreover, the operation is based on credits and it can be purchased by selecting the Buy credits option available. The image of the window is depicted below.
As we clear on the lead mining feature in the module and now let us discuss the lead enrichment feature available in the platform.
Lead Enrichment
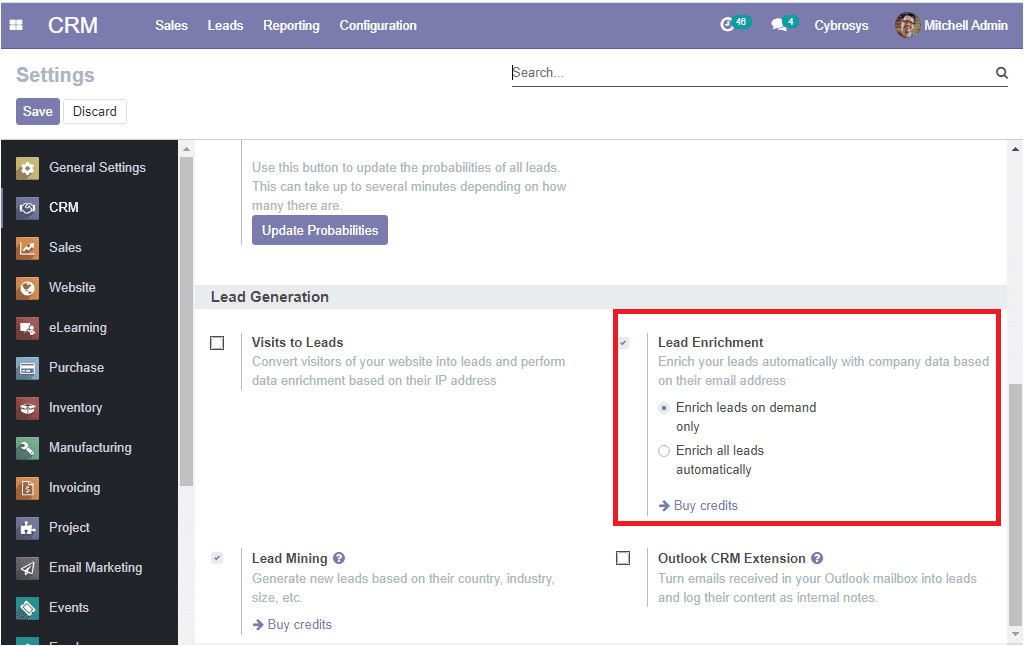
Lead enrichment the advanced feature in Odoo CRM allows you to bring out the contact information of your future customers from the simple contact information of email id and also from the automatic search on external sources such as social media and the web. This process of acquiring more contact information of the customer or potential customer will help you to transfer the potential customer to your regular customer. For accessing this feature you should activate the options lead enrichment in the settings menu of the CRM module. In the settings tab under the lead generation, you can find the option and you should check the box near the option of activating it. Additionally, you can view a Buy Credits option, Later you can select the save button for saving the changes. The image of the window is depicted below.
So far we were discussing the lead enrichment in the platform and now we can discuss the new feature Outlook CRM extension available in Odoo 14 community edition.
Outlook CRM Extension
The Outlook CRM feature in the platform is nothing but a connector that connects your outlook mailbox with your Odoo database. The new feature in Odoo 14 CRM module will be a helping hand to you to create leads from emails and send them to your mailbox. Moreover, it will provide more perfection on your contact searchings and keeping details.
Now let us discuss the lead scoring option available in the module.
Lead scoring
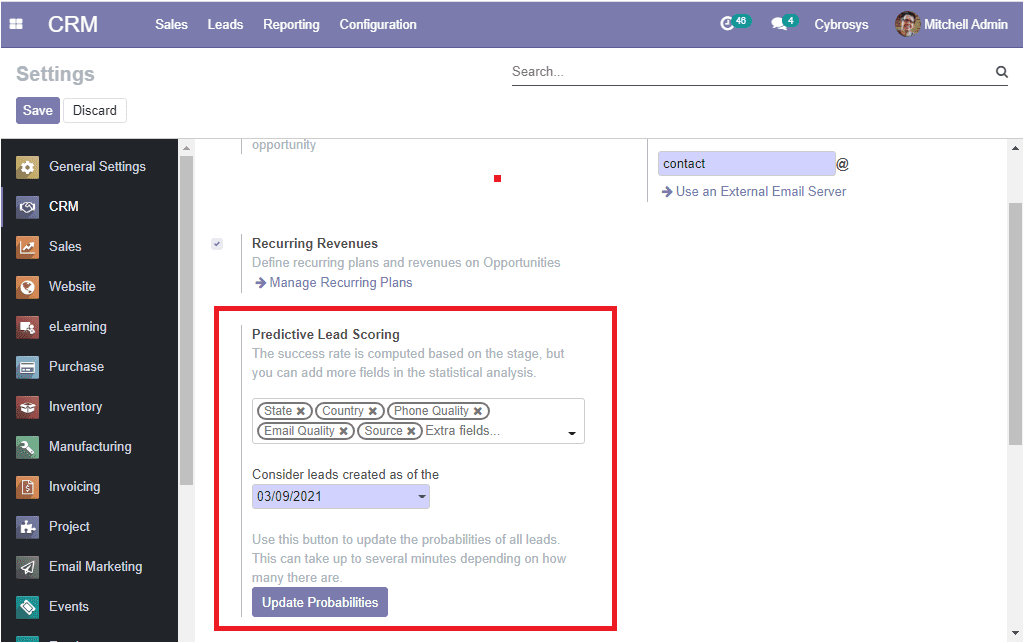
Lead scoring in the Odoo platform is an integral part of the successful lead management strategy. This feature provides you insight to determine a score for each lead based on some criteria such as country, pages visited, type of industry, sources, and many more.
As we clear on the lead scoring option available in the platform and now let us discuss the various operations that can be conducted on leads.
Operations on Leads
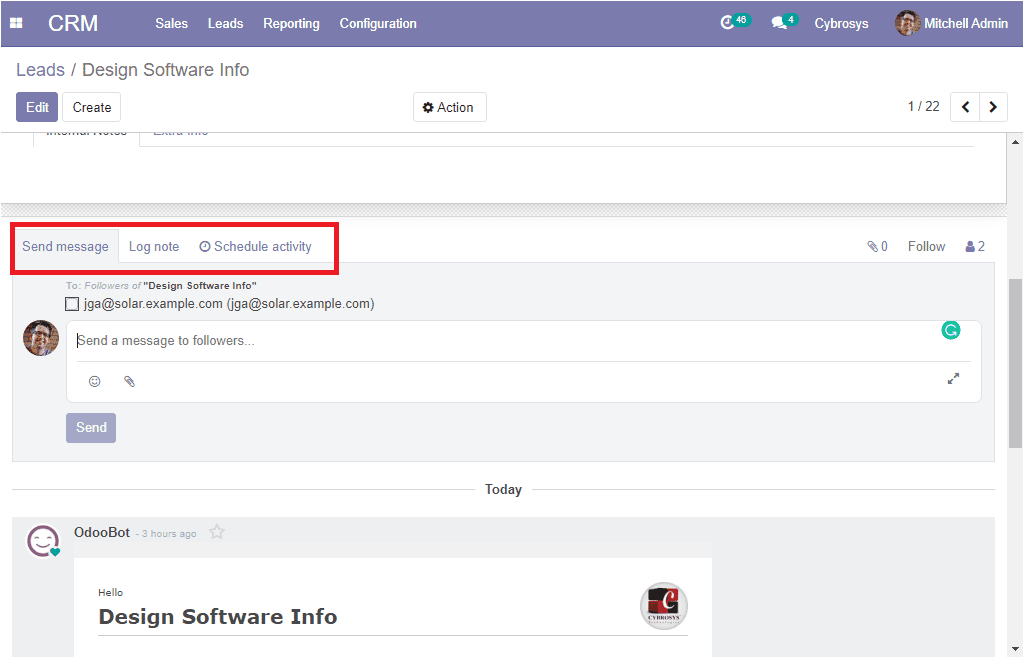
The Odoo platform provides the provision to conduct various actions on leads apart from activity scheduling. That is you can also send messages or log notes. These options can be accessed under each lead description as shown in the below image.
By selecting the Send messages option you can send messages to the leads straight from the lead menu and under the Log note tab, you can log an internal note for this lead on the basis of the operations conducted. You can attach various documents under these options. In addition, you can Schedule activities under the schedule activity tab.
So far we were discussing the operations on leads and now we can discuss how to manage multiple sales teams in the platform.
Managing Multiple Sales Team
In the Odoo platform, you can deal with several sales teams. The user-friendly platform provides you the possibility to control, manage, and monitor all the activities of the various sales teams or channels. We can create sales teams based on different criteria such as the product, quantity of sale, region of operation.
Let us discuss this in detail.
Sales team management
A well-planned sales team is an important part of any business organization and they help us to not only increase the revenue but also they are building and keeping long-term customer relationships. This quality will definitely help your business to increase product sales, lead generation, brand reputation, and business growth. All the business activities of the Odoo CRM can be controlled by the sales team.
The sales team menu in the platform can be accessed from the configuration tab of the CRM module.
CRM -> Configuration -> Sales team.
The image of the window is depicted below where you can view the sales team details in a list view. You have the provision to edit the details that you described by selecting the respective teams.
The various default and customizable functionalities such as filters, group by, favorites options are available. You can create a new sales team by clicking on the Edit button available on the top left corner of this window. The image of the creation window is depicted below where you can provide the name of the sales team in the allotted space. You have to check the box near the option Quotations if you are sending quotations to your customers rather than confirming orders straight away and also you can enable the option Pipeline to manage a pre-sales process with opportunities. Additionally, you can check the box near the option Leads to filter and qualify incoming requests as leads before converting them into opportunities and assigning them to a salesperson. Moreover, you can mention the team leader and email alias, allocate invoicing targets if the company operates based on the sales target terminology. Also, you have the option Accept emails from and it is the policy to post a message on the document using the mail gateway and here you have the different options ;
Everyone: If selecting this option everyone can post.
Authenticated Partners: Only authenticated partners.
Followers-only: Only followers of the related document or members of the following channel.
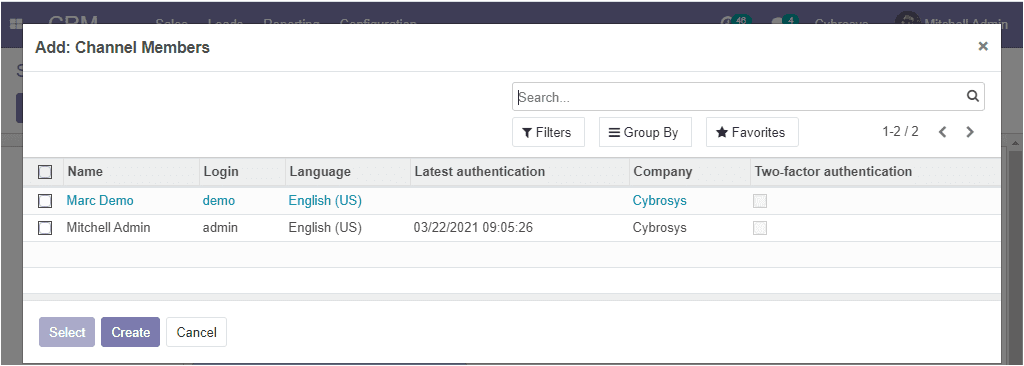
Finally, you can add channel members to the sales team under the Team members tab. On selecting the Add option you will be depicted with a pop-up window as shown below where you can view all the created members along with the details.
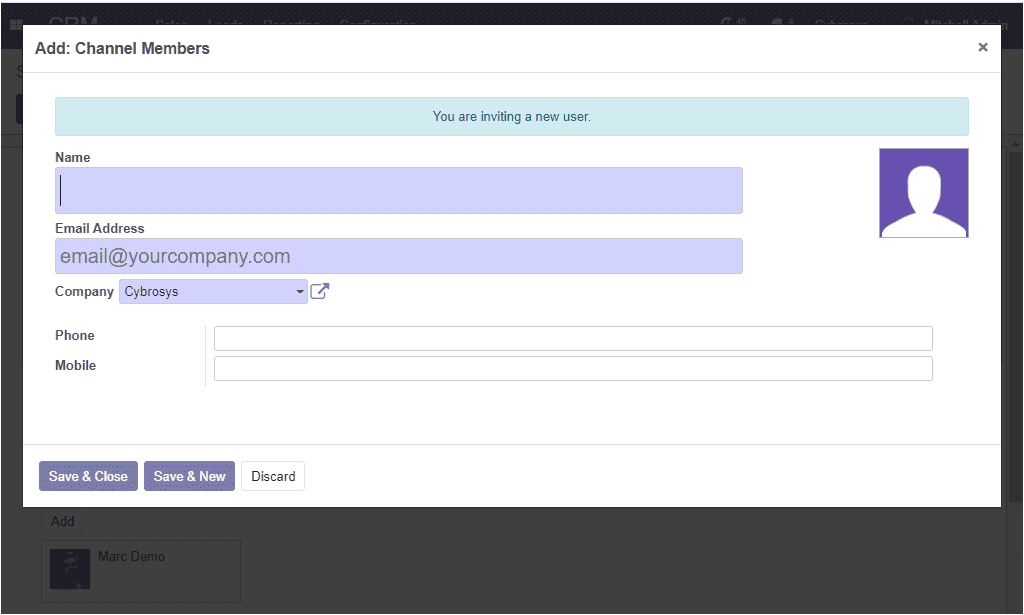
You can also create new channel members directly from the window by clicking on the create icon. The image of the channel member creation window is depicted below.
So far we were discussing the sales team management on the platform and now let us have a look at how to convert leads into opportunities.
Converting Leads into Opportunities
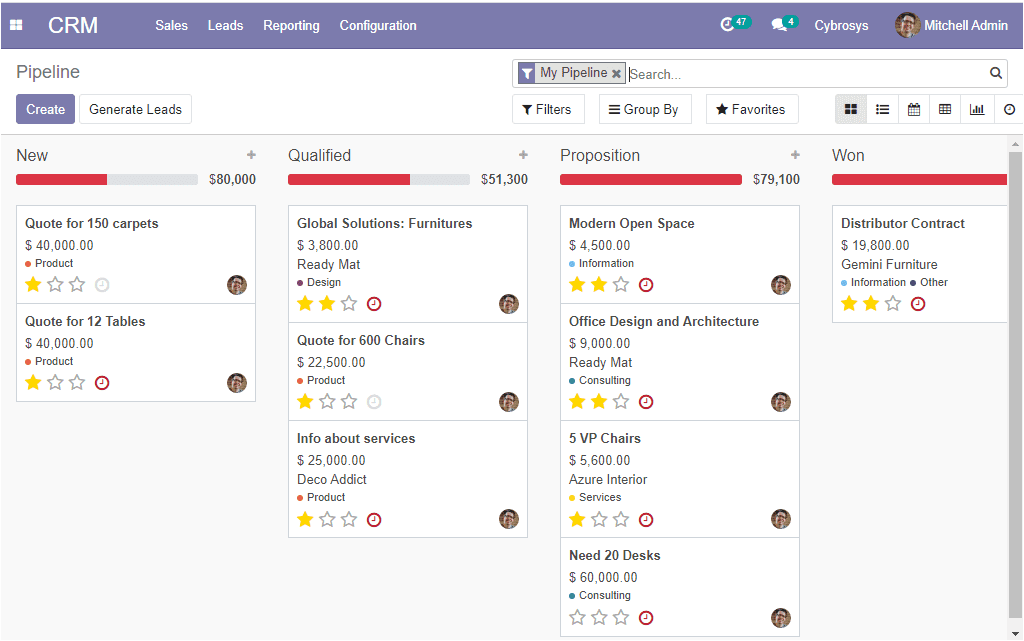
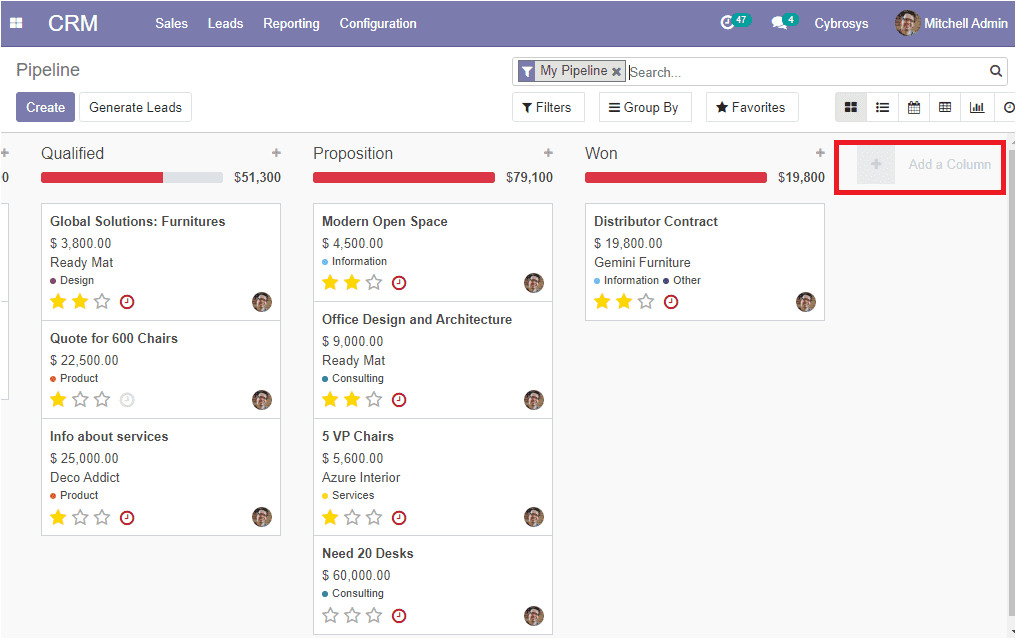
The Customer Relationship Management module in the Odoo platform allows you to keep the customer and potential customer contact information, recognize sales opportunities, manage marketing campaigns, and many more. All the CRM operations in the platform are arranged on pipeline aspect and all the information from the first contact to the final sale is described here. In short, it is the visual representation of all your sales processes. In the CRM sales pipeline, the leads are arranged at the left end of the window in the kanban view and then moved to the right from one stage to another. The stages in the pipeline are named New, Qualified, Preposition, Won, and of course, you have the provision to define the sales stages depending on your requirements and sales process.
You can include more stages in your sales pipeline by selecting the Add a Column menu.
By viewing this window you can get a clear picture of the CRM pipeline. The drag and drop option allows you to easily manage the different stages of opportunity. All the pipeline activities are conducted based on the leads and contacts acquired. The leads in the platform can be converted into opportunities directly from the leads window. Like any other window in the platform, all the filtering and sorting options are also available in the window.
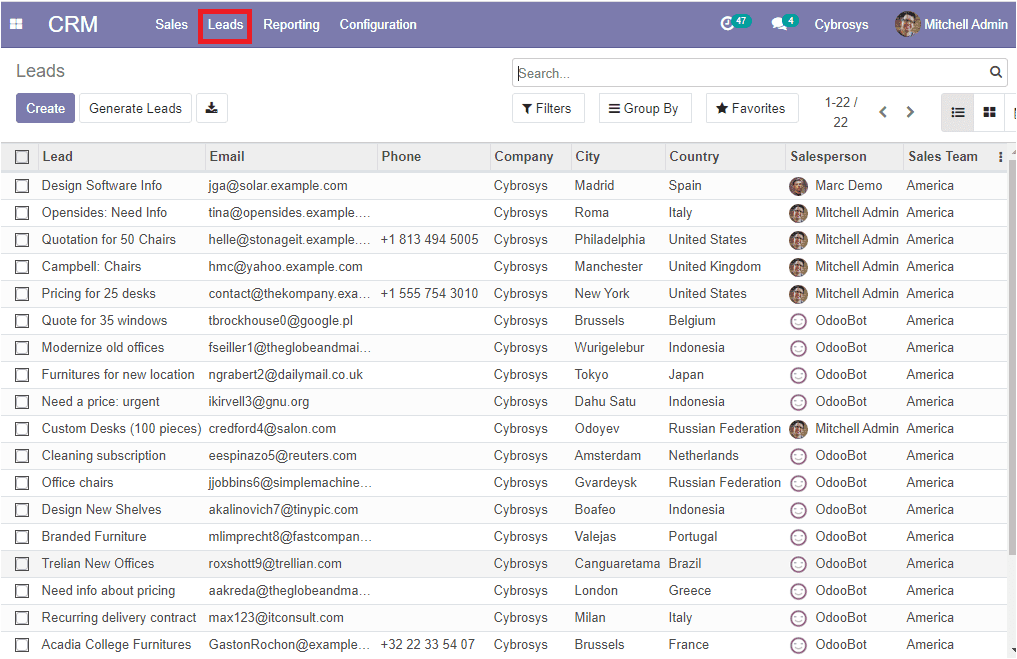
The lead menu in the platform can be accessed from the CRM dashboard and the image of the window is depicted below where you can view all the leads described in the platform along with the details such as email id, phone number, company, city, country, and the responsible salesperson and sales team.
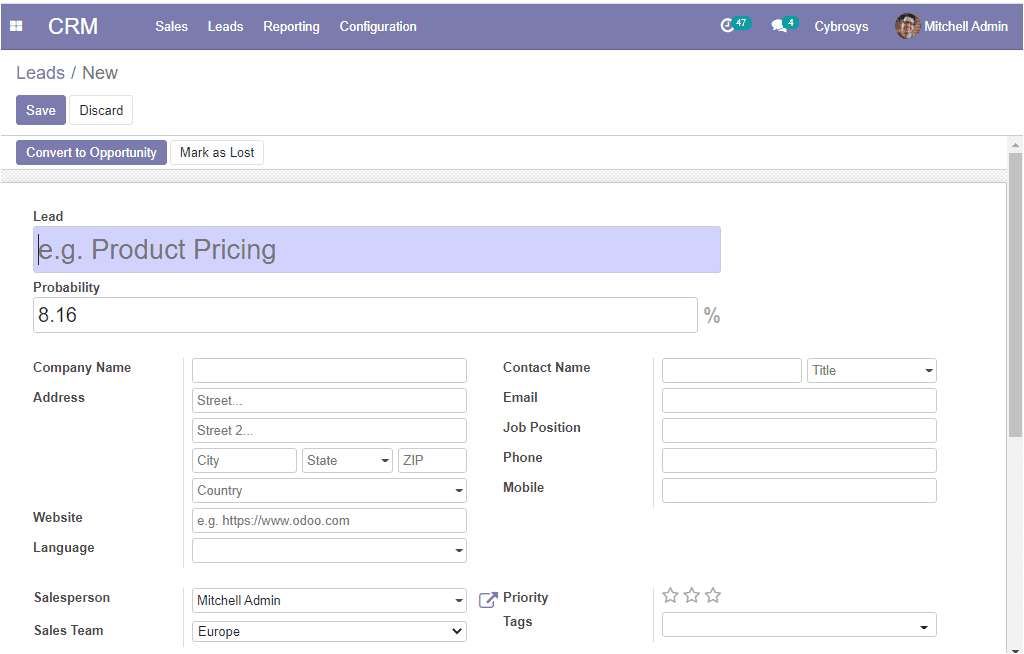
You can create new leads by accessing the create icon available on the left corner of this window. Here in this window, you can define the lead and the probability of acquiring the lead in the allotted space. The name of the future partner company along with the contact details can be mentioned. The website of the contact and the language also can be allocated. Additionally, the salesperson and sales team related to this lead along with the priority can be specified. Apart from these fields, you are also able to classify or analyze your leads or opportunity under the Tags option. Under the internal notes tab, you can add an internal description if needed. Finally, under the Extra information tab, you can describe the tracking details along with the assignment and closed date. After providing all the required information you can save the details. The image of the lead creation form is depicted below.
If you have not got enough contact information about the lead, you can enrich the lead by selecting the enrich option available.
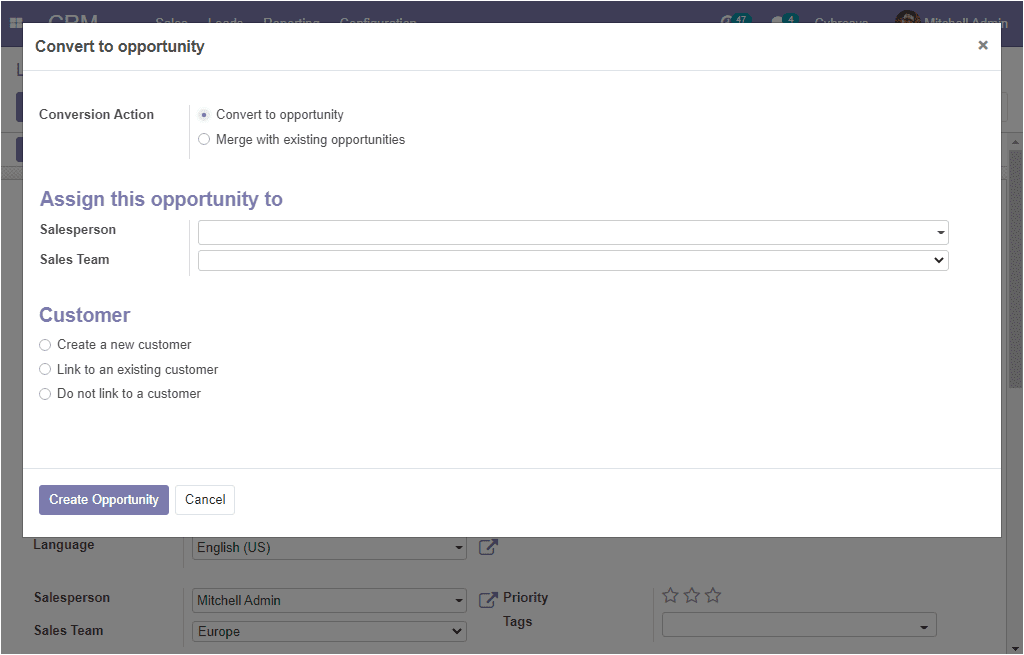
Now you can either convert the lead to an opportunity when the lead has won or you can also mark it as lost when the lead cannot be created as an opportunity. For converting lead as an opportunity you can select the Convert to Opportunityoption available in the top left corner of the window. On selecting this option you will be displayed with a pop-up window as shown below where you can define the opportunity.
In this window, you can see the options available for conversion where the lead can be converted to a new opportunity or the lead can be merged with an existing opportunity. Also, you can assign a salesperson and sales team for this opportunity. Under the customer option, you can select create a new customer or link to an existing customer. Now you can select the Create Opportunity button.
Creating Sales Quotations
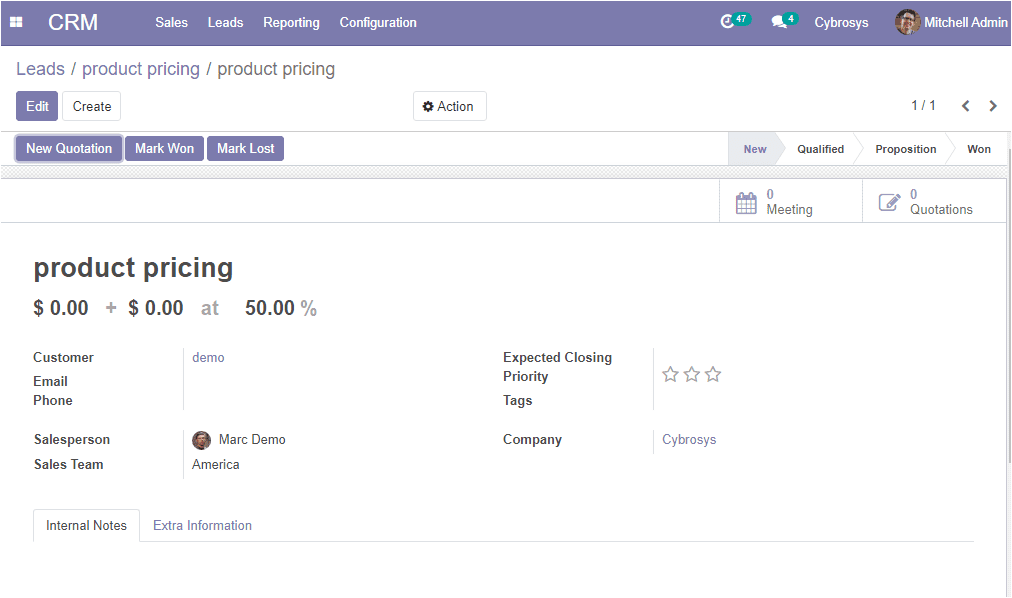
After converting the lead to an opportunity, now you have to create quotations from the lead window. The image of the window is depicted below.
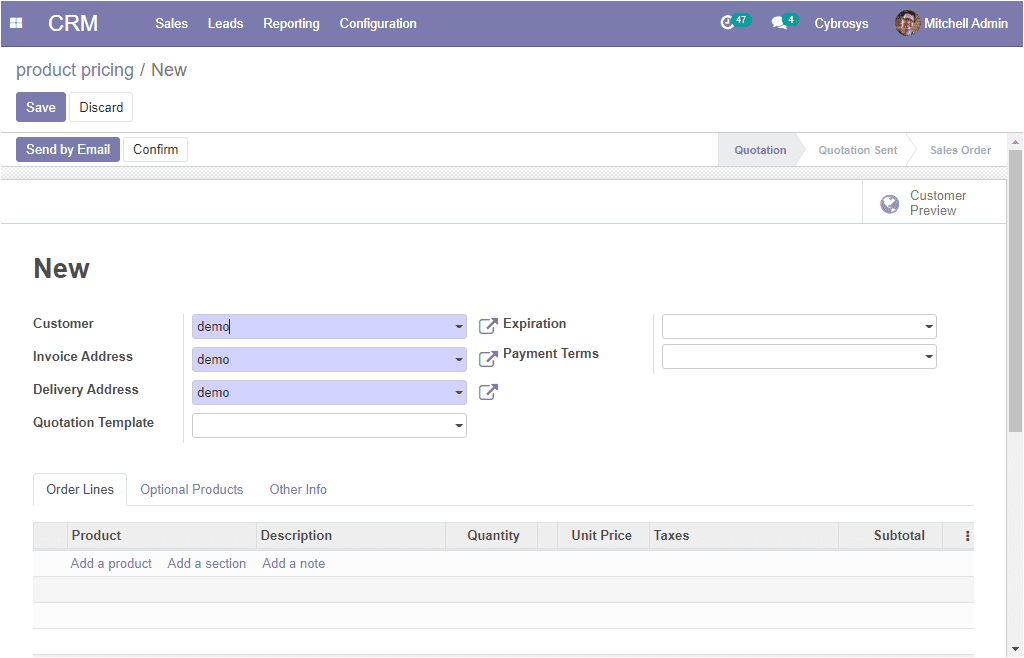
Here in this window, you can view all the information about the opportunity that we previously defined. Using this window you can create a new quotation by selecting the New Quotation menu available on the top left corner of the window. You also have the provision to mark the opportunity as won or lost on selecting the respective menu. You can also view the different statuses such as New, Qualified, Preposition, and Won. Now the window is in a New state. On selecting the New Quotation menu you will be showcased with a quotation creation window where you can create a new sales quotation.
Here you can provide all the required details of the customer such as customer name, invoicing, and delivery address along with the quotation templates and payment terms. The expiration date can be allocated by clicking on the calendar pop-up.
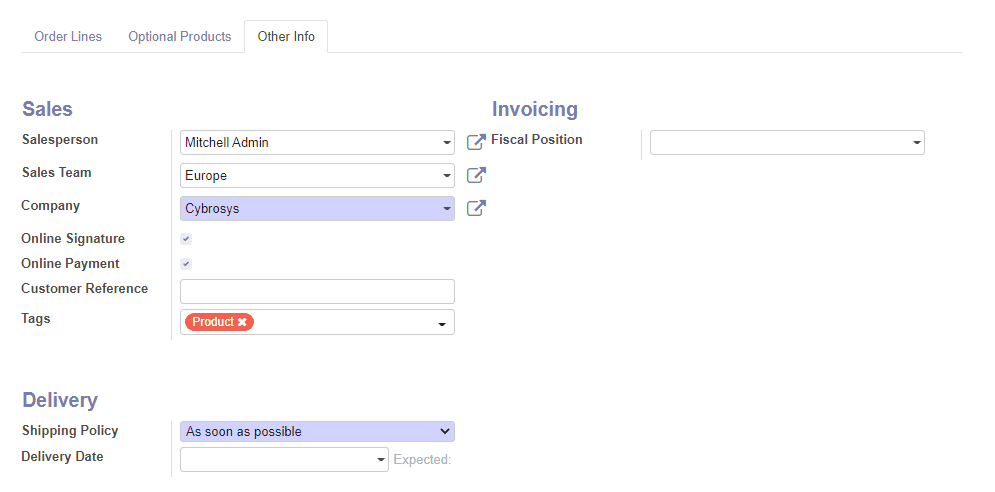
Now you can mention the product on which the lead generation was completed and it can be made under the Order linesTab. You can also have the provision to add a section and a note along with the product allocation. Moreover, the optional product allocation can be made under the Optional Product tab. Additionally, under the Additional Information tab, the sales, invoicing and delivery details can be allocated.
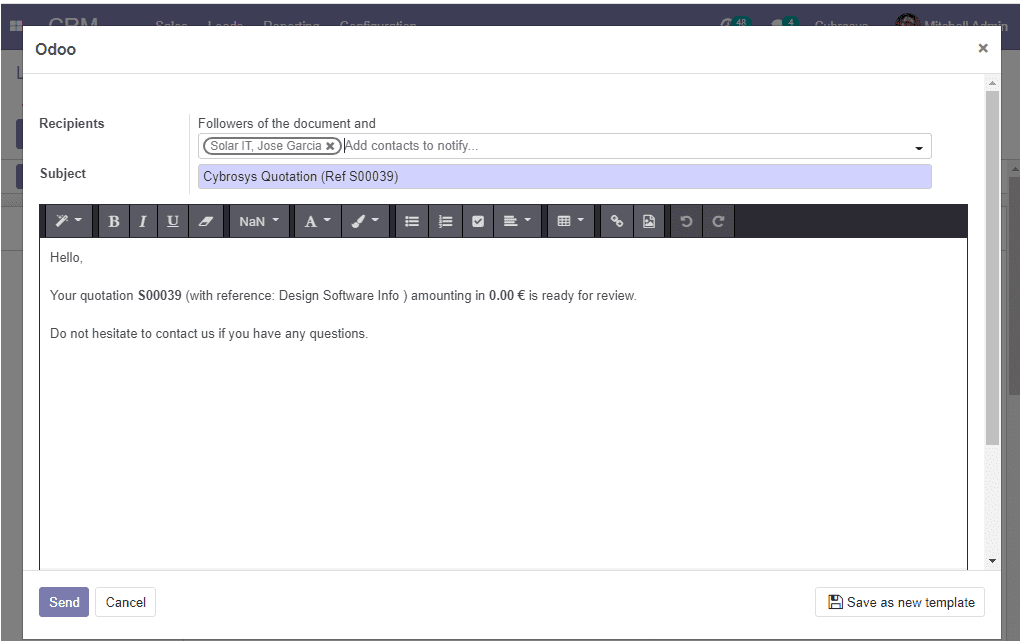
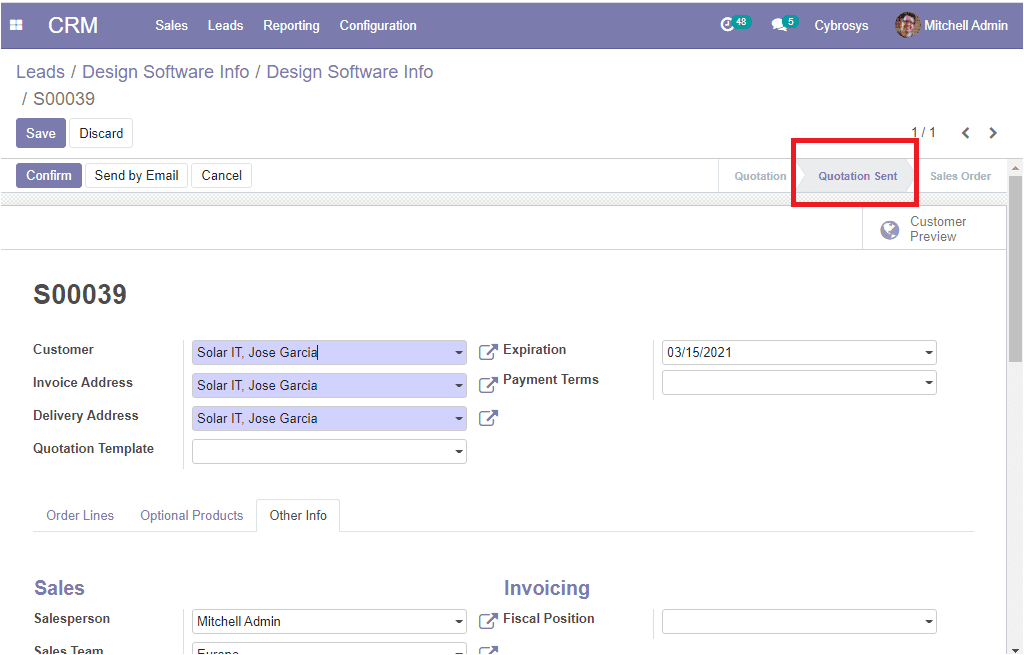
providing all the required information, you can click on the save button to save the details. Now the quotation can be sent via email to the customer by clicking on the Send by Email button available in the top left corner of the window. Now you are directed to the window as shown below where the email can be created by default with the email template that you can use to create your own unique designs.
By sending the email the status will change from quotation to quotation send as shown below image.
Now you can create a sales order by confirming the quotation.
So far we were discussing how to create sales quotations on the platform and now let us discuss how to generate leads from websites.
Generating leads or opportunities from websites
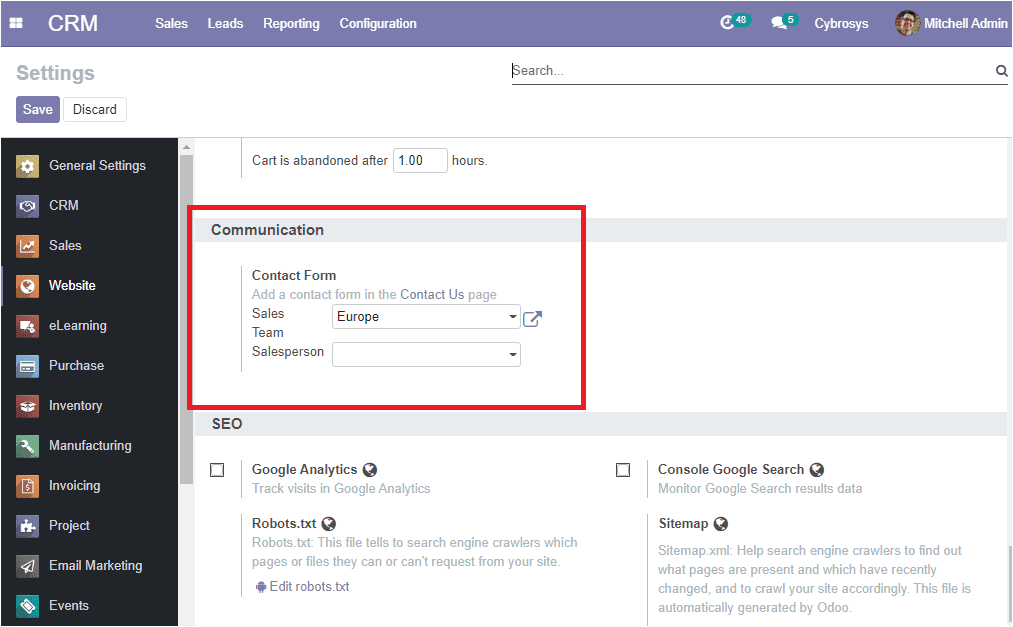
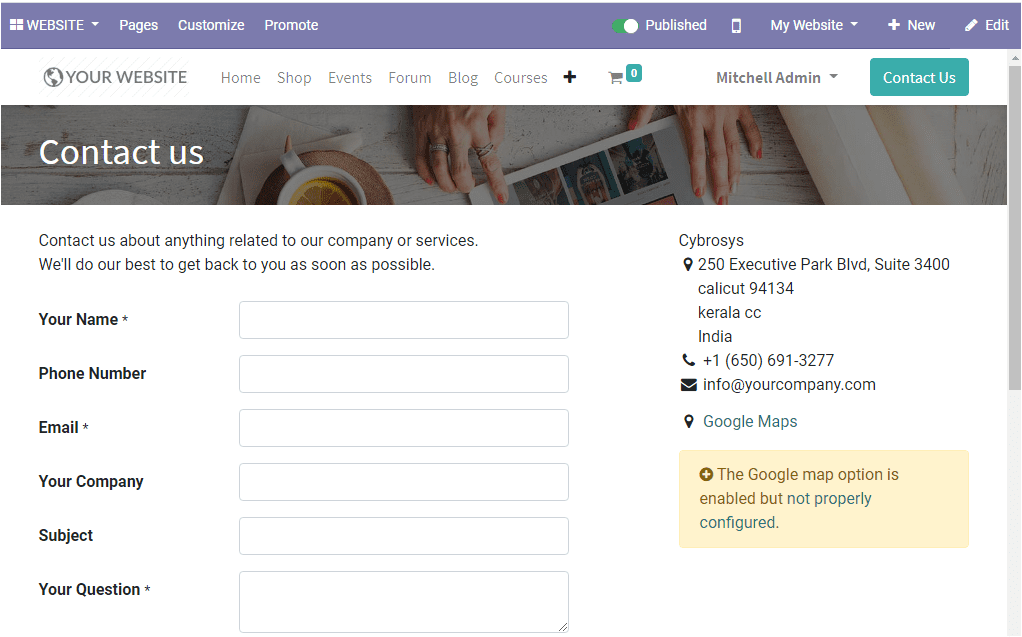
The Odoo platform provides an opportunity to generate leads from the company’s websites. This can be done based on the visitors to the company website. This feature will allow you to generate future customers based on their interests. In the settings menu of the website module, you have the option named Contact Form under the communication tab. If any of the visitors utilizing the contact form on the website will make a lead or opportunity in the pipeline.
The image of the website contact us page is depicted below where you can view the contact form.
The Odoo Customer Relationship Management module allows all types of businesses to gain an accurate and deep understanding of their customer’s needs and modify their business operations to make sure that the customers are treated in the best possible manner. Moreover, the platform helps you to see all your leads and opportunities in one place, and arranges them from one stage to another, and analyze your outcomes.

