Odoo Invoicing
The invoicing module is a well-organized and convenient module available in the Odoo platform and this module will help you to generate invoices effortlessly and send them online without any fail. This module can be easily integrated with all other modules such as Sales, Purchase, Inventory, and much more available in the Odoo platform.
The important features of this module are listed below.
- Create organized customer invoices with few steps.
- Allows you to use Incoterms, International Commercial Terms to assure you have standard terms on your contract.
- You are allowed to print a hard copy of your invoices to send by post or send by email.
- Manage recurring invoices.
- Allow customers to pay multiple currencies.
- Customizable dashboard.
- Informative reporting session.
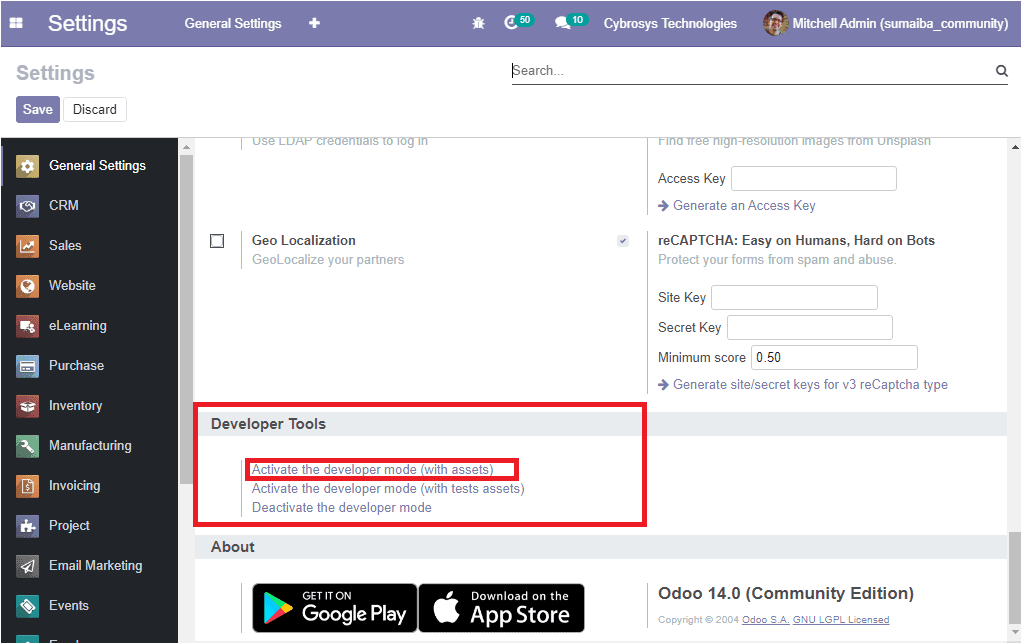
For accessing all the accounting features in the Odoo invoicing module, you should activate the developer mode from the settings as depicted in the below image.
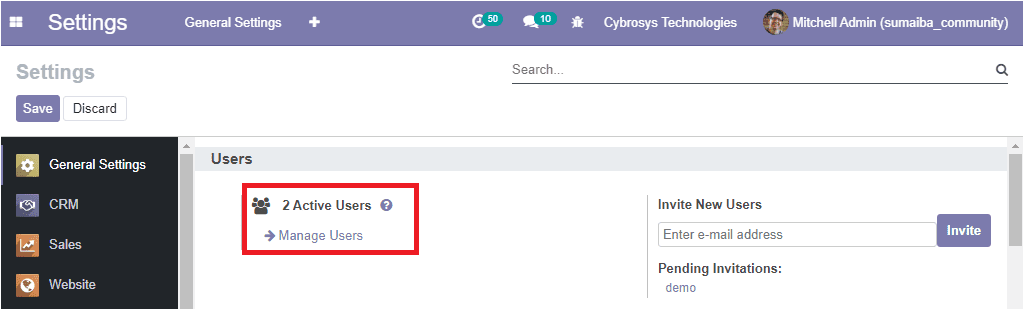
After activating the developer mode you can go to the manage user’s menu available under the Users tab of the general settings as shown below.
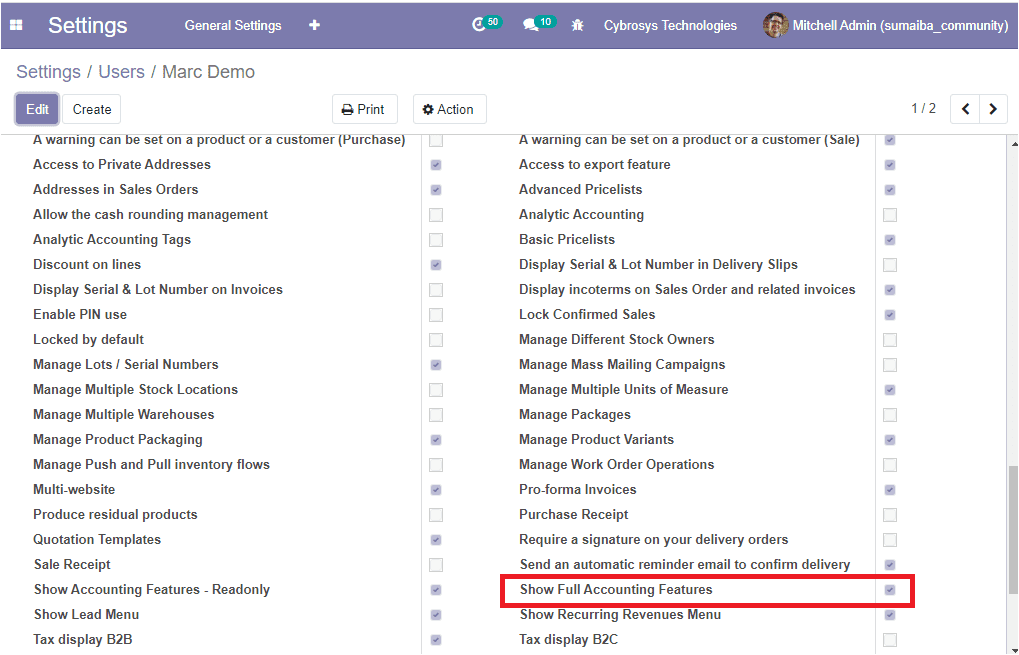
By selecting the Manage user’s menu, you will be depicted with a new window where you can view the option Show Full Accounting Features under the technical settings. You can enable this option for getting all the accounting features to your invoicing module. The image of the window is depicted below.
Now let us discuss the module in detail.
Accounting Dashboard
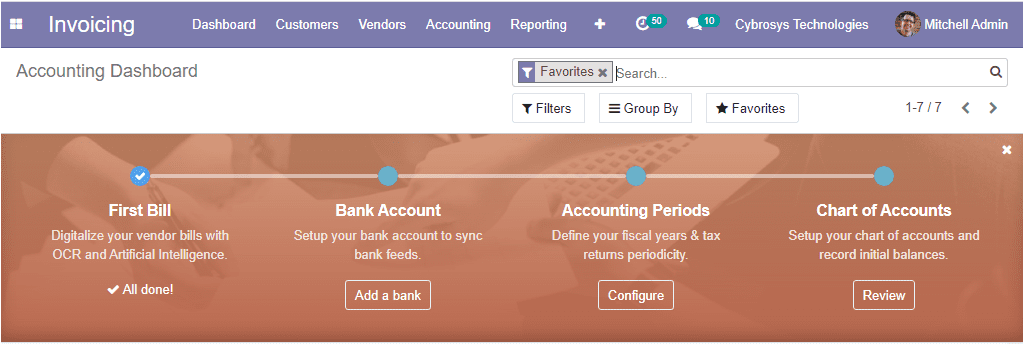
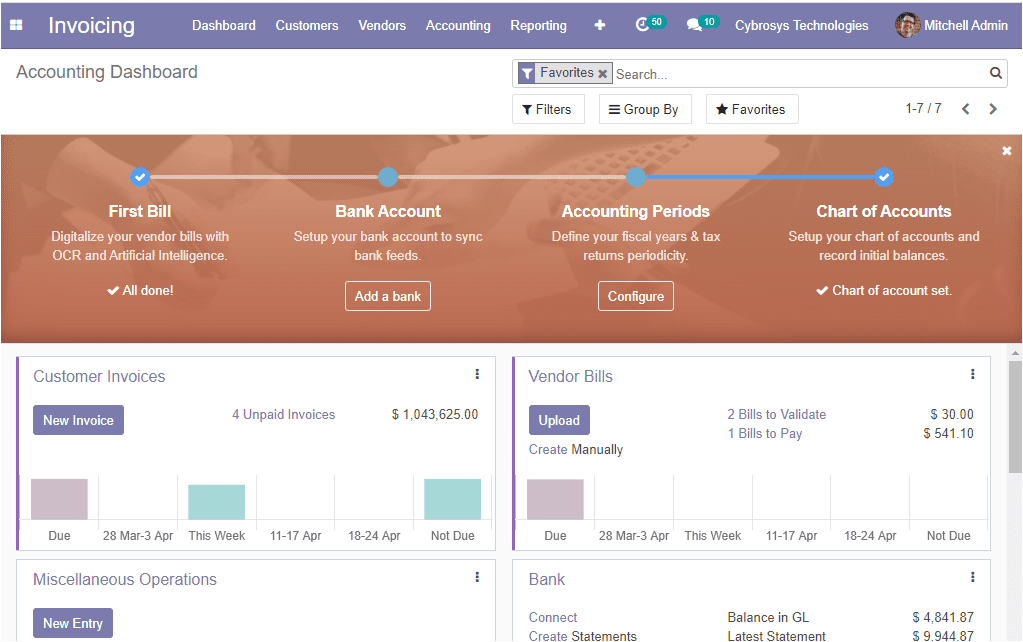
The invoicing module of the community edition allows you to manage all the accounting features of your company in a well-organized manner. When you enter the Odoo accounting module, you can view an accounting overview window as shown below where you can view a step-by-step accounting onboarding banner and it is composed of four steps as Company data, Bank accounts, Accounting periods, Chart of accounts. This onboarding banner is displayed until you select to close it. The image of the onboarding banner is depicted below.
Under the on boarding banner, you can view the advanced options and can conduct the customer invoices operations, new invoice generation, create and upload vendor bills, connect with the bank and create statements, and many more from the accounting dashboard itself. The image of the window is depicted below.
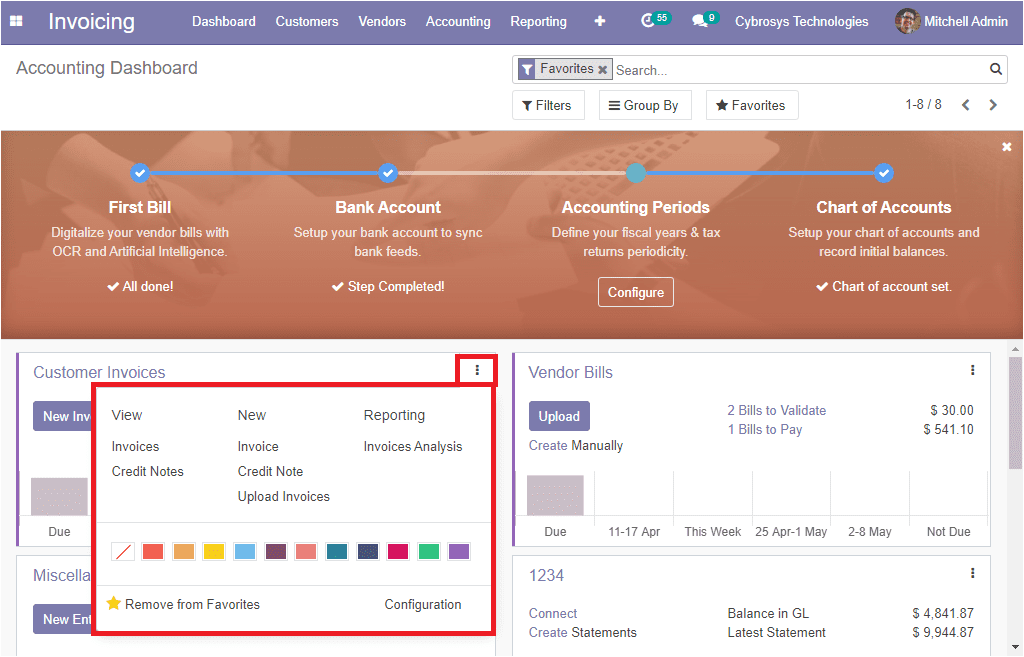
There you can view three dots available at the upper right corner of each tab. By selecting these dots you can view a new dropdown menu where you have different options such as View, New, and Reporting. Under the view option of the customer invoices tab, there are options to access the invoices, credit note windows. You can also create new invoices and credit notes under the New option available. Likewise, we can view these options under each operation.
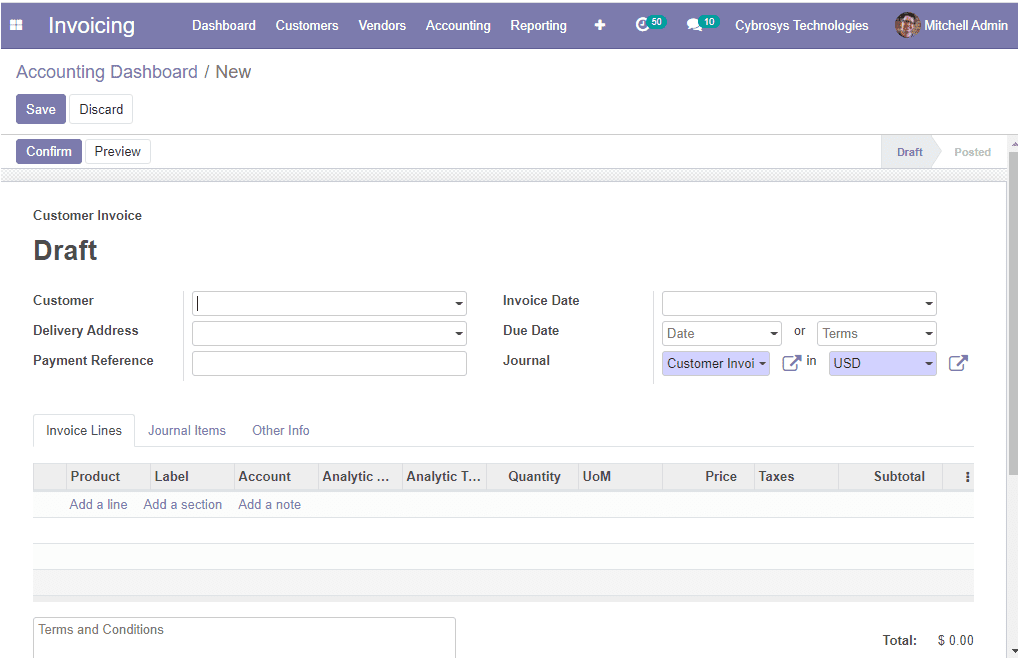
To create new invoices you can select the Create option and you will be depicted with the new creation window where you can allocate the customer from the dropdown menu, delivery address for the current invoice, and you can provide the payment reference to set on journal items. Moreover, you can specify the invoice date, due date, along with the journal entry. The image of the window is depicted below.
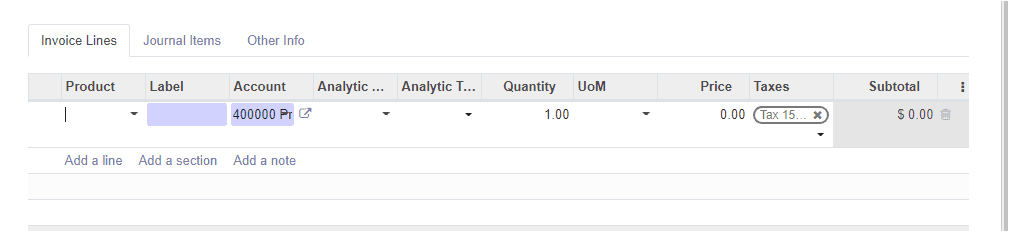
Under the Invoice Lines, you can add products with respect to the sales to the invoice by clicking on the Add a line option. You can also add a section and a note by selecting the respective option.
Under the Other info tab, you can specify the invoice details such as customer reference, salesperson, sales team, recipient bank which is the bank account number to which the invoice will be paid. If it is a customer invoice or vendor credit note, a company bank account number is needed. Otherwise, a partner bank account number is enough. Additionally, you can provide the payment QR- code. Along with these details, you can also allocate the company, incoterms, fiscal position, cash rounding method. Moreover, you can enable the option Post automatically to automatically post at its date. Also, you can enable the TO check option when you are not sure of all the related information at the time of the creation of the move and that the move needs to be checked again.
So far we were discussing the accounting dashboard and how to create new invoices in the Odoo platform. Now let us have a look at the various configurations available on the platform.
Configurations
There are so many default configuration options and various menus are available in the Odoo 14 Invoicing module(community edition) which will provide you an insight to deal with the financial sections of the company. We can discuss each one below.
Let us discuss how to configure a Chart of accounts on the platform.
Chart of accounts
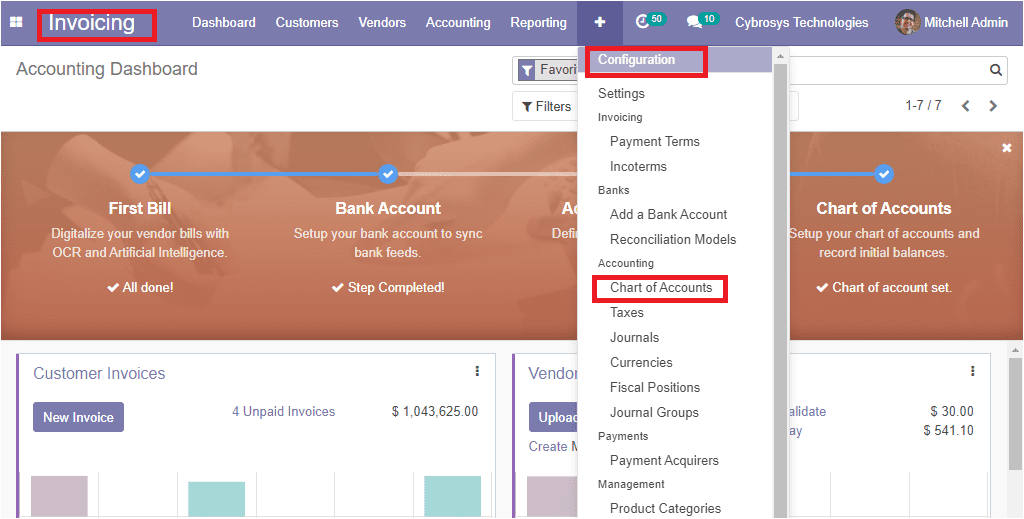
The chart of accounts is the index of all the accounts which is used in the various business operations of the company to record their financial transactions. It is an organizational tool that comprises a company’s general ledger and it will allow a company to allocate every transaction which will help you to understand where your business is making and spending money. It will segregate the revenue, expenditure, assets, and liabilities of an organization. In the Odoo platform, you have the feature and it also includes the balance sheet, or profit and loss accounts. Using this customizable feature, you can prepare a chart of accounts as per your business requirements. The chart of accounts menu in the platform can be viewed from the configuration tab of the Invoicing module.
Invoicing -> Configuration -> Chart of Accounts
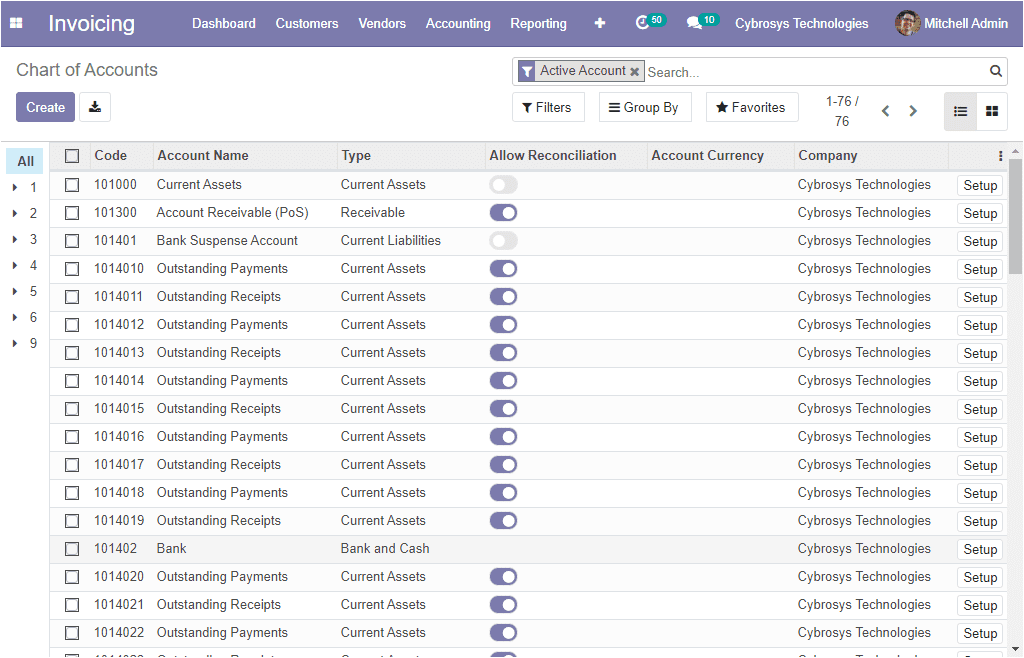
The image of the Chart of Accounts window is depicted below where you can view all the created accounts along with their code, type, company, and other details. This window can be viewed in both the list and kanban view. The various default and customizable options such as filters, group by, favorite search are also available.
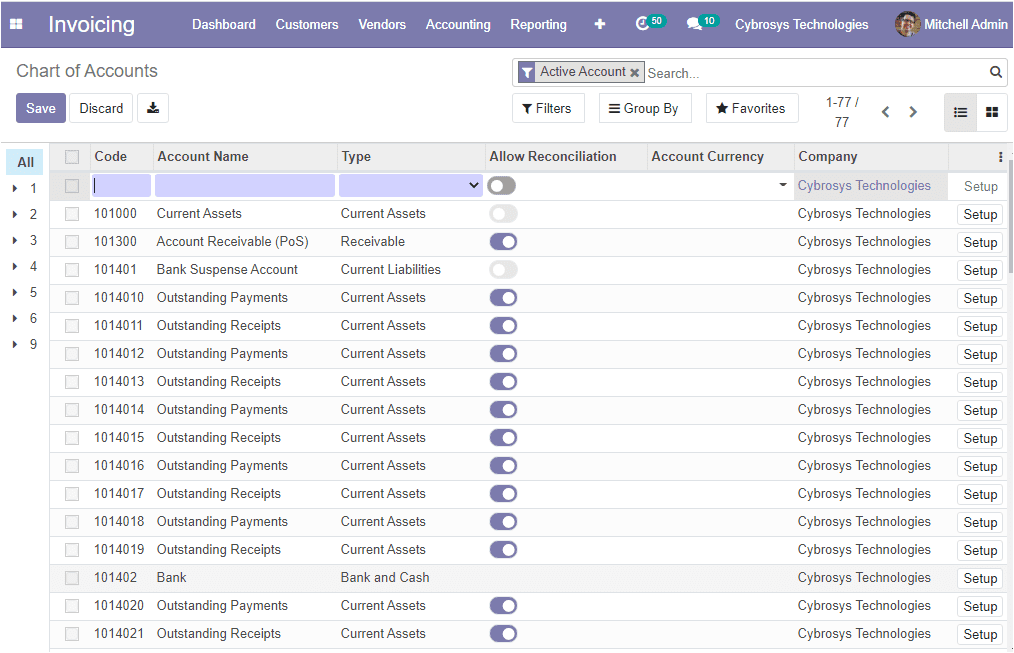
For creating a new Chart of Accounts, you can click on the Create button available on the top left corner of this window. The new one can be defined in the same menu itself by selecting the create button.
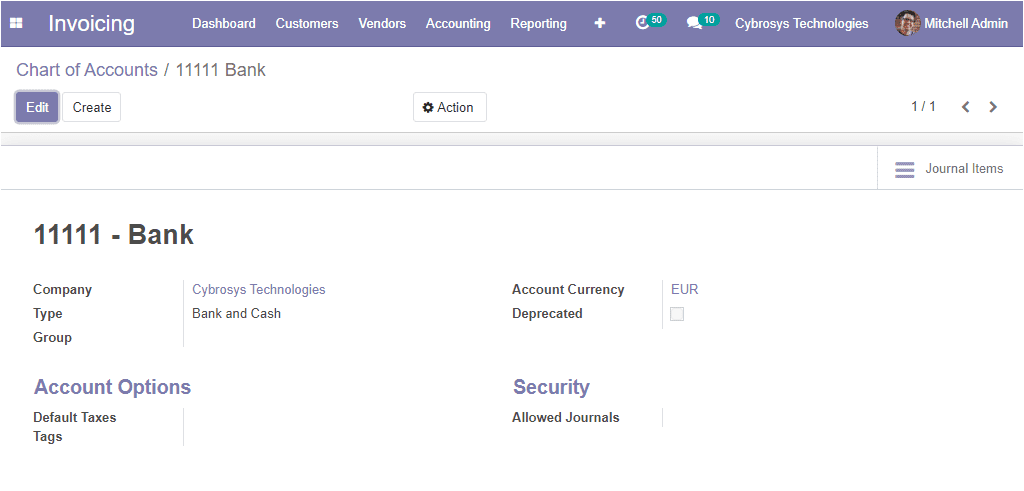
Here you can provide the code which is the identification mark of the account, account number, account type, company, let and enable or disable the option Allow reconciliation. Moreover, there is a setup window available under each of the chart of accounts and where you can provide the details to define the accounting aspects of the respective chart of account. The image of the setup window is depicted below.
As we clear on how to configure Chart of Accounts in the platform and now let us discuss the next operation Taxes and its configuration.
Taxes
Taxes are a very important aspect of a company and the Odoo platform allows you to create and configure the various taxes for your company operations and the taxes menu can be accessed under the accounting section available from the configuration tab of the invoicing module.
Invoicing -> Configuration -> Accounting -> Taxes
The image of the taxes window is depicted below.
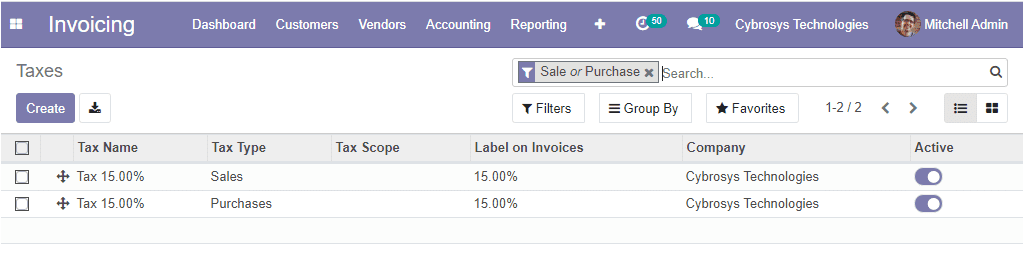
In this taxes window, you can view all the taxes described in the platform along with the tax name, tax type, label on invoices, and the name of the company.
The Odoo platform supports a wide range of tax types such as Value Added Tax (VAT), eco-taxes, federal/state/city taxes, retention tax, withholding tax, and many more. The chart of accounts that you defined is automatically preconfigured with the main taxes of the country.
Now we can discuss how to define new taxes in the platform.
The new taxes can be configured by accessing the creation window available. In the creation window, you can provide the tax name, allocate tax computation from the drop-down menu, along with the tax scope, tax type, and amount. The tax scope defines where the tax is selectable which means with sales, purchase, or none and none means the tax cant to be used by itself. However, it can still be used in a group. Using the tax scope option we can restrict the use of taxes to a type of product. There are four different types of tax computations available under the tax computation option. Which are the group of taxes, fixed, percentage of the price, percentage of price tax included. Moreover, you have the option active and you can set active to false to hide the tax without removing it.
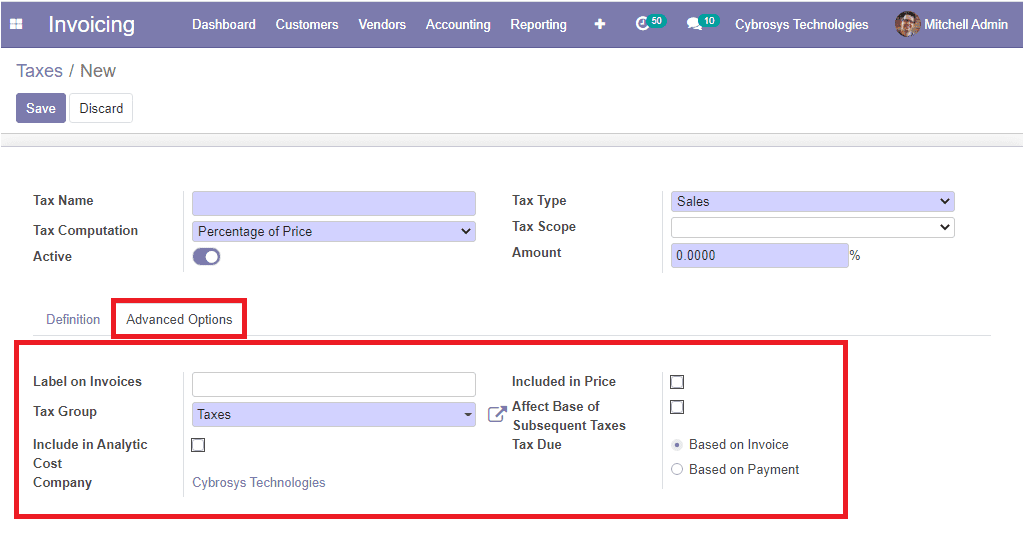
Under the definitions tab, the taxing rule for the distribution of invoices and credit notes can be configured.
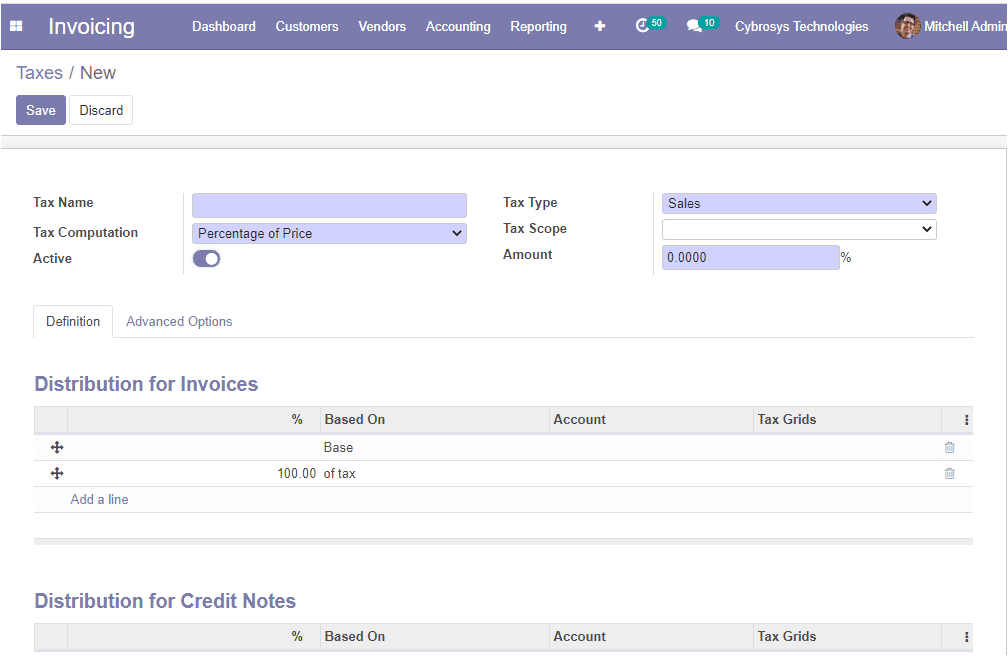
Based on Invoices: the tax is due as soon as the invoice is validated.
Based on Payment: the tax is due as soon as the payment of the invoice is received.
So far we were discussing the tax configuration in the platform and now let us move on to the next feature Fiscal positions in the platform.
Fiscal positions
The fiscal position is an advantageous accounting feature and it is also available on the Odoo platform. It is this feature that helps you to place the tax according to the country’s tax policy. By configuring this feature you can operate with multiple currencies and company operations. By using this feature you can configure the taxes and the accounts specific to the country or region of operation.
The fiscal positions menu in the platform can be accessed from the configuration tab of the module.
Invoicing -> Configuration -> Accounting -> Fiscal position.
The image of the fiscal position window is depicted below where you can view all the fiscal positions defined in the platform along with the company of operation.
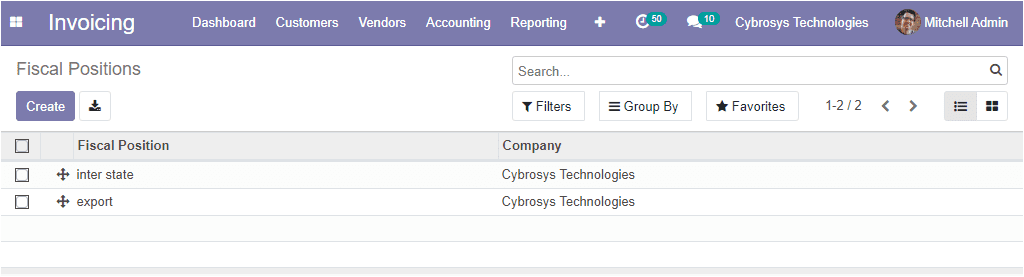
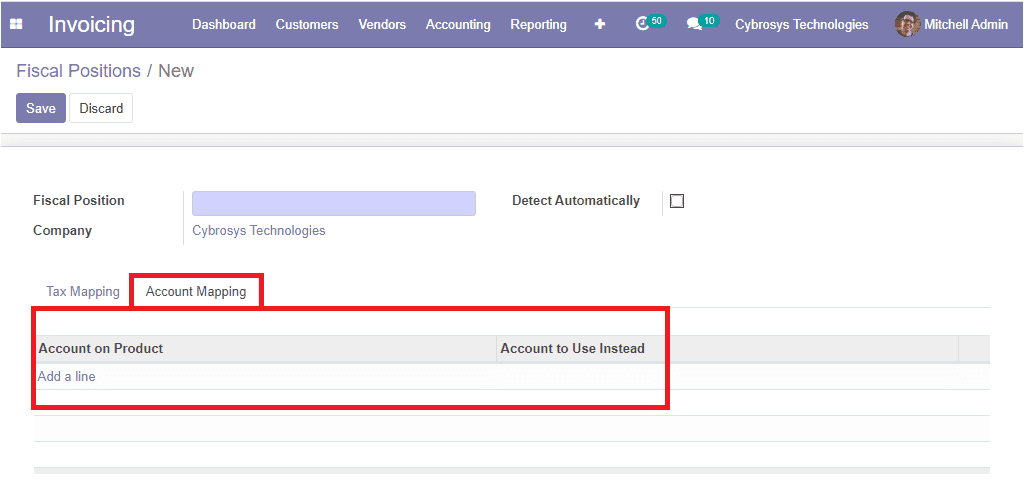
In this window, you are provided with all the customizable and default options and you have the provision to edit the details by selecting the respective one and you can also possible for creating a new one by selecting the Create icon available. The image of the creation window is depicted below.

In this fiscal position creation window, you can provide the name for the fiscal position, allocate the company and you can check the box near the option Detect Automatically to apply automatically this fiscal position.
Under the Tax Mapping tab, you can define a mapping by selecting the add a line option available. You can provide a tax on products and a tax to apply for the fiscal position. Likewise, the account mapping can also be defined under the Account Mapping tab.
So far we were discussing the fiscal positions in the platform and now we can discuss how to configure the journals in the platform.
Journals
The journals are the effective data recording aspect of the accounting operations as regards the transactions conducted. In the Odoo platform, all the financial documents associated with a company are recorded as journal entries. It is the record of transactions ordered by date.
The journal menu in the platform can be accessed from the configuration tab of the invoicing module.
Invoicing -> Configuration -> Accounting -> Journals.
The image of the journal’s window is depicted below.
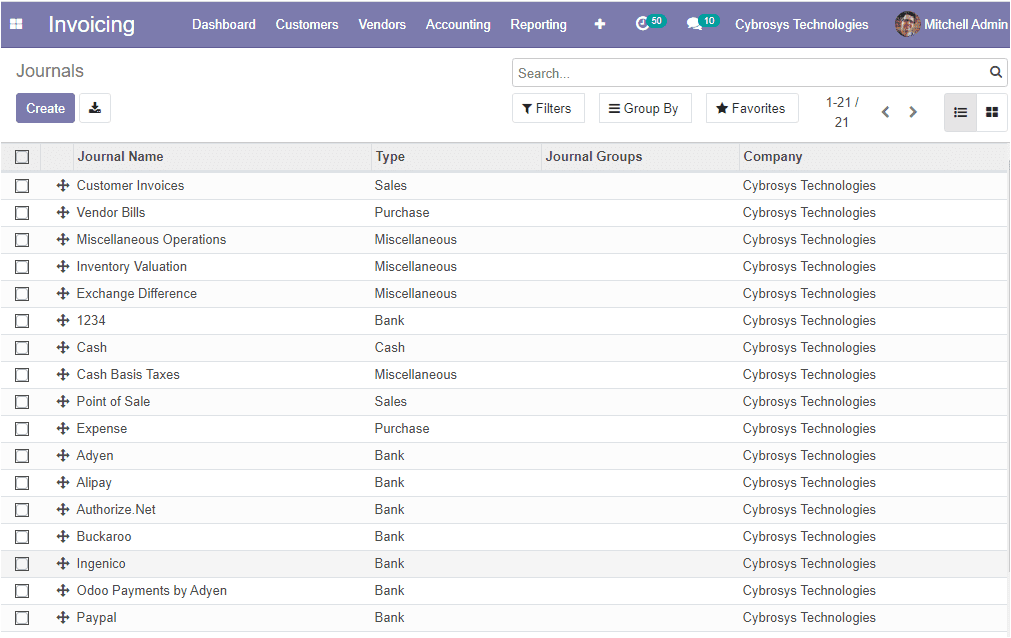
In this journal window, you can view all the journals described in the platform along with the journal name, type, and company. You also have the provision to create a new one by selecting the create icon. The image of the creation window is depicted below.
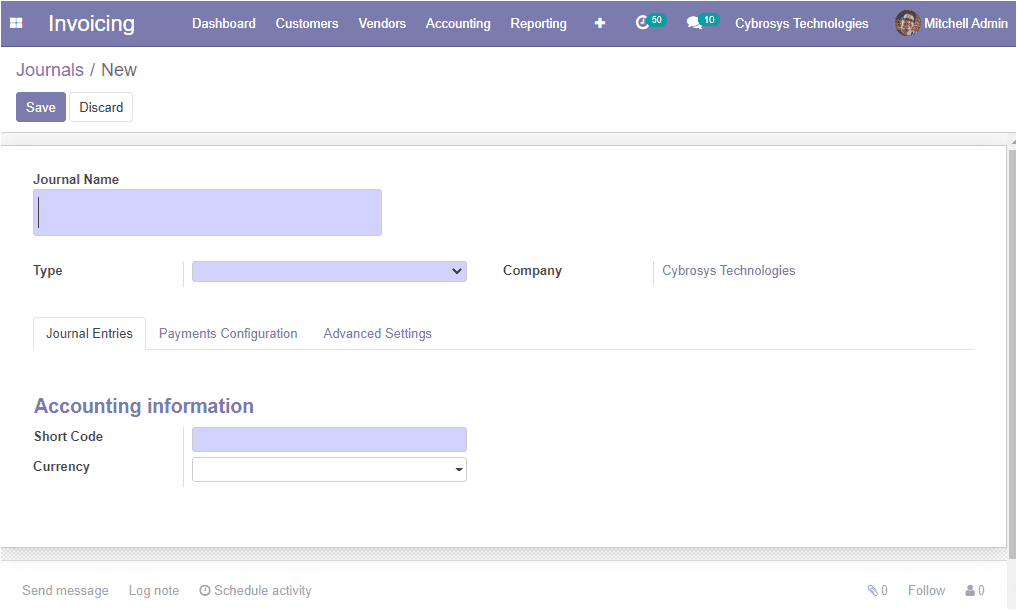
In this journal creation window, you can provide the journal name, allocate journal type from the dropdown menu. You can select the sales for customer invoices journals and the purchase can be selected for the vendor bills journals, select cash or bank for journals that are used in customer or vendor payments. Additionally, you can specify the company related to this journal.
Under the Journal Entries tab, you can allocate the accounting information such as Shortcode which is the shorter name used for the display. The journal entries of this journal will also be named using this prefix by default. Also can define the Currency used to enter a statement.
Under the Advanced Settings tab, you can provide the Control – Access information such as Allowed account types, allowed accounts. Also, you can enable or disable the option Lock posted entries with hash. If you are enabling this option, the accounting entry or invoice receives a hash as soon as it is posted and cannot be modified anymore.
Now let us discuss the journal types.
Journal types
All the journal entries of this module should be configured for the operation under the journal types defined. That means by giving a journal type on journal entries you are specifying that the current journal comes under an accounting document. Here in the Odoo platform, the journal type can be defined under the journal types menu available from the configuration tab of the invoicing module.
Invoicing -> Configuration -> Accounting -> Journal groups.
The image of the journal group window is depicted below.
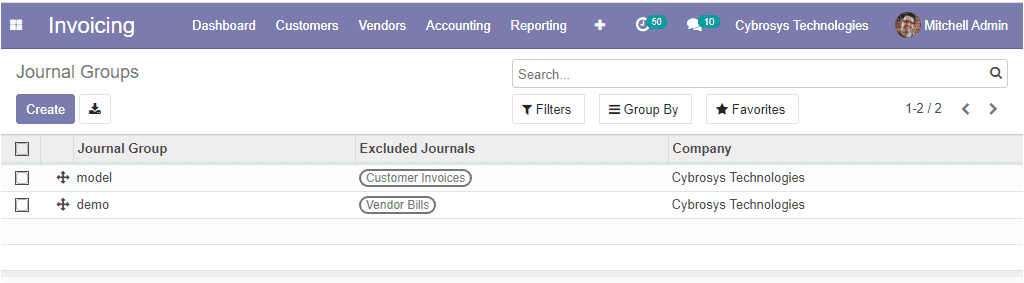
In the Journal group window, you can view all the journal entries defined in the platform and you can create a new one by using the create icon available in the window.
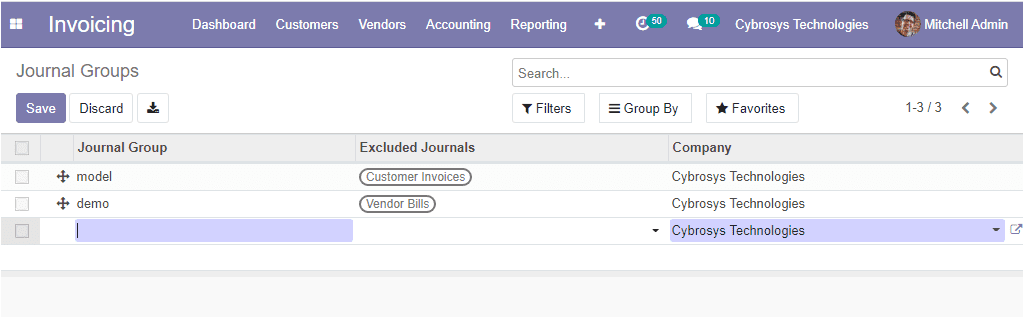
You can allocate the new one in the same window along with the details such as journal group name, the excluded journals, and the company related to this operation.
As we clear on the feature Journal Types available in the platform and now let us discuss another feature Incoterms.
Incoterms
The Incoterms are the fifteen trade terms of sales published by the International Chamber of Commerce ( ICC ) and it is accepted worldwide in an allocation of cost and responsibilities between the seller and the purchaser. These international commercial terms (incoterms) can be used in both international and domestic trade contracts. This feature can be accessed from the configuration tab of the invoicing module. The image of the Incoterms window is depicted below where you can view all the incoterms defined in the platform along with the name and the code.
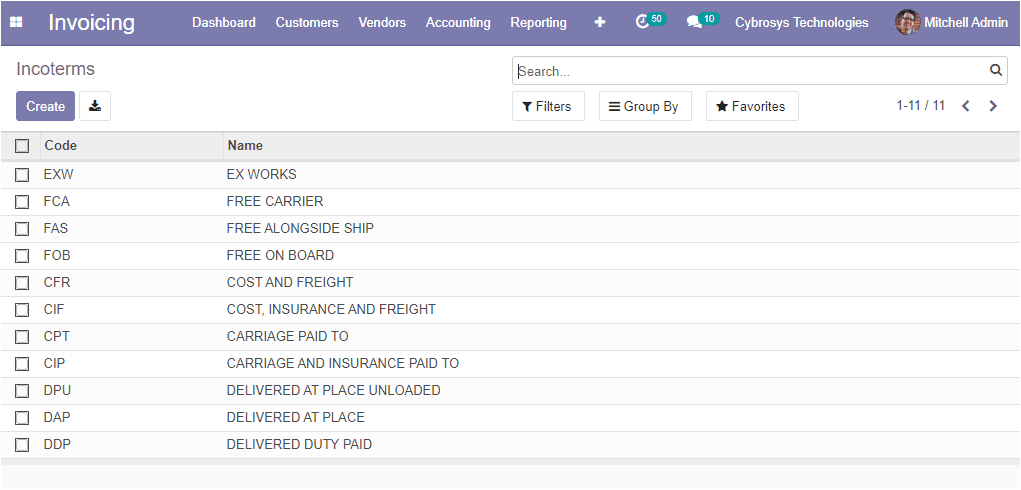
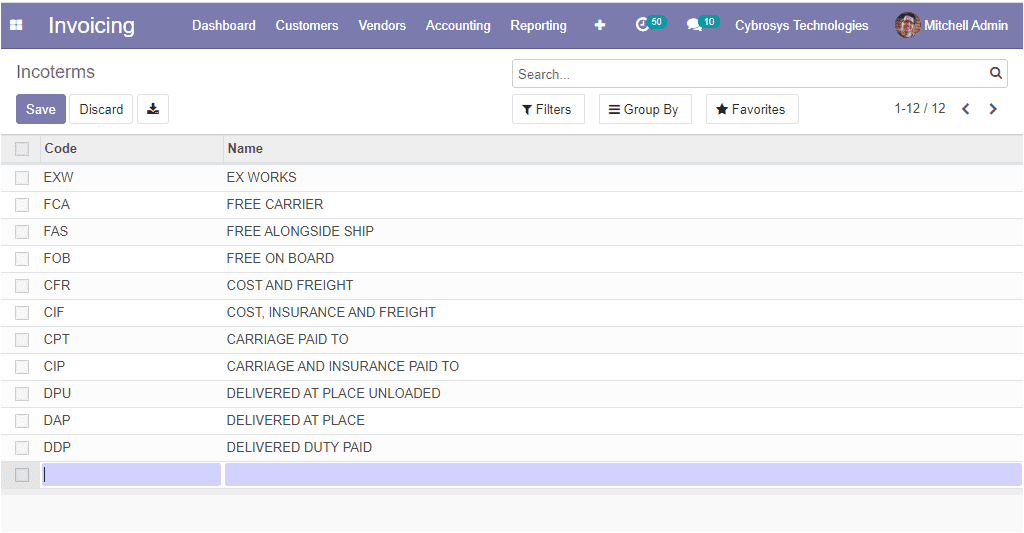
You have the provision to create a new one and this can be done in the same window itself by clicking on the create icon.
The created incoterms must be reliable for all the business operations. Now we are clear on the incoterms in the platform and now let us discuss the configuration of Payment terms.
Payment terms
The payment terms are the various conditions followed by the customer and the supplier to make payments for the product and services. It can be applied to both supplier bills and customer invoices. One of the examples for defining payment terms is to pay 60 percent within 7 days and the remaining balance can pay within 30 days. The Odoo platform allows you to describe the various payment terms and the menu can be accessed from the configuration tab of the module.
Invoicing -> Configuration -> invoicing -> Payment terms.
The image of the window is depicted below.
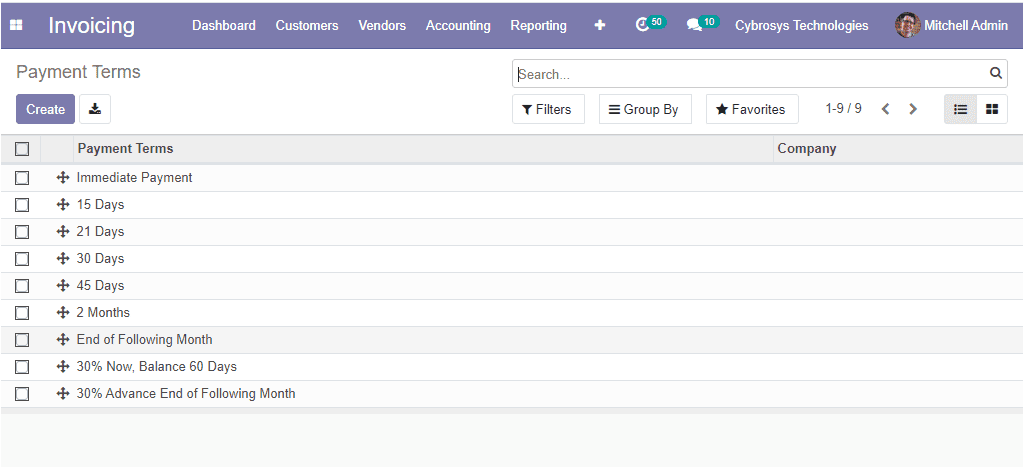
Here in this payment terms window, you can view all the described payment terms in the platform and you can create a new one by selecting the Create icon available.
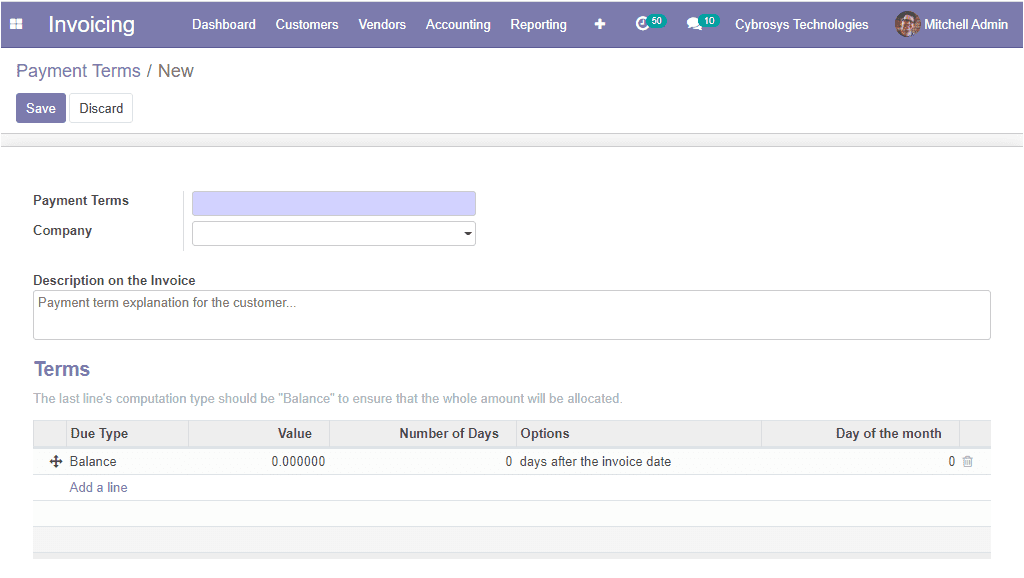
The image of the payment terms creation window is depicted below where you can provide a name for the payment terms and you can allocate the company where this payment terminology should be used if you have multiple companies. The descriptions that should be mentioned on the invoice which is the payment term explanation for the customer can be provided in the allocated box.
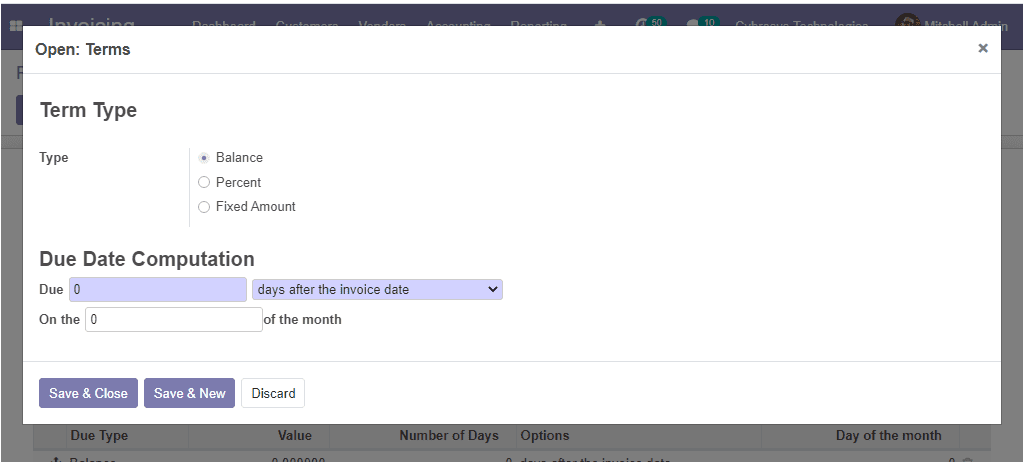
Additionally, you can define the terms by selecting the Add a line option where you will be depicted with a new pop-up window for creating terms. In the pop-up window, you can mention the term type. It can be allocated as balance, percentage, or fixed amount. You can select the term type depending on your business requirements. Moreover, the due date computation can be defined. It can be made based on the day after the invoice date, day after the end of the invoice month, last date of the following month, or last date of the current month, and this can be selected from the dropdown menu available. Then you can select the save & close button to add the terms to your payment terms window.
So far we were discussing the configuration of Payment terms in the platform and now let us move on to the analytical account option available.
Analytical accounting
The analytical accounting feature in the Odoo platform can be used in business to track and record the financial aspect of the majority of sectors inside a company such as sales, purchase, and invoicing and the various financial aspects included to find out where the funds of the company are being spent and are retained. The Odoo Analytic Accounting allows you to create Analytic accounts, Analytic Tags without creating more accounts in the Chart of accounts. This feature can be used for various requirements such as analyzing the cost of the company, reinvoicing the time to a customer, and analyzing the performance of a service or project.
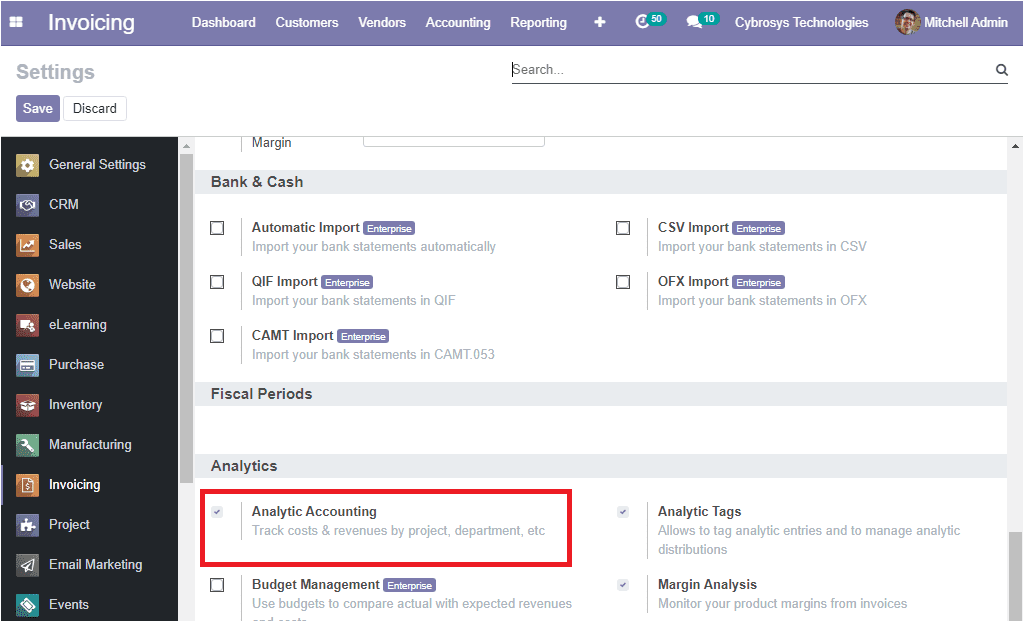
The analytical accounting feature in the Odoo platform can only be accessed if you enable the Analytic accounting option available under the Analytics tab of the settings menu.
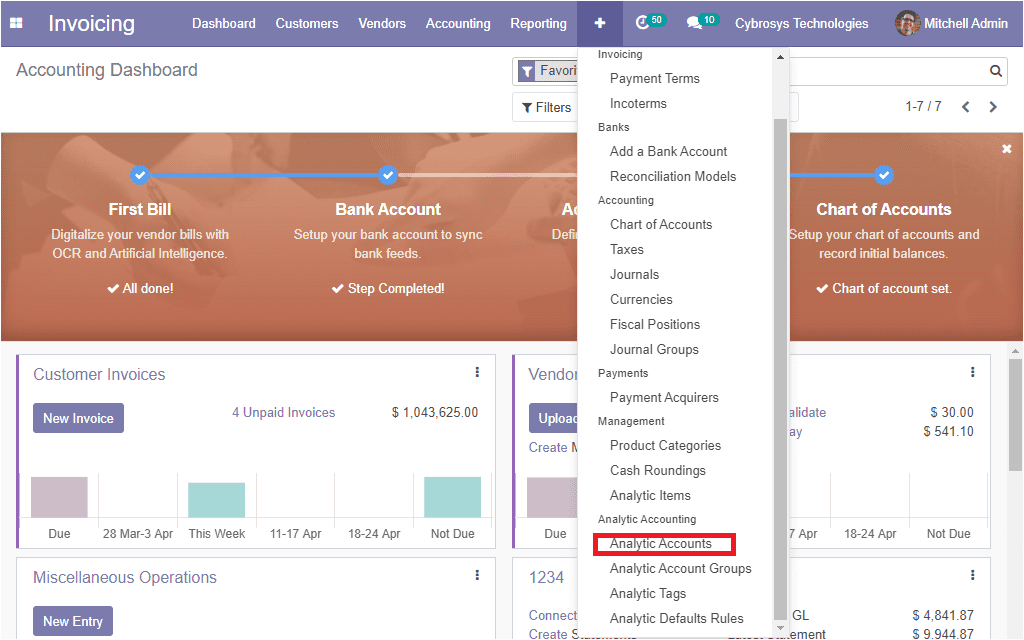
Now the analytical accounts menu can be accessed from the configuration tab of the invoicing module as depicted in the below image.
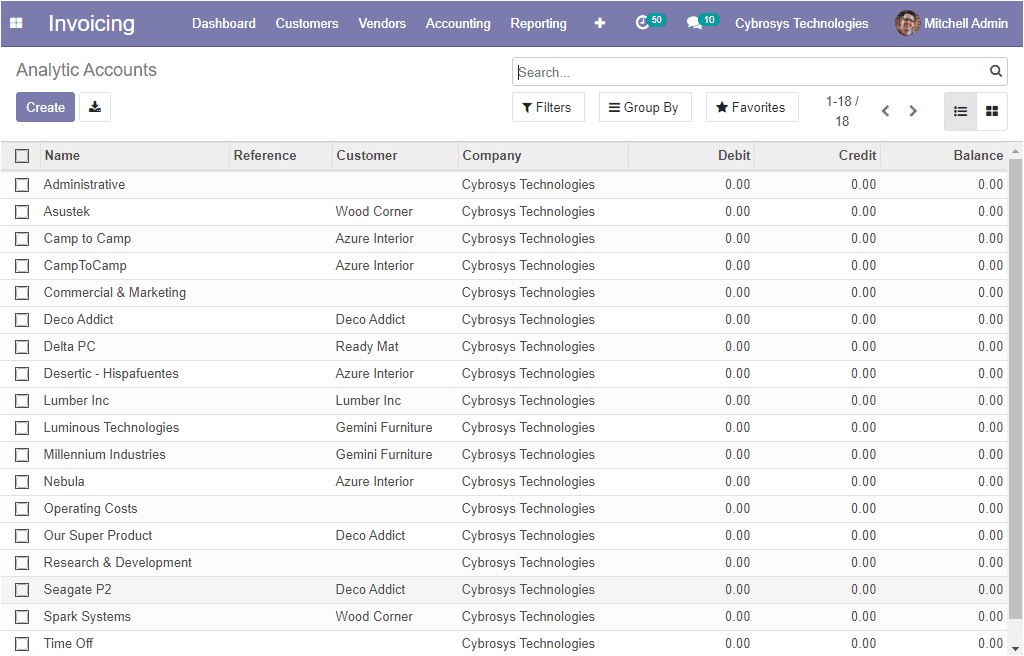
On selecting the Analytic accounts menu you will be directed to the Analytic Accounts window as depicted below where you can view a list of all the created analytic accounts along with the name, customer, company, debit, credit, and balance. It is possible to edit them by selecting the edit button.
You can create a new Analytics Accounts by selecting the Create icon available. The image of the creation window is depicted below.
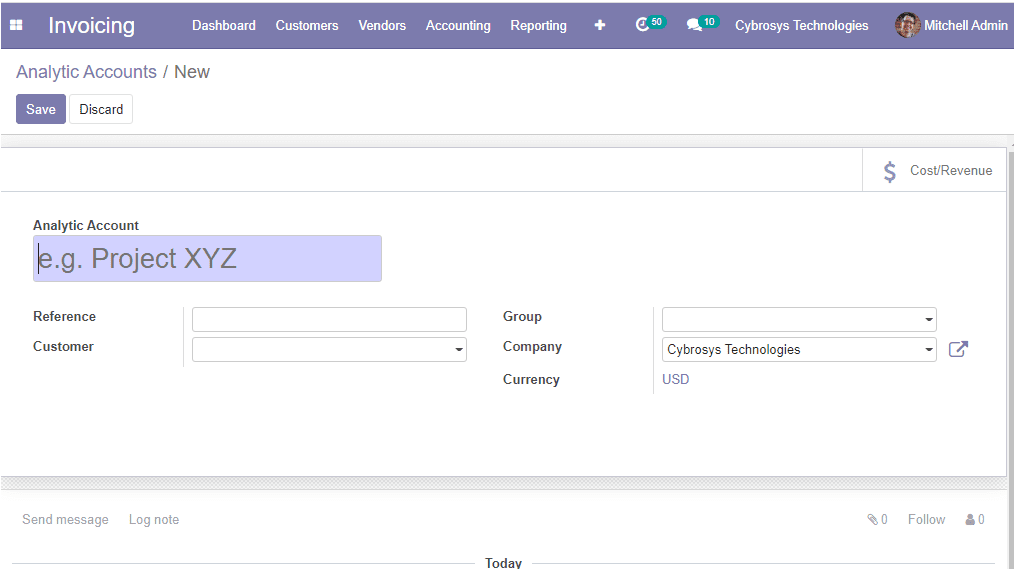
In the creation window, you can provide the name of the analytic account along with the reference number and the customer details. Moreover, you can allocate a group, a company related to this operation, and the currency. After providing all the fields you can save the details by selecting the Save icon available.
So far we were discussing the Analytic Accounts window available in the platform and now let us move on to the Analytic tag option available in the module.
Analytic Tags
In the Odoo invoicing module, you have the option Analytic tags, and the expense and profits can be distributed among the different analytical accounts using this feature analytic tag. The analytic tags window in the platform can be accessed from the configuration tab of the invoicing module.
Invoicing -> Configuration -> Analytic accounting -> Analytic tags.
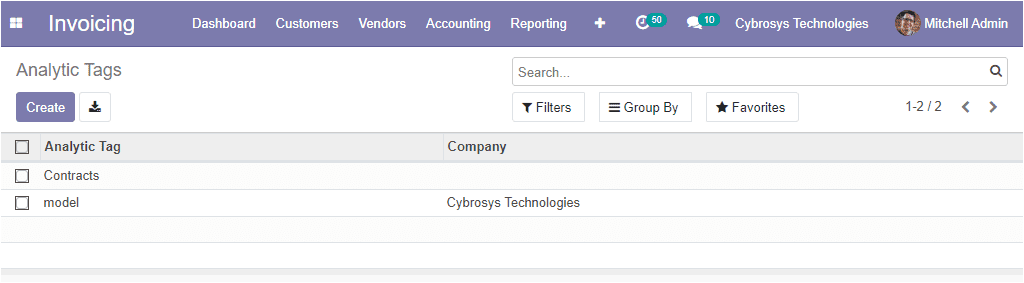
The image of the Analytic tags window is depicted below where you can view all the analytic tags described in the platform.
On selecting the Create icon you can create new analytic tags and the image of the creation window is depicted below.
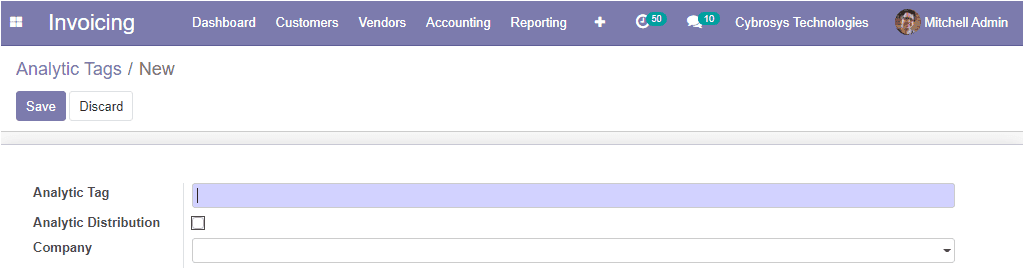
Here in the creation window, you can allocate the name of the tag, enable the analytical distribution option and specify the company.
As we are clear on the Analytic tags option available in the platform and now let us move on to the next section.
Customer invoice to payments
In the Odoo platform, you have the provision to follow different approaches to automate the customer invoice creation based on your business and the application you use. Generally, draft invoices are made by the framework ( data originating from different reports like sales orders or contracts) therefore the accounts can easily approve or validate the draft invoice and send the solicitations in batch (by customary mail or email).
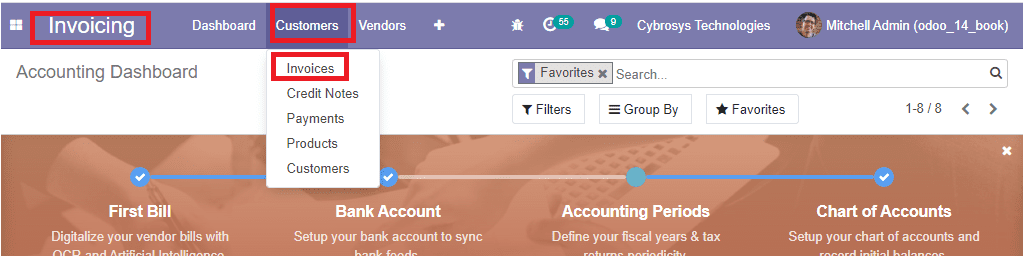
It is possible to create customer invoices directly from the dashboard by accessing the Invoices button available under the Customers tab.
Invoicing -> Customers -> Invoices.
The image of the window is depicted below.
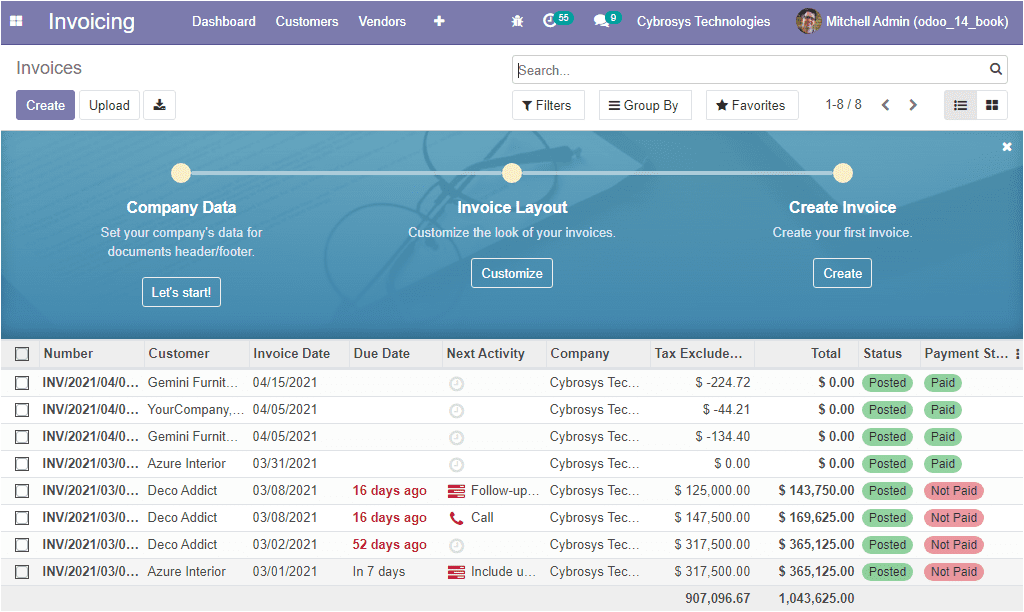
On selecting the Invoices menu you will be navigated to the Invoices window where you can view all the invoices described in the platform along with the reference number, Customer details, Invoice date, Due date, Next activity, Company, Tax excluded, Total amount, Status, Payment status. The image of the window is depicted below.
In this window, you can view a Create icon on the top left corner. By selecting this icon you can create new invoices. The image of the creation form is depicted below.
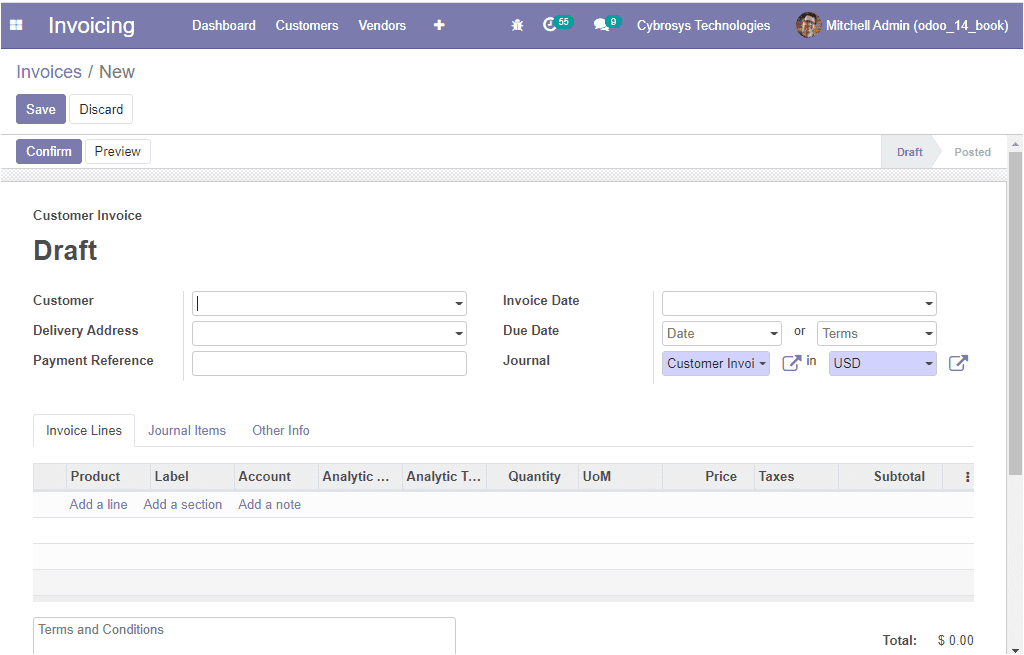
Here in this window you can allocate the Customer details using the drop-down menu and provide the Delivery address along with the Payment Reference. Moreover, the Invoice date, Due date, Journal can be specified under the respective field.
Under the Invoice lines tab, you can add the products which the customer intends to buy via clicking on the Add a line option available. It is also possible to add a section and a note by selecting the respective tab.
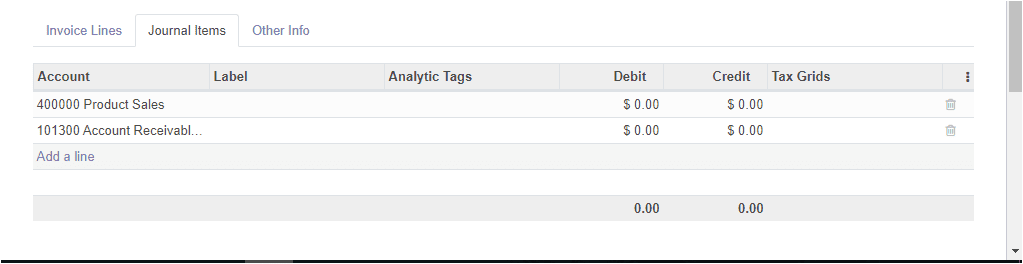
Moreover, you can add a journal item by selecting the Add a line option available under the Journal Items tab.
Now let us move on to the Other Info tab available in the invoices window. Under this tab, you can provide the Invoice, Marketing, and Accounting details. In the Invoices field, you can allocate Customer Reference, Salesperson, Sales Team along with the Payment QR-code and Recipient Bank. Recipient Bank is the bank account number to which the invoice will be paid. As for the Marketing details, you can define the type of Campaign. This is a name that helps you keep track of your different campaign efforts like Christmas specials. Also can allocate the Medium using the dropdown menu. It is the method of delivery such as banner, email, direct, and many more. Moreover, you can specify the Source of the link such as the search engine, another domain, or name of the email list, and so on. Finally, you can mention the Accounting details such as the Company related to this journal, Incoterms, Fiscal position using the dropdown menu.
Additionally, you can specify the Cash Rounding Method. Finally, you can check the box near the option Post Automatically. So the entry will be automatically posted at its date. At last, you have one more option named To check. This option means that the user was not sure of all the related information at the time of the creation of the move and that the move needs to be checked again. After filling in all the required information you can select the Save button to save details. Then you can click on the Confirm button. Now the status will change from Draft to Posted. The image of the window is depicted below.
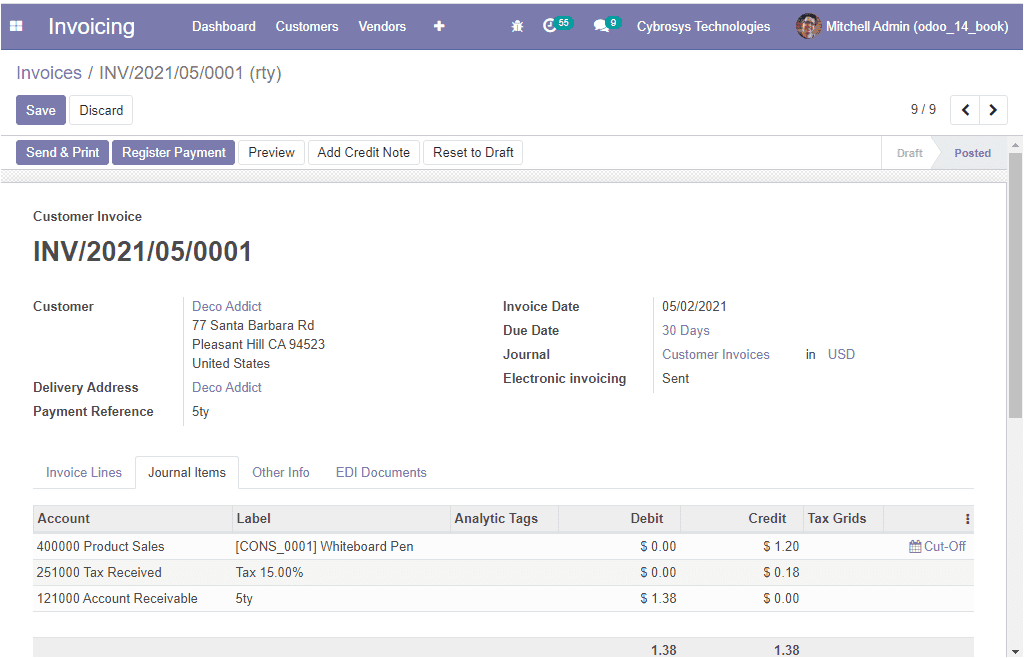
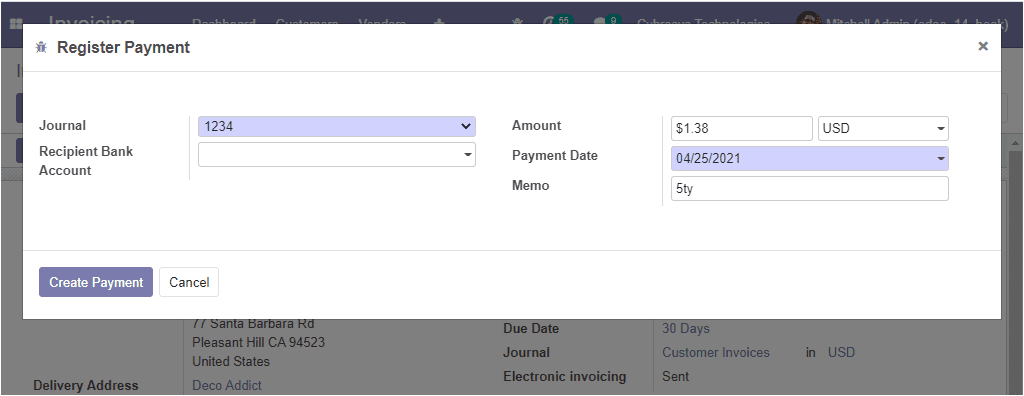
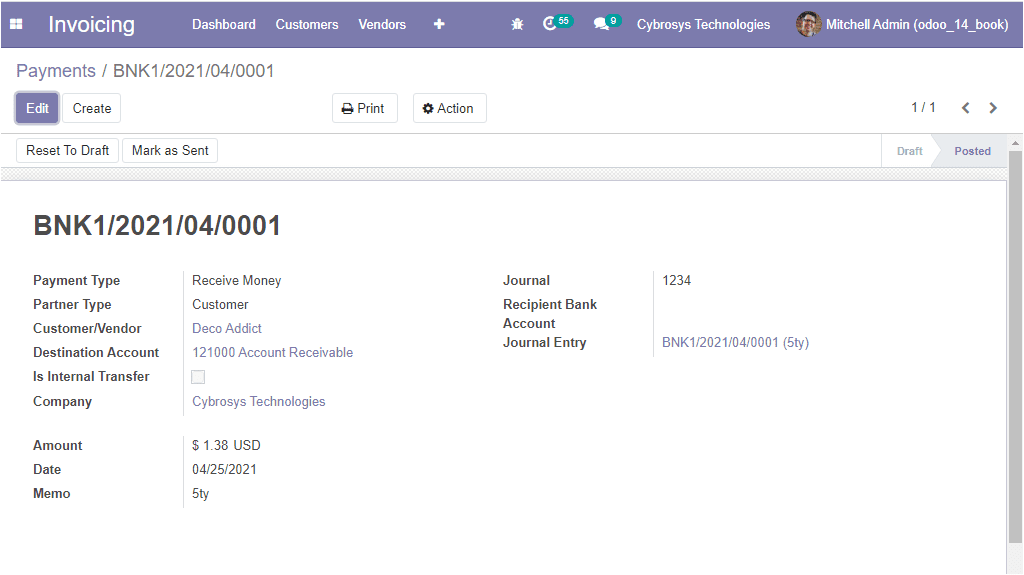
In the above window, you can view different tabs on the top window named Send & Print, Register Payment, Preview, Add Credit Note, Reset to Draft. If you click on the Register payment button, you will be navigated to a Register payment window where you can describe the details. You can define the Journal, Recipient bank account along with the Amount date, Payment Date, Memo. after entering all the required details you can select the Create Payment icon.
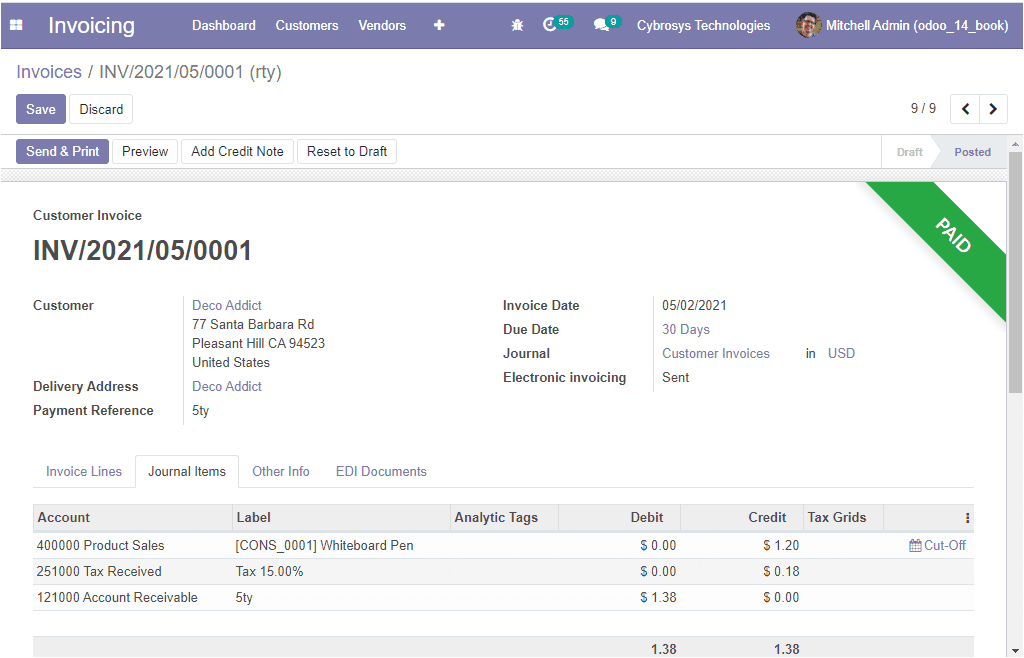
By selecting the Create Payment button you will be directed to a new window where you can view a green tag with Paid status. This means the invoice has been paid for. The image of the respective window is depicted below.
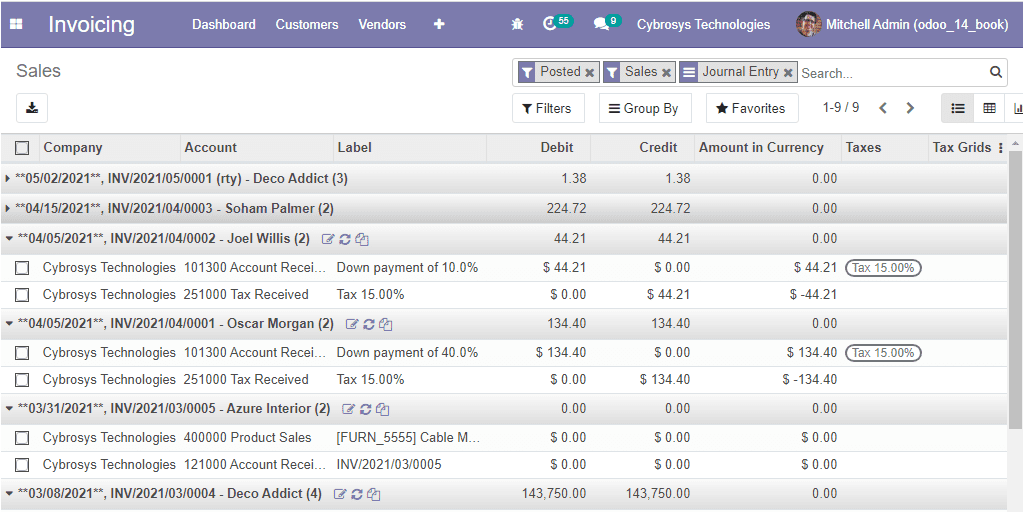
Now you can go to the Sales window of the invoicing module. It can be accessed from the accounting tab. Here in this window, you can view the journal entry that was automatically created for the invoice. The image of the window is depicted below.
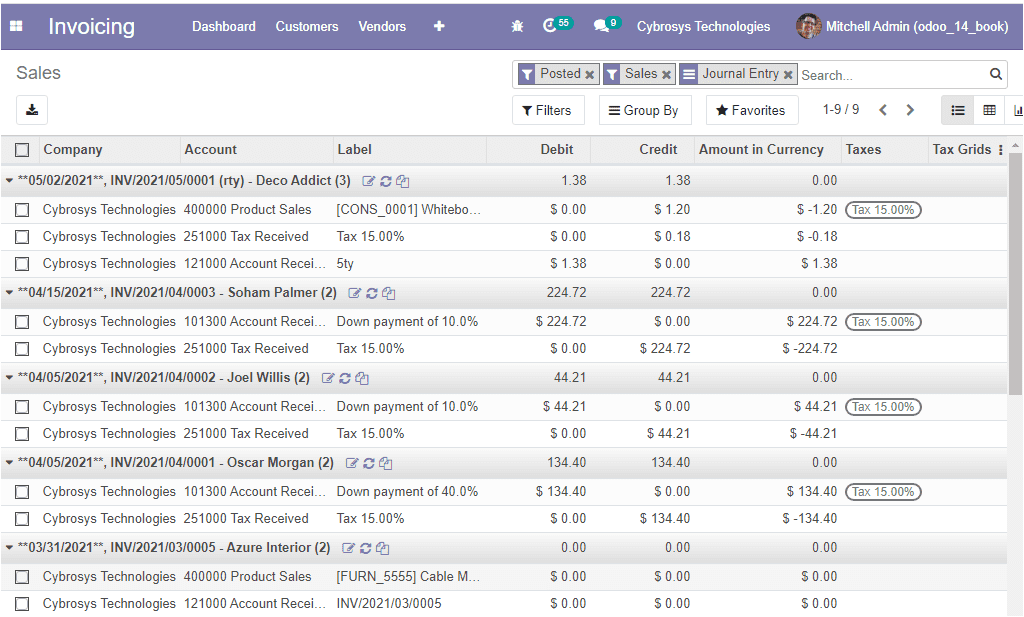
You can click on them to get the journal entry with debit and credit balanced.
Now you can view the payment details under the Payment window available in this module. The window can be accessed by taking the route Invoicing -> Customers -> Payments.
The image of the window is depicted below.
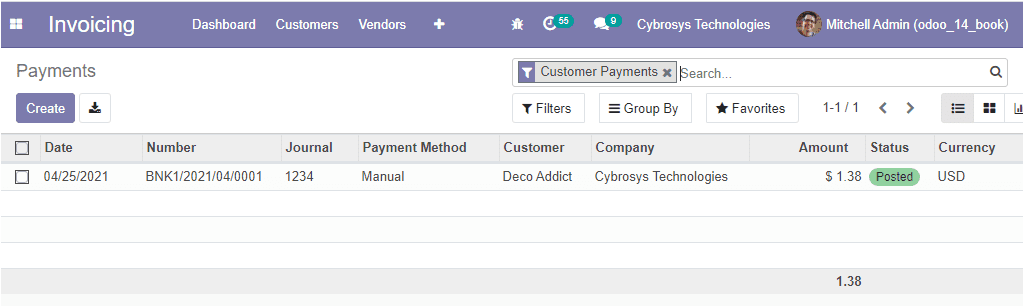
Here in this window you can view the invoice payment details such as Payment Method, Journal, Customer and Company name, Date, Number, Amount, Status, and Currency.
So far we were discussing the Invoice creation and Payments available in the module and now let us discuss the feature of Cash rounding in the platform.
Cash Rounding Methods
Cash rounding is one of the available features in Odoo which allows you to round the total amount of a bill to the nearest full figure. It happens when the base unit of an account is smaller than the most reduced denomination category of the currency. The amount that is required to be paid is adjusted to the closest variety of cash units accessible, through exchanges paid in different ways such as checks, credit cards are not adjusted.
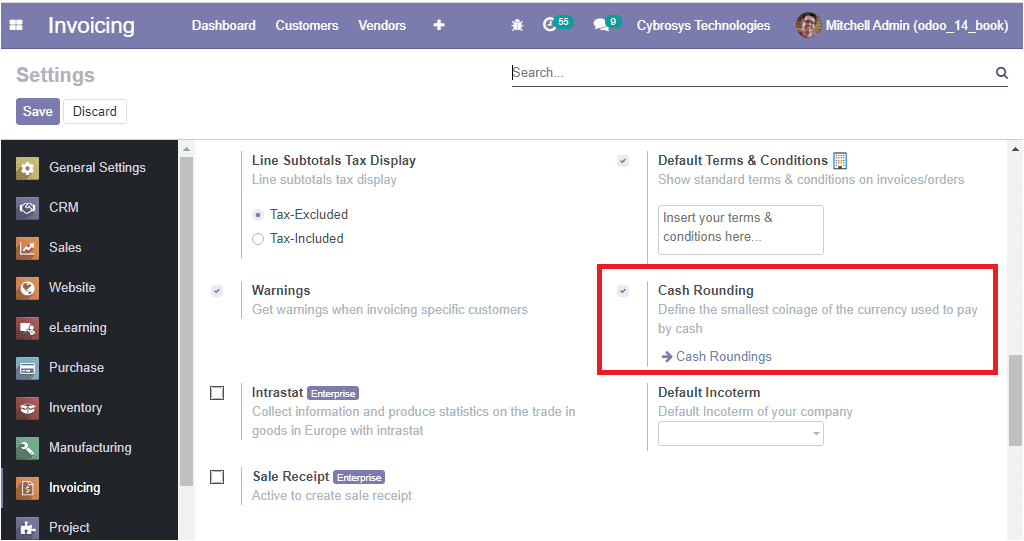
To enable this feature, you should go to the settings and where you can view the Options Cash Rounding. You can check the box near the option and click on the Save button for enabling this option.
Now you can access the Cash rounding window by taking the route Invoicing -> Configuration -> Cash Rounding. The image of the window is depicted below.
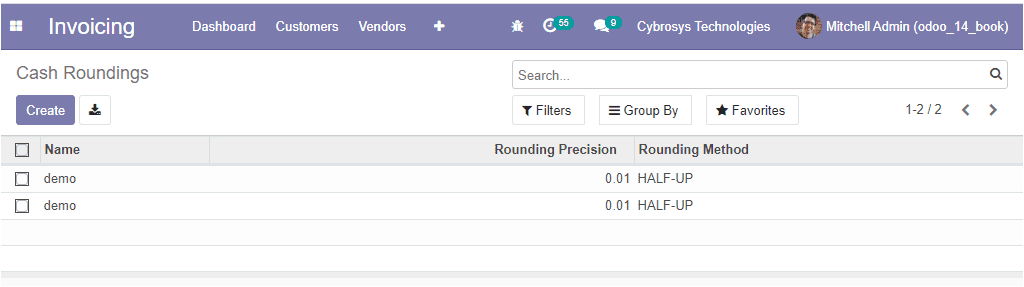
In this window, you can view all the created Cash Roundings and you have the provision to create a new one by selecting the Create icon available. The image of the Cash Roundings creation window is depicted below.
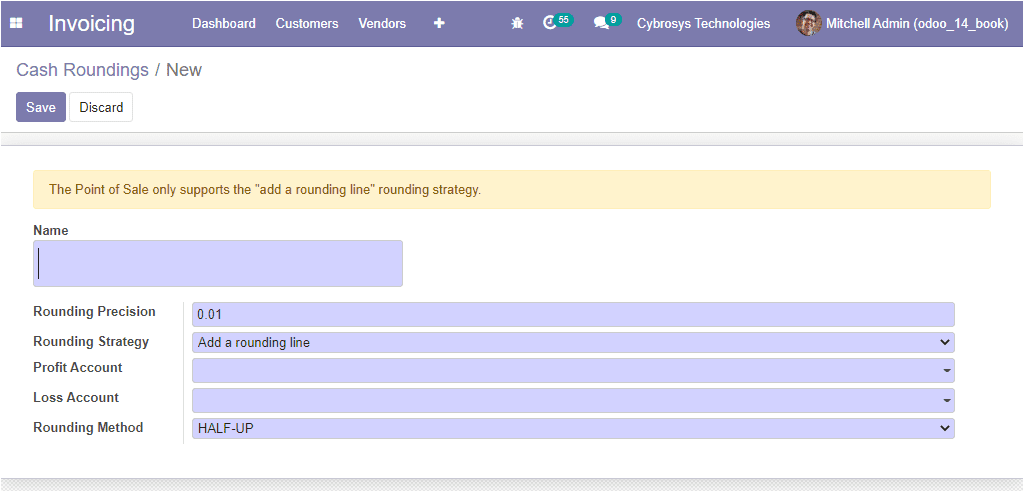
In this creation window, you can provide a name for cash roundings and can allocate the Rounding Precision which you can represent the non zero value smallest coinage. The rounding precision will also affect the rounding of the computed value. Moreover, you can describe the Rounding Strategy. Here you can specify which way will be used to round the invoice amount to the rounding precision. This can be done in two ways where one is to Add a rounding line and modify the tax amount. Add a rounding line means that you can add the rounding in a new line. In the case of modifying the tax amount, you can add the rounding to the highest tax amount. After that, you can allocate the Profit Account and the Loss Account. Finally, you can describe the Rounding Method. Using this option you can define to which precise value is rounding, it can be either up, down, or half-up.
As we clear on the Cash rounding aspects of this module and now let us move on to the Multi-currencies option available in the module.
Multi currencies in Odoo
Multi-currencies are one of the eminent features in Odoo which allows you to send Sales invoices, quotes, and purchase orders or receive bills and payments in different currencies. By using this option you can conduct transactions other than your own currency. Moreover, you can set up bank accounts in other currencies and can conduct reports on your foreign currency activities.
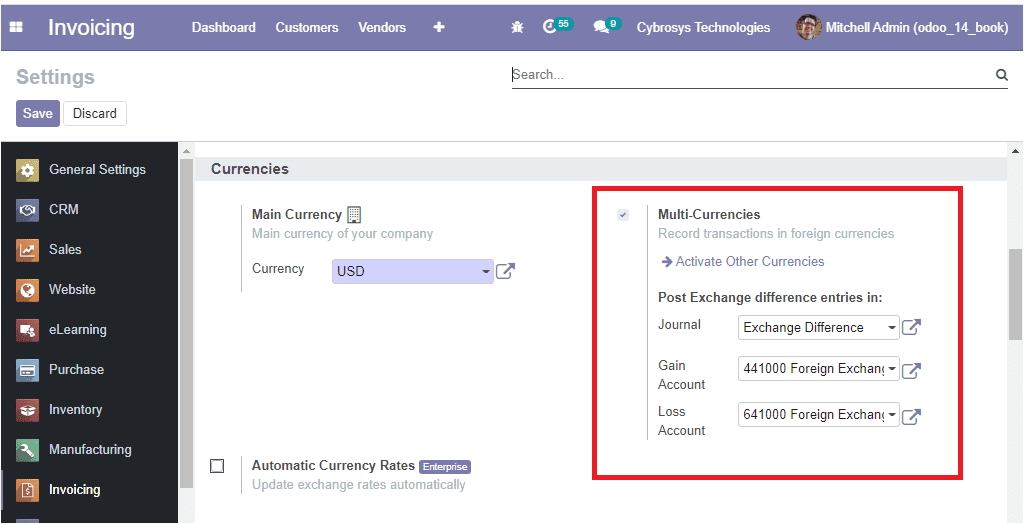
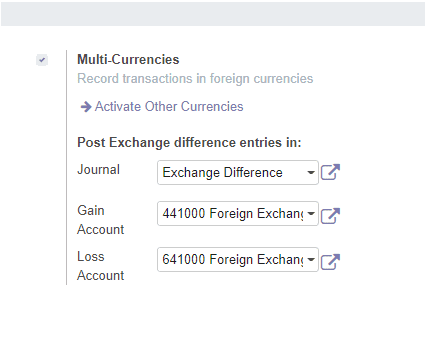
To enable this option you can go to the Settings menu of the Invoicing module where you can view the option Multi-currencies option under the Currencies tab. The image of the window is depicted below.
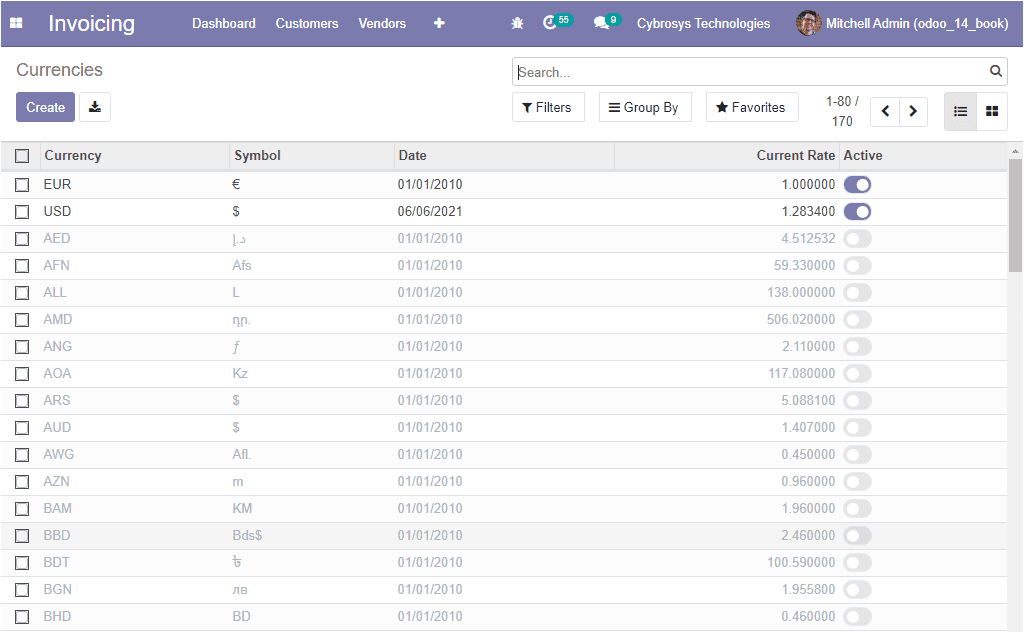
Now you are able to view the Multi-currencies option in the module. This can be accessed by going to Invoicing -> Configuration -> Accounting -> Currencies. The image of the Currencies window is depicted below.
Exchange gain or loss
The Odoo platform permits you to record the difference between the payment registration and the expected amount. This means if the instalment is paid two months after the receipt was issued, there might be chances for variations in the exchange scale. This variation will bring some misfortune or benefits that are recorded by Odoo.
The Invoicing module is one of the benevolent modules available in the Odoo community edition. Using this module, we can instantly generate invoices and can send them through email in just a few clicks. The convenient module provides an insight to track your sales activities and helps to manage your finance effortlessly.