Sales
The Odoo sales module is one of the top most sales management platforms which allows you to organize your sales orders in a systematic and structured manner. In Odoo all the sales activities that result in selling of goods and services are described in an efficient manner. Using this module you can create professional quotations, simply manage your orders and contracts. Also you can schedule activities in each stage. Moreover this platform helps you to create,configure and maintain products and their prices. Finally you can generate useful sales reports. In short, the Odoo sales module definitely assists you to sell your products more efficiently.
Now let us discuss the module in detail.
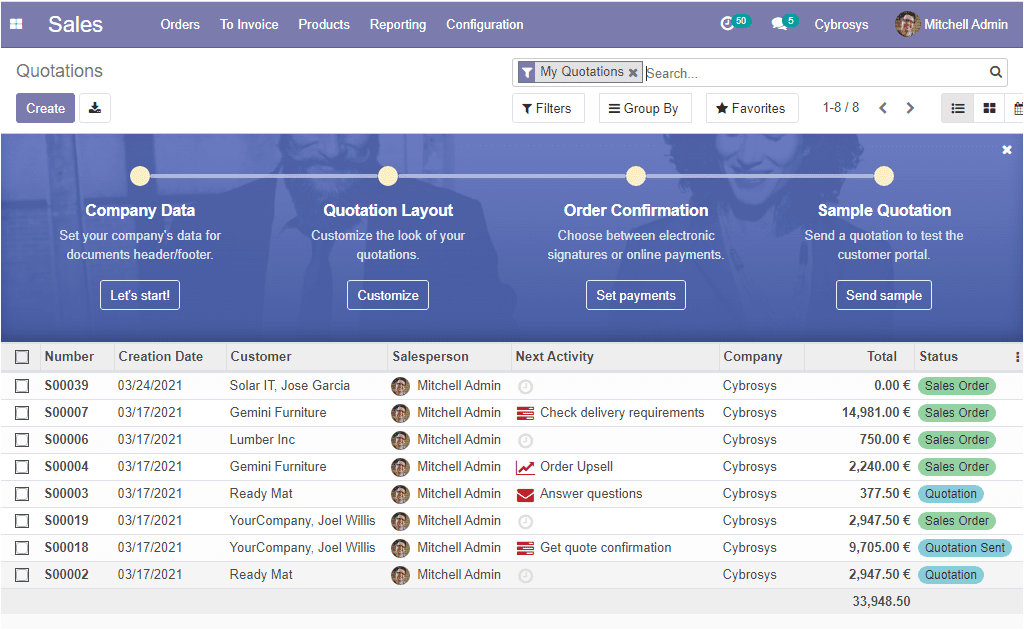
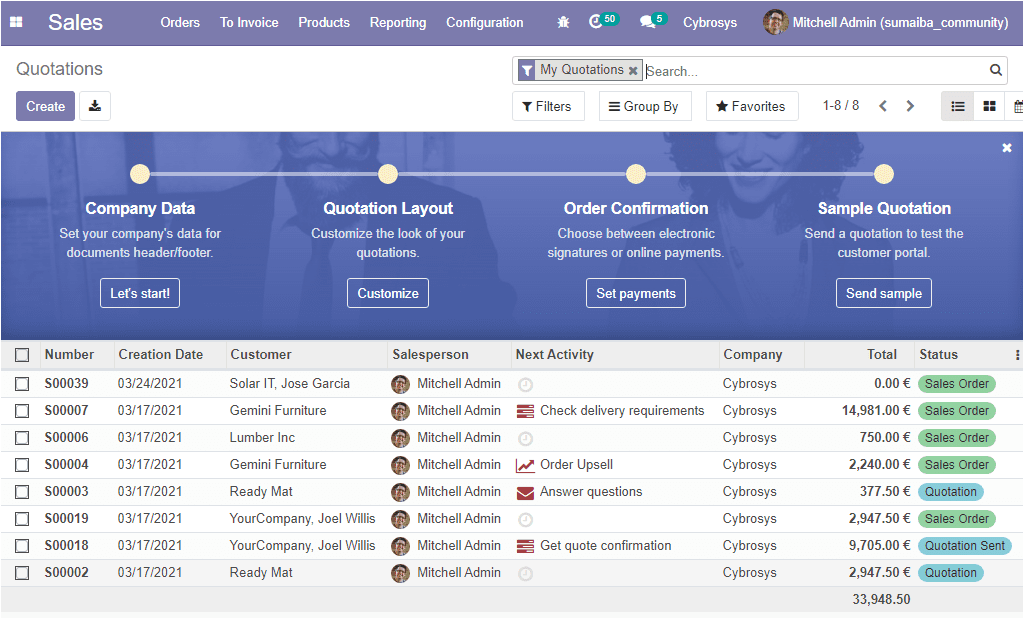
The below image depicts the overview of the sales module. From this page itself, you have the provision to set your company’s data for documents header or footer by clicking the let’s start button. You can easily customize the look of your quotations by selecting the Customize button and you can make order confirmation and payments online. Moreover, you can send sample quotations by selecting the Send sample button.
We got a clear picture of the overview and now let us discuss the Product configuration and the product window.
Products
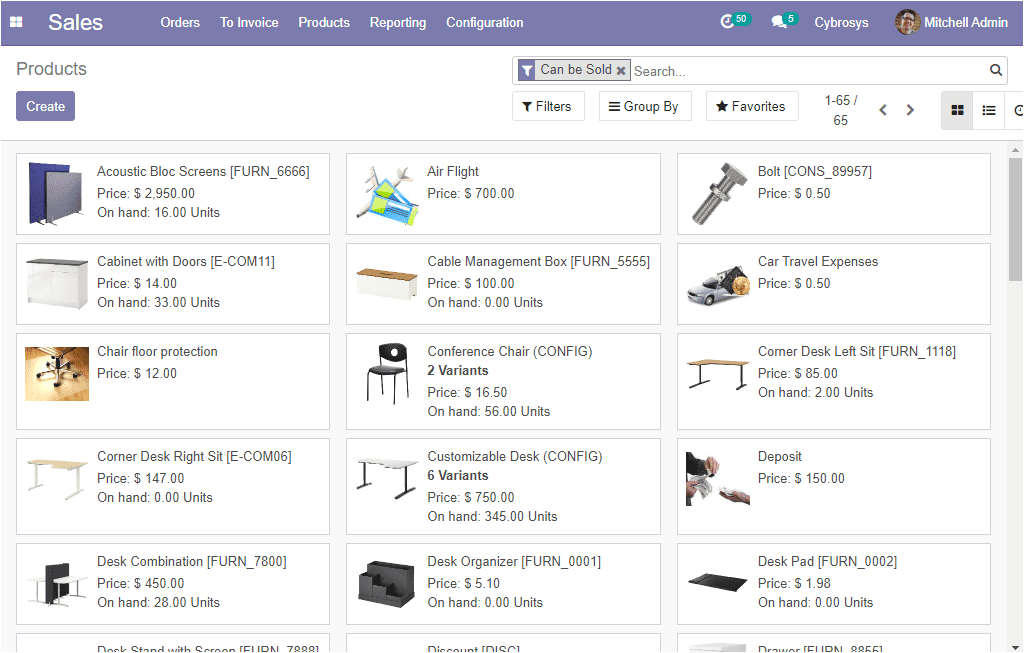
The products window in the platform is depicted below where you can see all the products described in the platform in the Kanban view.
You can also view this window in list view and the image of the window is depicted below.

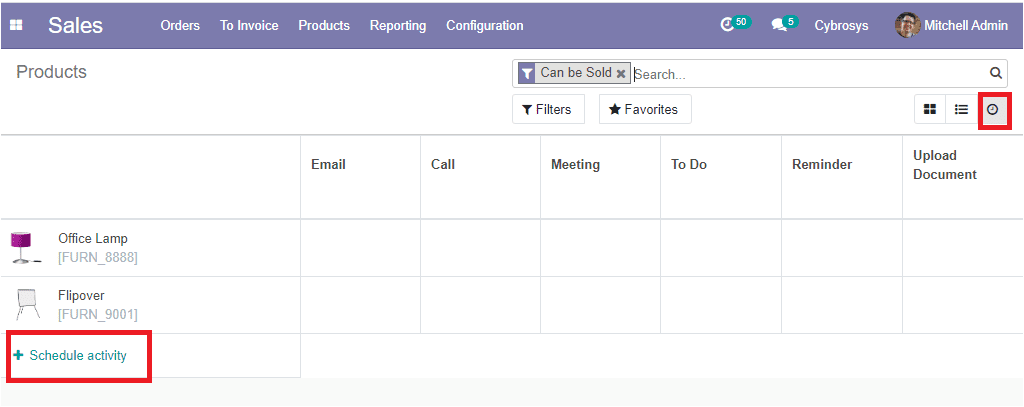
Like any other window in the platform, here also you have the customizable and default functions such as filters, group by, favorites, and favorite search. Moreover, you can schedule activities by selecting the view activity button.
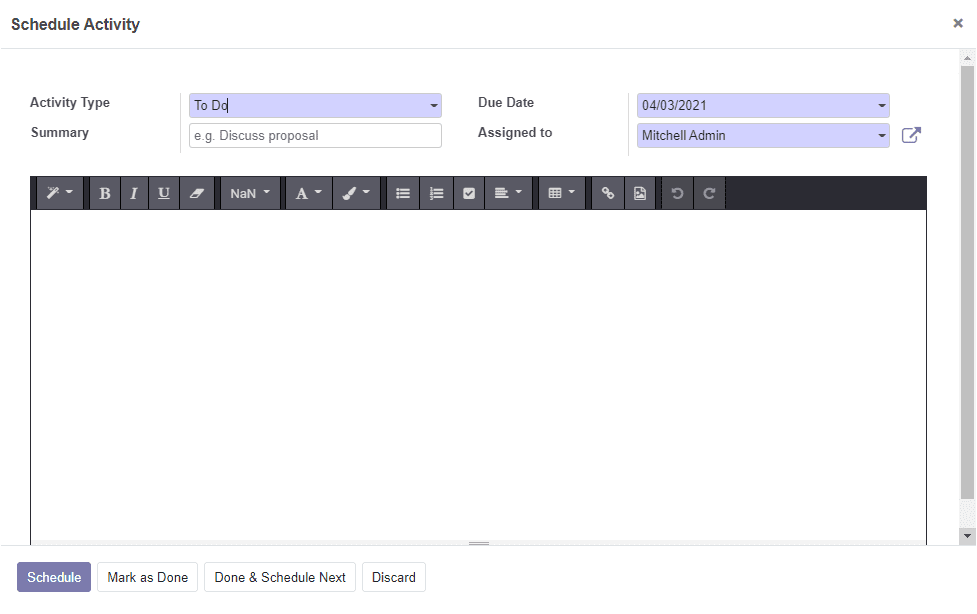
The image of the schedule activity window is depicted below where you can mention the Activity Type, Due date, allocate assigned person along with the summary of the activity.
Now it is time to come back to the product window. Here in the window, you have the provision to create new products. This can be done by selecting the Create icon available on the top left corner of the window. The image of the window is depicted below.
You can create new products here by providing all the required information. First of all, you can provide the product name which is the name of the product and it will be displayed on all platforms when mentioning this particular product. Next, you have three enabling options such as can be sold, can be purchased, can be expensed. This opinion is used mainly in the time of creating a raw material or a product for internal consumption. If the product is for selling purposes you can enable this option. When the product is for purchasing you can select the can be purchased option. Additionally, the expensed option is for specifying whether the product can be selected at an expense.
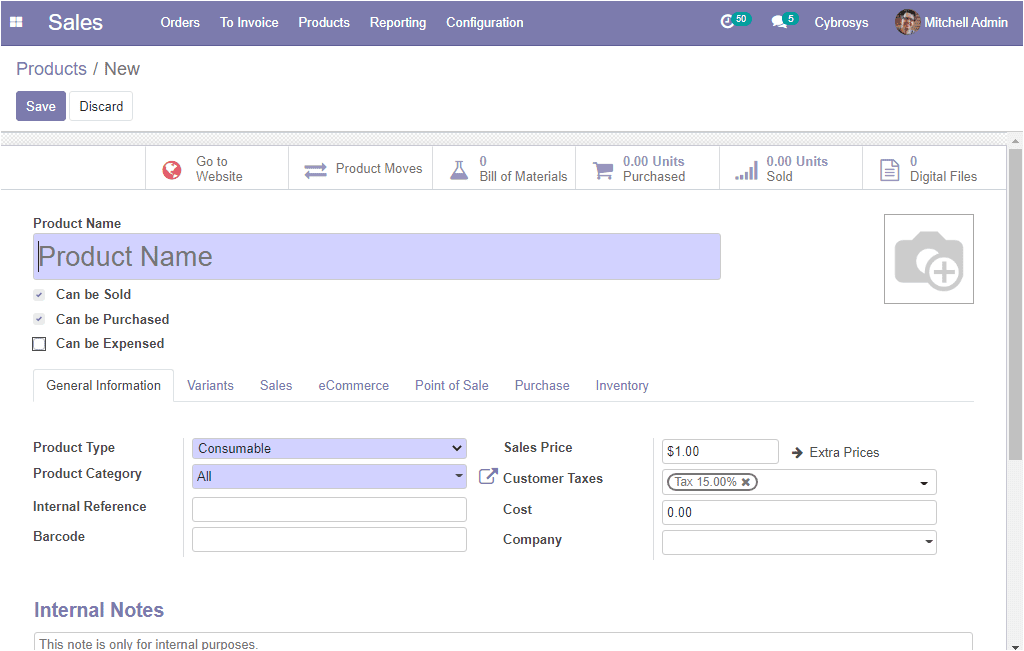
Under the general information tab, you have so many options such as product type, product categories, internal reference, bar code, sales price, customer taxes, cost, and company. Under the product type, you have three options
1. Storable product
2. Service product
3. Consumable product
The storable products are the products used in the stock management system and its restoration of stock or supply to a formal level is more or less automated as described by the rules in the system. It can be managed with the help of an inventory and you can easily manage your minimum stock level by setting reordering rules for stock in your system. This will keep a product from running out of stock. Also, the platform will show warning messages or alerts in the quotation if you fail to set reordering rules.
A consumable product is a tangible product and it can be taken care of as a storable product with the exception that the stock management was not taken into account by the system. On the other hand, it can be directly received by the customer from the supplier. Odoo handles it as the product always has sufficient stock.
Odoo considers the services which the company provides to the customer as the product and it is labeled as non-material products. This type of product does not seem in the stock operations. The assumption of services as the product will be helpful for the easy running of the business ERP.
After confirming the product type you can select the product category from the drop-down menu where you can view all the created product categories and you can also have the create option
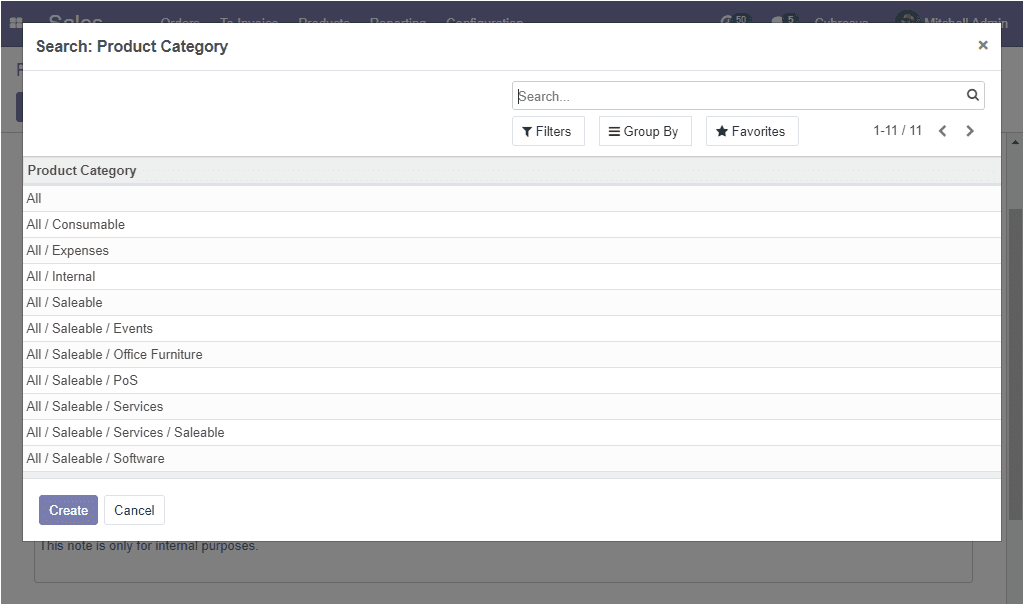
By enabling this option you can organize the products under a specific category. The internal reference field is used to enter the product code which is used as an alternative code for the product. Most of the time Odoo uses the product name field and the product description when displaying the product information. In the case of a company, It is quite common to have a specific coding system for their products. So the internal reference field is practical to enter the alternative product code.
The advanced Barcoding functionality is definitely helpful when managing products, especially when dealing with a large number of products. This will help you to reduce human errors and human efforts. In the barcode field, Odoo allows you to add or update product quantity or other details by scanning the product barcodes. This is possible in both the time of receiving and selling products.
Now you can allocate the sales price which is the selling price of the particular product. Additionally, you can define the customer taxes which are the default taxes used when selling the product. Odoo has a tax engine and it supports various kinds of taxes such as GST, CST, SST, and many more. If you are mentioning the tax details here, this tax will come as the default one for the product in the sale order. Along with the customer taxes, Odoo allows you to set different types of taxes such as value-added taxes (VAT), federal taxes, eco-taxes, withholding taxes, retention, vendor taxes. The chart of accounts used in most of the countries is pre-configured with the major taxes of the country. Moreover, you can define the cost of the product, company, along with the unit of measure and the purchase unit of measure which is the default unit of measure used for purchase orders. It must be in the same category as the default unit of measure. Finally, you may add the internal notes if it is needed.
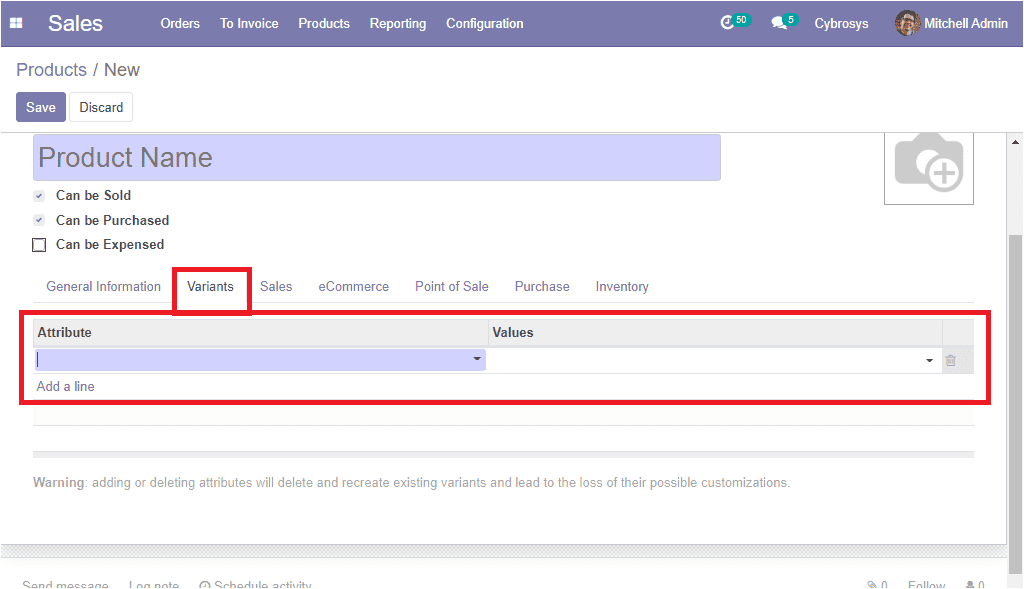
Under the Variants tab, you can add the values and attributes by selecting the Add a line option. Attributes define the color, size, or other features of the product variant and the values mean the attribute values such as the sizes like large, medium, and small.
Now we can come to the sales tab of the product creation window, and here you can select the invoicing policy manually. If you are activating the ordered quantities option, what is the ordered rule is used as the default mode. This means the invoice quantities used by the customer. In the case of Delivered quantities, which means the invoice quantity that has been delivered to the customer. The re-invoice expenses can be enabled. This means a validated expense can be re-invoiced to a customer at its cost or sales price. If there are no such expenses you can enable the ‘No’ option. Additionally, you can allocate the email template and it will help you to send a product-specific email once the invoice is validated. Moreover, you can specify the optional products which are the suggested products when a customer hits the Add to cart menu and you can enable the ‘Is an event ticket’ option for automatically creating an event registration for this product at the time of sale order confirmation. Finally, you can provide a sales description of the product that you want to communicate to your customers. This description will be copied to every sales order, delivery order, and customer invoice or credit note.

Under the eCommerce tab, you have so many options. The website option allows you to restrict publishing to this website and you can allocate products under the categories option and the selected products will be available in the mentioned eCommerce category. This can be done by going to shop -> customize and enable the eCommerce categories.
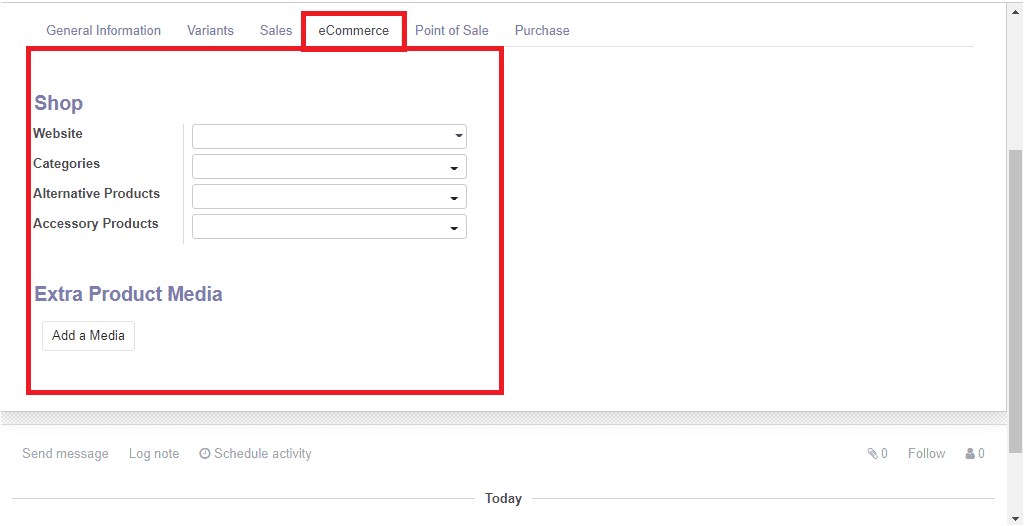
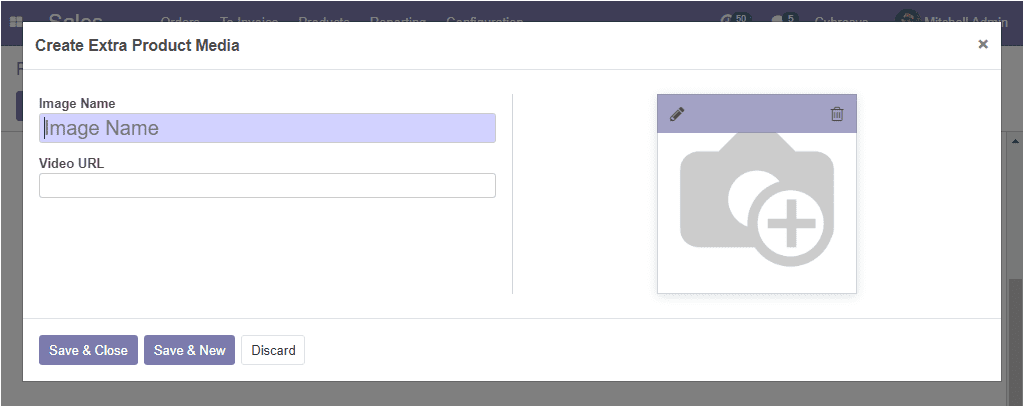
Moreover, you can mention the alternative products for recommending it to your customers and it is considered as the upsell strategy also these products show up on the product page. Additionally, you can also include the accessory products and it will show up when the customer reviews the cart before the payment and this is part of cross-sell strategy. And also you have the advanced option named Extra Product Media and this option allows you to upload a video URL or photograph of the product to give a better experience to the customer.
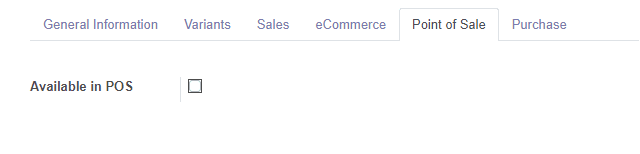
Under the Point of sale, you have an option named Available in POS. By enabling this option you can make the product appear at the point of sale.
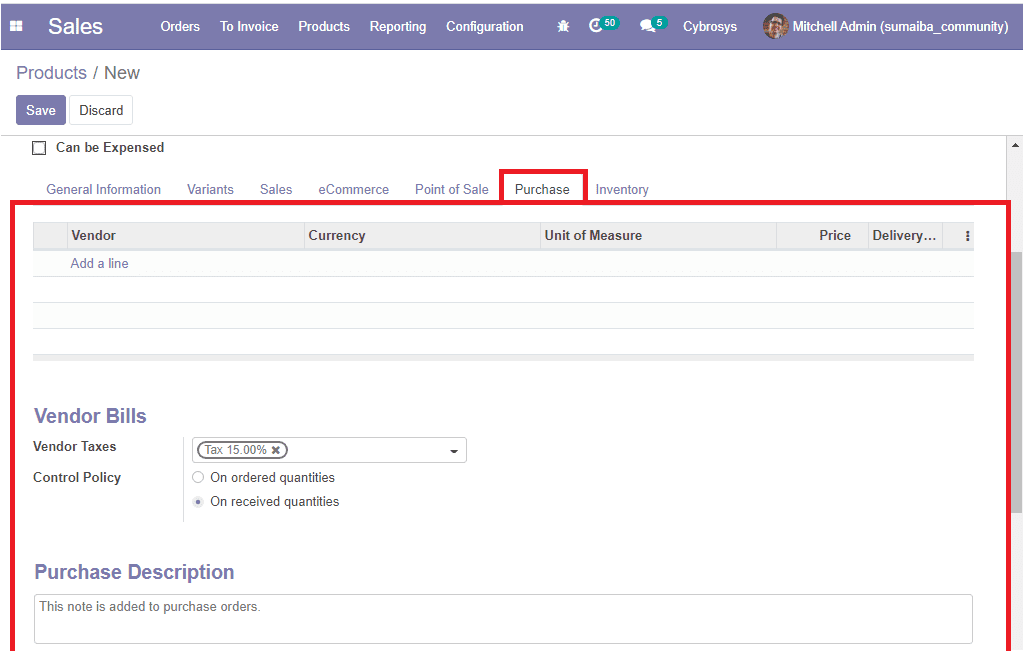
Under the Purchase tab of the product creation window, you can define vendor pricelists. Here you can provide the details of the vendor by selecting the Add a line option. You can also enable the option Purchase automatically for auto-creating RFQ to buy the product each time you sell this product through a SO and keep in mind to set a vendor on the product. Moreover, you can define vendor taxes which are the default taxes used when buying the product along with the control policy. Finally, you can provide the purchase description and this note will be added to purchase orders.
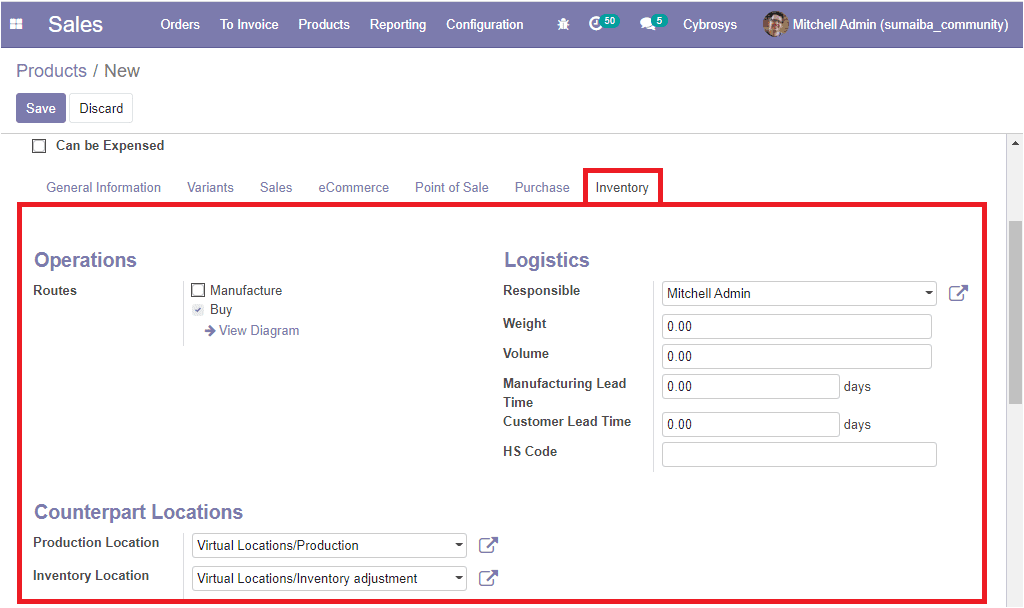
Now let us discuss the option available under the Inventory tab of the Odoo product creation window. Firstly you can view the Routes option and it will allow you to define the route of the product depending on the modules installed. This can be helpful for deciding whether the product will be brought, manufactured, or replenished on orders and so on. Under the logistics heading, you can allocate the responsible person who is responsible for the next activities related to logistic operations for this product. You can also mention the weight along with the volume, manufacturing lead time, customer lead time, and HS code. Additionally, you can set the counterpart locations and these stock locations will be used instead of the default one as the source location for the stock moves generated by manufacturing orders.
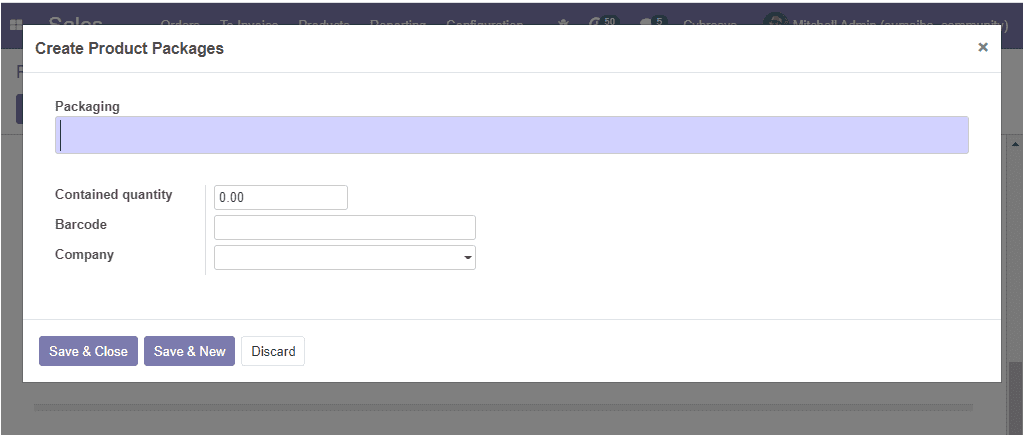
You can create different product packages by selecting the Add a line option available under the Packaging option. This option allows you to package the same product in different ways. The image of the product packages creation window is depicted below.
Finally, you can include the description for delivery orders and the description for receipts.
So far we were discussing the product creation window and now let us move on to discuss the Customers window available in the platform.
Customers
Under the customer’s menu available in the Odoo sales module, you have the provision to keep all the details of each customer defined in the platform and you can also create new customers by selecting the create option.
You can access the customer page by taking the route Sales -> Orders -> Customers. The image of the customer window is depicted below
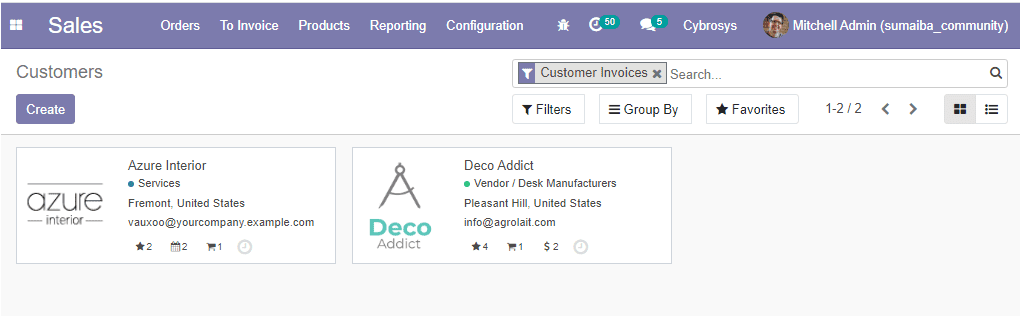
Here in the window, you can view all the created customers and you can create a new one by selecting the create icon available in the top left corner of the window. It is also available with default and customizable features such as filters, group by, favorites, favorite search, and many more. The window can be viewed in both Kanban and list view. The image of the window is shown below.
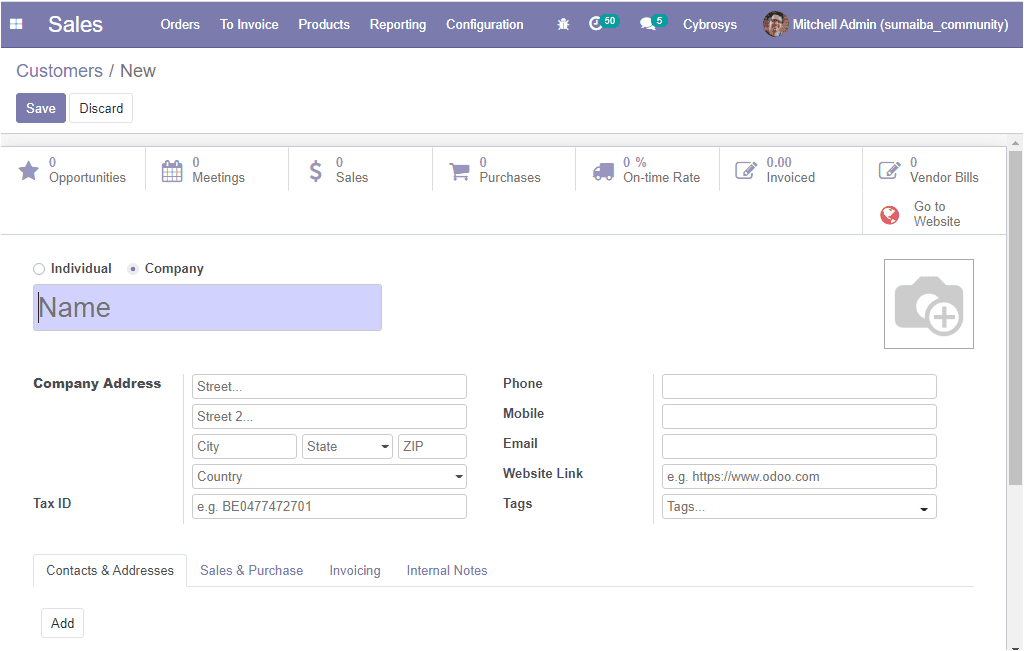
In this customer creation window, you can provide all the required information such as the name of the customer, company address, tax ID, phone and mobile number, Email ID, Website Link. In the Odoo platform, you have the provision to select two types of customers- Individual or company. The Tags can also be added from the drop-down menu.
Under the Contacts and Addresses tab, you can add the contact by filling the following pop-up window. This can be done by selecting the Add option.
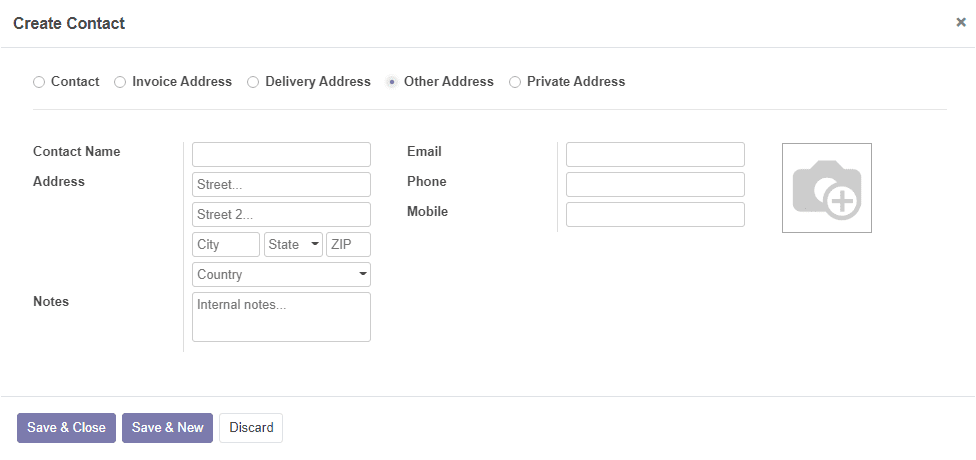
There might be some situations when the customer needs the delivery with a new address. So this window can be made use for adding a new contact address. You can create a contact by selecting the address types Invoice address, Delivery address, Other Address, Private address. Invoice and Delivery addresses are used in sales orders. Private addresses are only visible by authorized users.
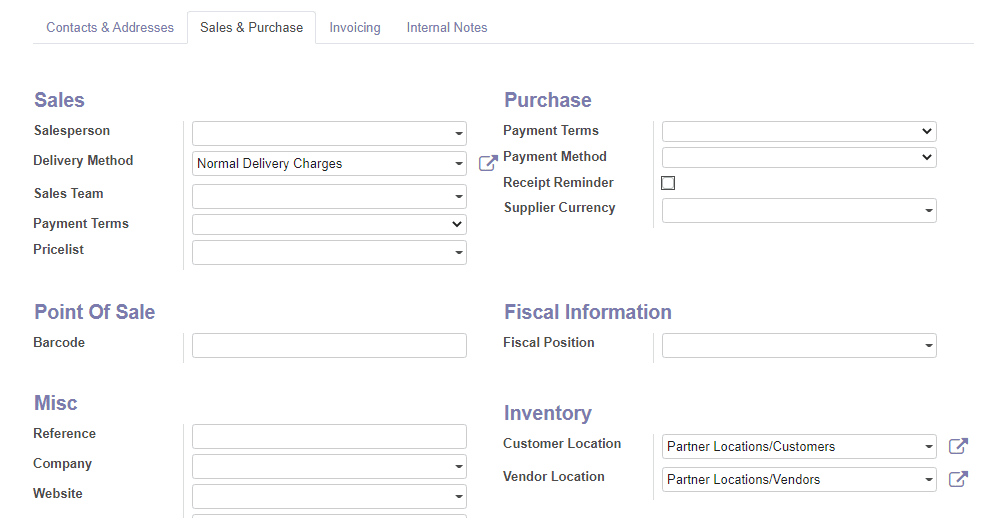
Under the Sales and Purchase tab, you can provide the internal user in charge of the contact as the salesperson and you can select the delivery method from the drop-down menu where you have three options such as normal delivery charges, free delivery charges. Additionally, you can allocate a Sales team and this team will be used for sales and assignments related to this partner. Moreover, you can allocate the Payment terms along with the Pricelist. These payment terms will be used instead of the default one for sales orders and customer invoices. The pricelist can be used instead of the default one for sales to the current partner.
Then you can provide the purchase order-related information such as the payment terms and payment methods. The payment terms will be used instead of the default one for purchase orders and vendor bills. Also, you can enable the Receipt reminder to automatically send a confirmation email to the vendor some days before the expected receipt date by asking him to confirm the exact date. In addition to it, you can allocate the supplier currency along with the barcode. Apart from these options you also have to specify the fiscal position and the miscellaneous details such as reference, company, website, industry along with the inventory information like customer location and vendor location. Customer location is the stock location used as the destination when sending goods to this contact and the vendor location is the stock location used as a source when receiving goods from this contact.
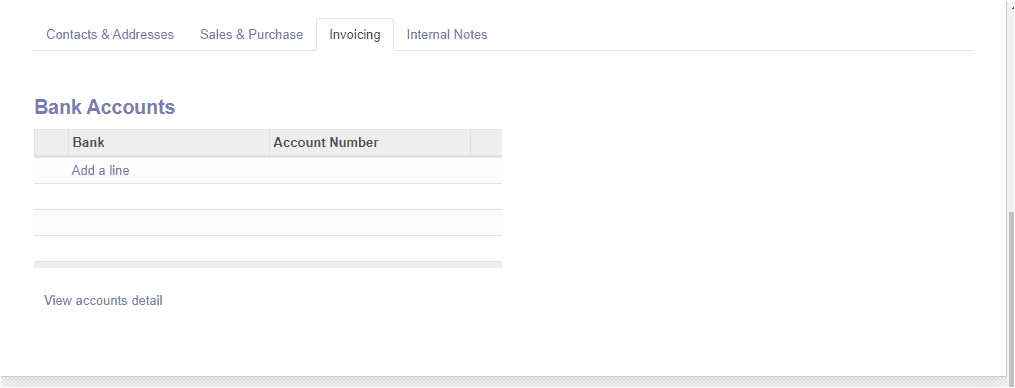
Under the Invoicing tab, you can provide the details of bank and account number by selecting the Add a line option.
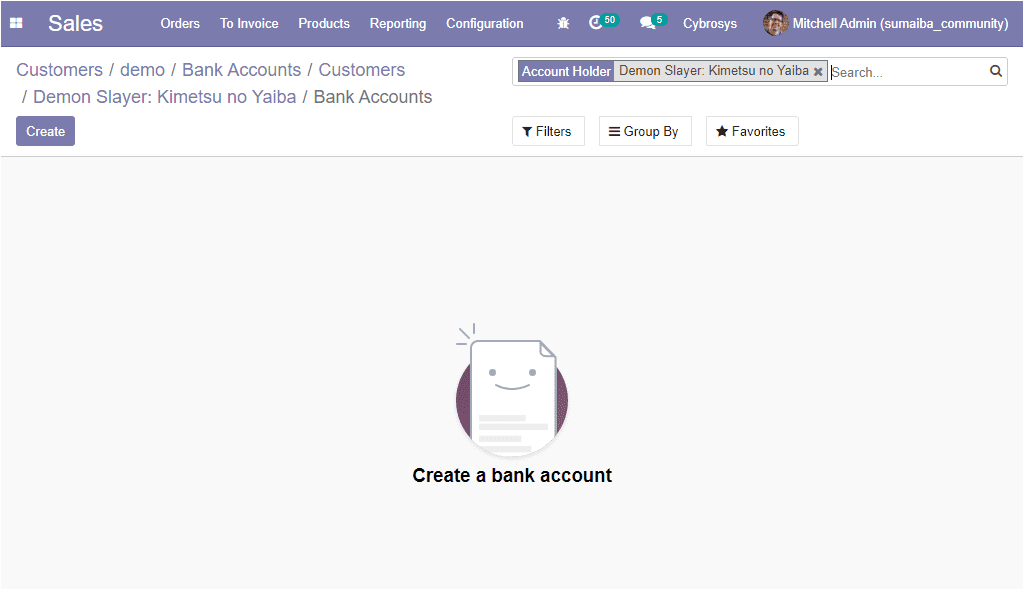
If you are clicking on the View account detail menu , you will be directed to the bank account details window as shown below.
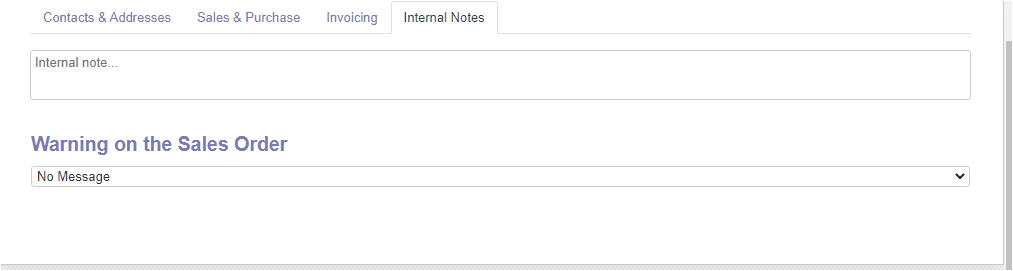
And under the Internal notes tab you can provide additional information or comments privately to the customer.
So far we were discussing the Customers window and now let us discuss the Sales Quotation and its related facts.
Sales Quotation
A sales quotation is the official document that a seller provides to a purchaser with the information on the costs that will be concerning for a desired work or product. It can also be the price of a service. By creating a sales quotation the seller can offer his/ her products and services at a defined price and the purchaser can understand the accurate product and service costs before they commit the deal.
You can access the Quotations from the orders menu available in the Sales module.
Sales -> Quotations -> Orders.
The image of the quotation window in the platform is depicted below where you can view all the quotations described in the platform along with the details of creation date, customer, salesperson, next activity, company, total amount, and status.
You also have the provision to create new quotations by selecting the create icon available on the left corner of the quotations window. The image of the window is depicted below.
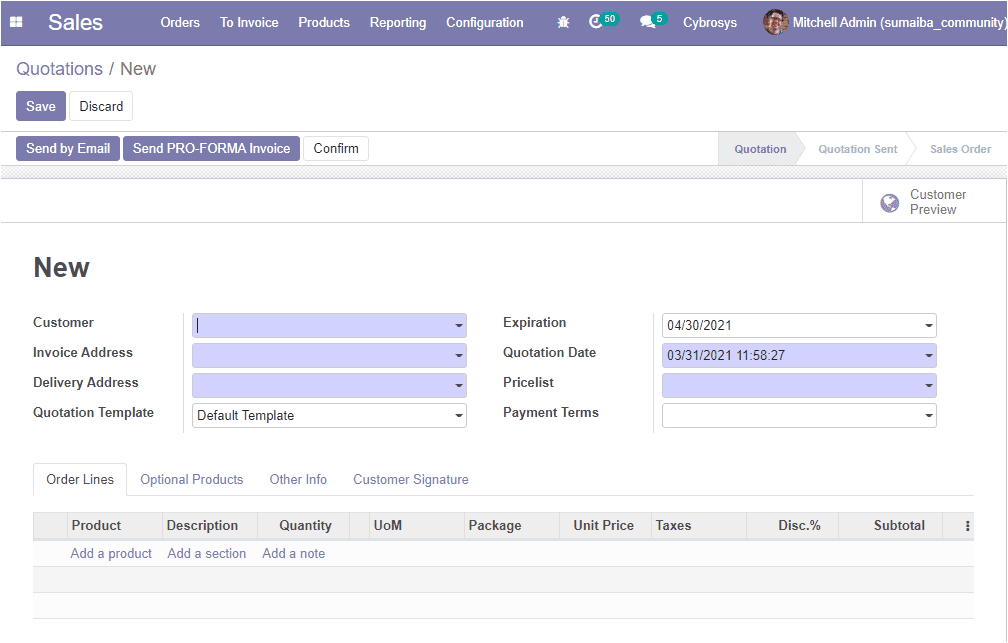
In this quotation creation window you can provide the details of the customer and the product. First of all, you can allocate the name of the customer along with his invoice and delivery addresses. Additionally, you can define the quotation template, pricelist, and payment terms along with the expiration date and quotation date.
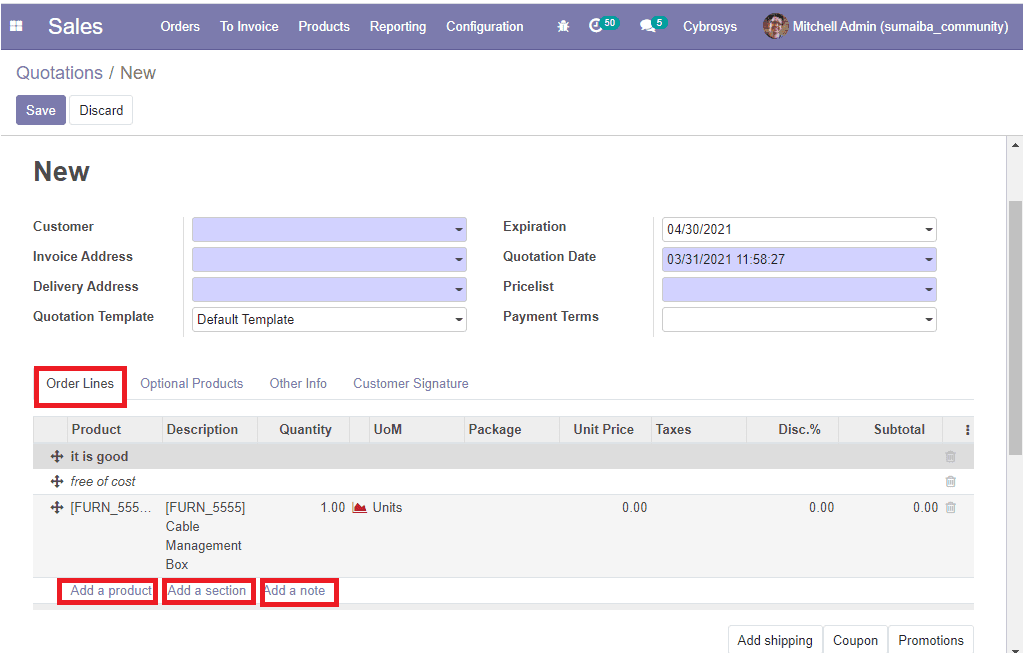
Under the Order Lines menu, you can add the product item which you want to sell by clicking on the Add a product option. The product name, description, quantity, unit price, taxes, discounts, subtotal everything can be specified. Additionally, you can add a section and note by selecting the respective menu.
Under the Optional products tab, you can add the optional products if any by selecting the Add a product option.

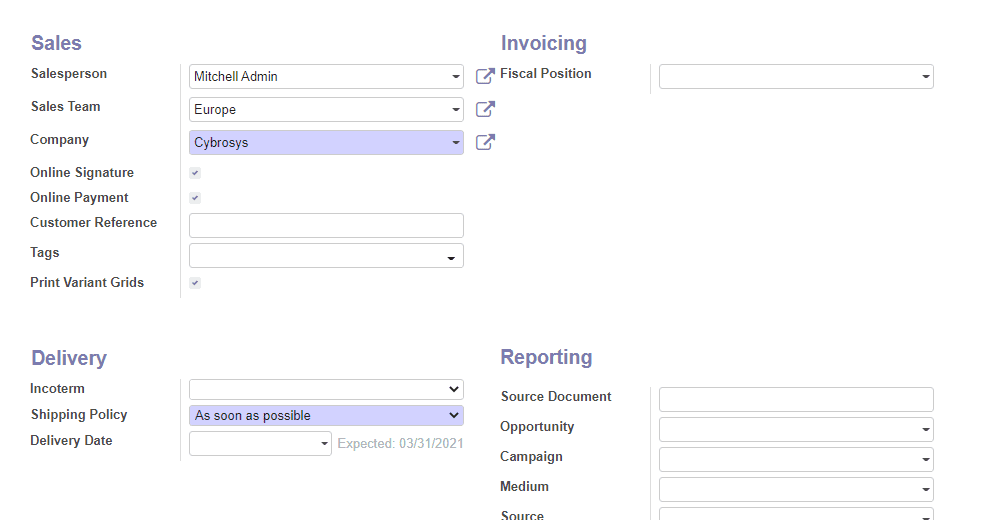
If you click on the Other Informations tab you can provide more information such as salesperson, sales team, company, customer reference, and tags. Also, you can enable the options online signature and online payments to request them to the customer in order to confirm orders automatically. Moreover, you have the option Print Variant Grids and if you are enabling this option the matrix of the products configurable by matrix will be shown on the report of the order.
The delivery information such as incoterms, shipping policy, delivery date can be allocated. Incoterms means the international commercial terms are a series of predefined commercial terms used in international transactions. The delivery date is the promised delivery date to the customer and if you are setting the date the delivery order will be scheduled based on this date rather than product lead times. Additionally, you can allocate the fiscal position which is used to adapt taxes and accounts for particular customers or sales orders or invoices. The default value comes from the customer. Moreover, you can provide the reference of the document that generated this sales order request as a source document. Additionally, you are able to specify the opportunity, campaign, medium, and source.
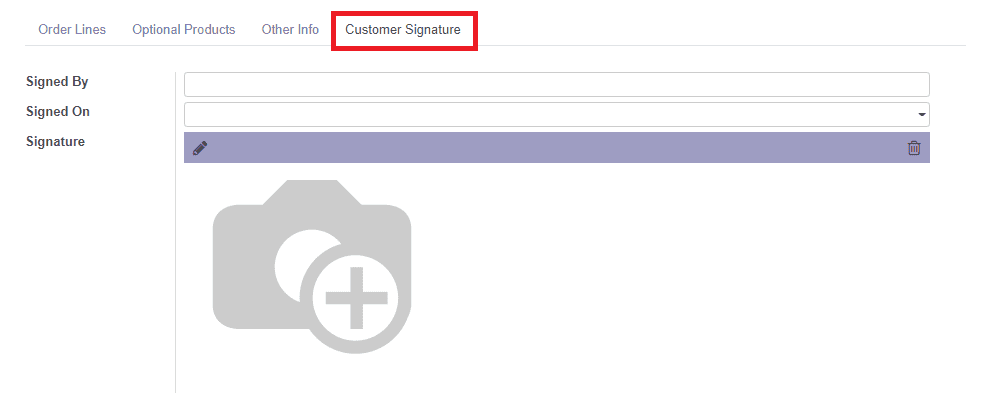
Under the Customer signature tab of the quotation creation window, you can provide the name of the person that signed the sale order in the Signed By column and the date of the signature under the Signed On option. Moreover, you can display the signature received through the portal.
Now you can save all the information by selecting the Save button. Then you can click on the Send by Email button to send it in Email.
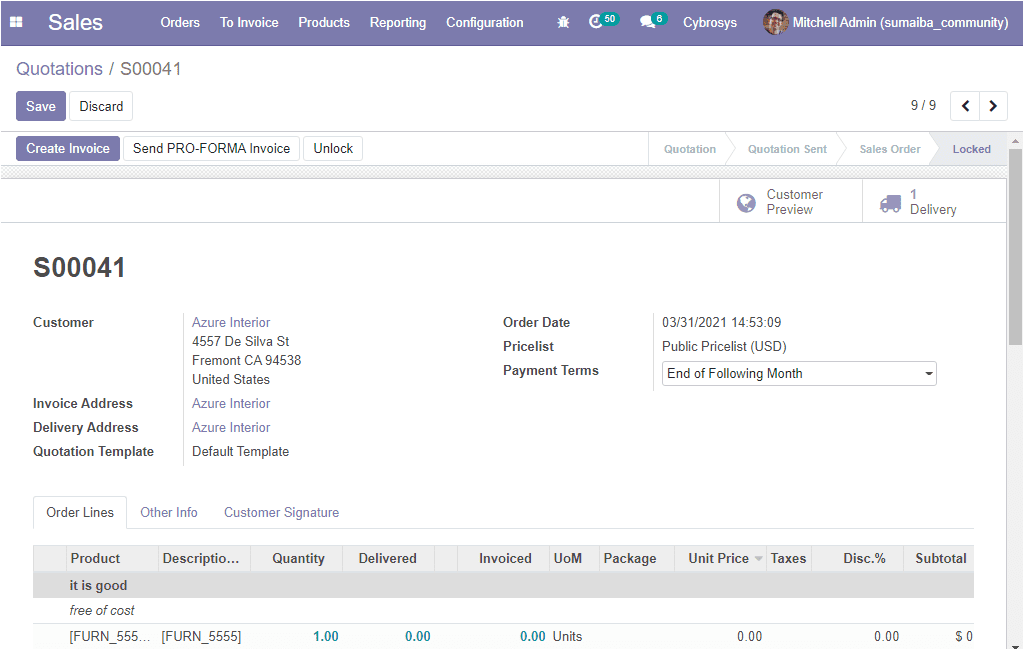
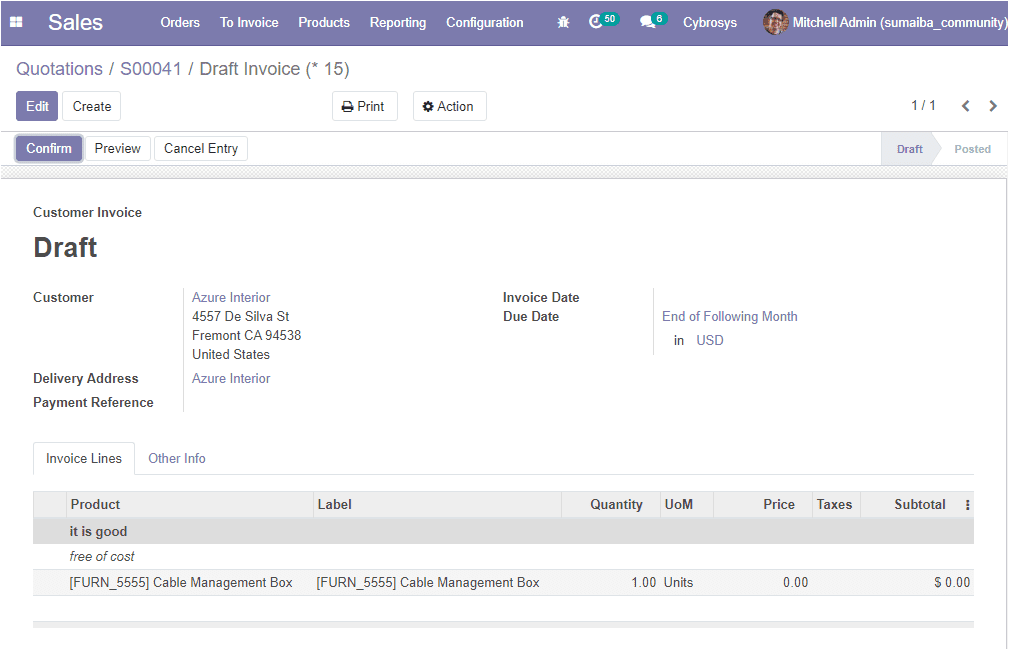
Now the status of the quotation will change from quotation to quotation sent. If it is time to confirm the quotation you can click on the Confirm button and now the window will look like the below image.
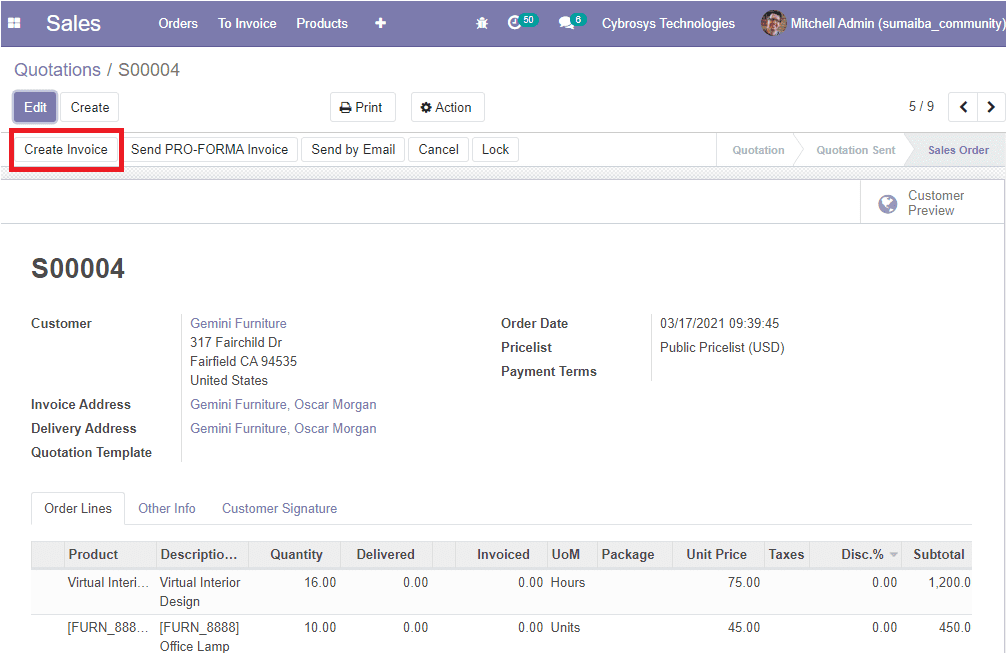
After viewing the confirmed quotation you can Create Invoice by selecting the create invoice button available in the left corner of this window. This action will lead you to a pop-up window as shown below.
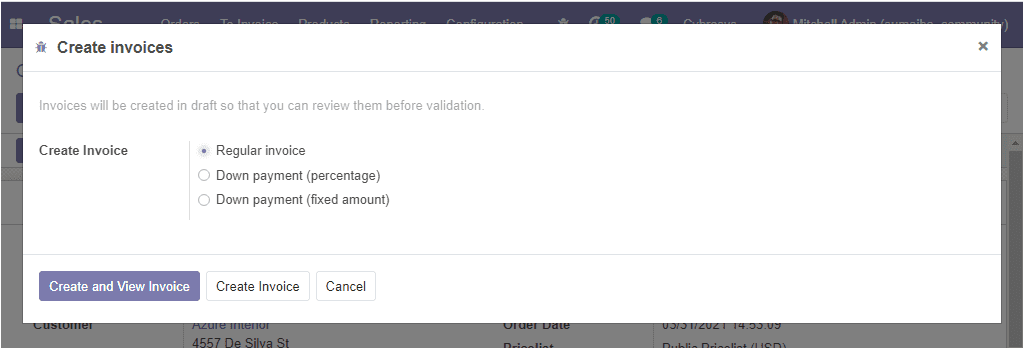
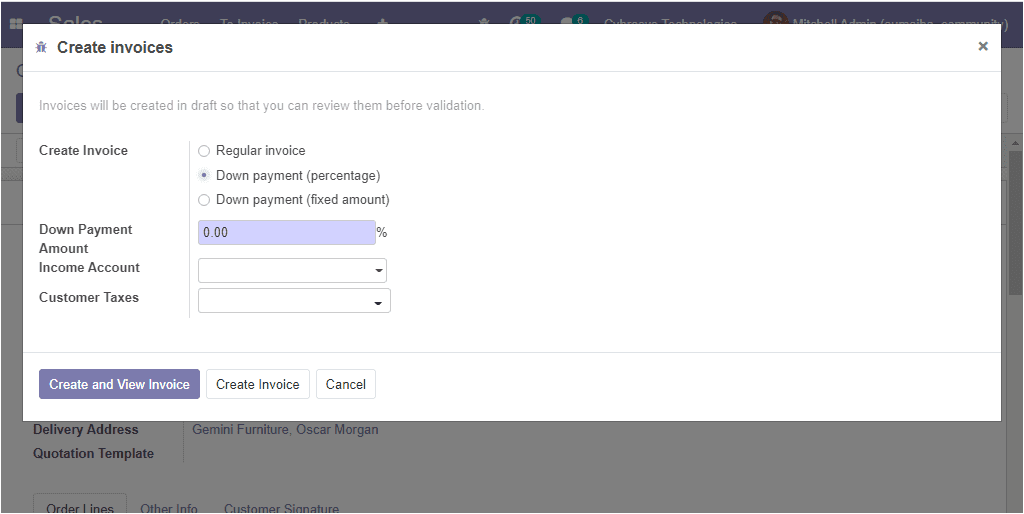
From this window, you can choose the invoice type from Regular invoice, Down payment(percentage), Down payment(fixed amount). Then you can click on the Create and View Invoice button and you can confirm the drafted invoice and you have the provision to view and edit the invoice before confirming it.
The confirmation window is depicted below where you can view the status changes from Draft to Posted and the window is marked as PAID in a green label
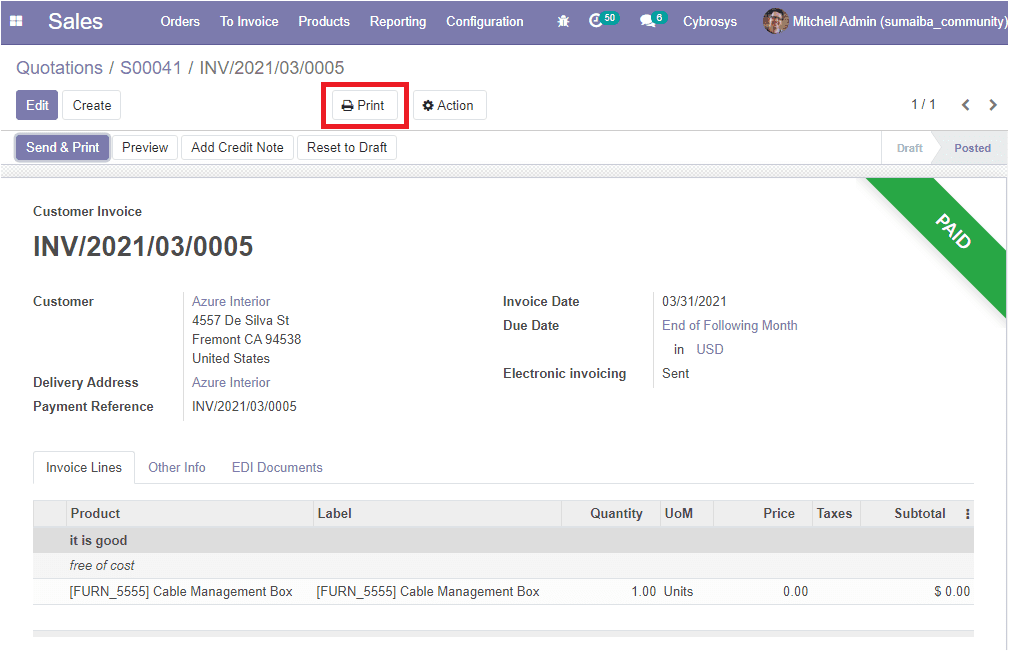
In the window, you have the option named Print and it will help you to take the print of the invoices.

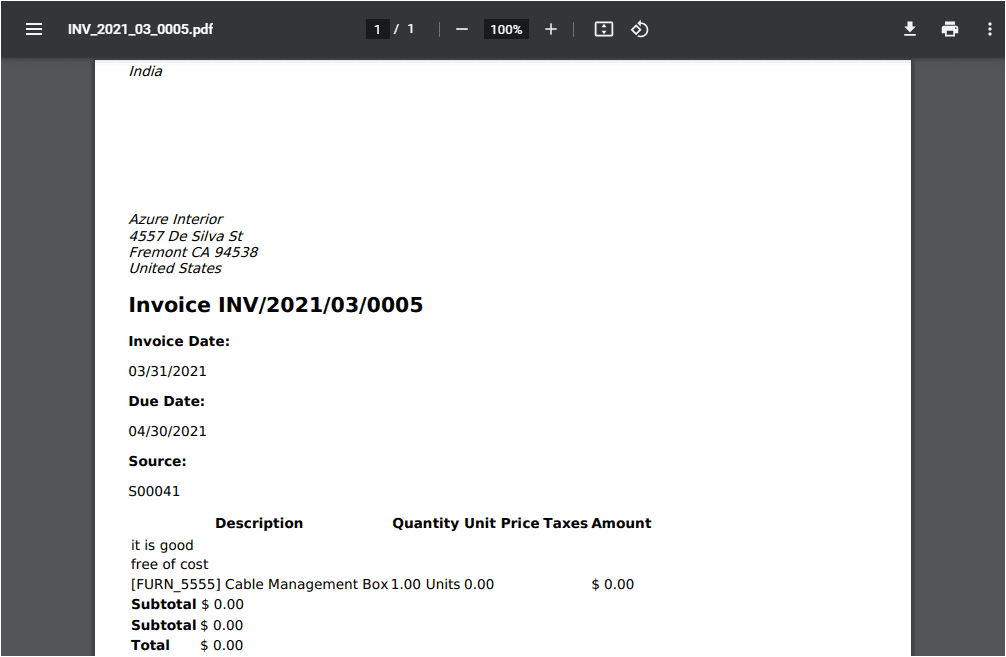
The preview of the print taken for Invoices is depicted below.
So far we were discussing the Sales quotation and its related operations in detail and now let us discuss the Quotation Templates
Quotation Templates
A quotation template is a customizable document where an organization can include the product and services details and their estimated cost for providing it to their potential customers.
For accessing this feature you should activate the quotation templates option from settings.
Sales -> Configuration -> Settings -> Quotations & orders -> Quotation template.
There is another option also available on settings named quotation builder and using this feature you can make more polished quotation templates effortlessly. This option will automatically install in the Odoo website module.

Create Template
In the Odoo sales module, you can view the quotation templates by taking the route
Sales -> Configuration -> Quotation Templates.
The image of the window is depicted below and where you can view all the created quotation templates in a list view.
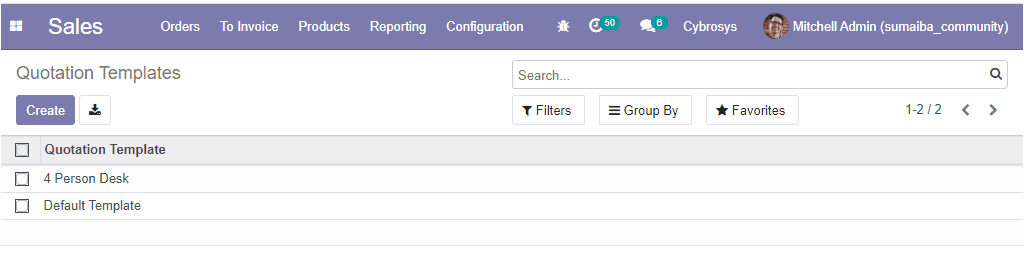
In this window also you have customizable and default functionalities such as favorite search, filters, and group by options. You have the possibility to edit the existing one by selecting the edit button available in each window. You can also have the provision to create new quotation templates by selecting the Create icon. The image of the customer creation window is depicted below.
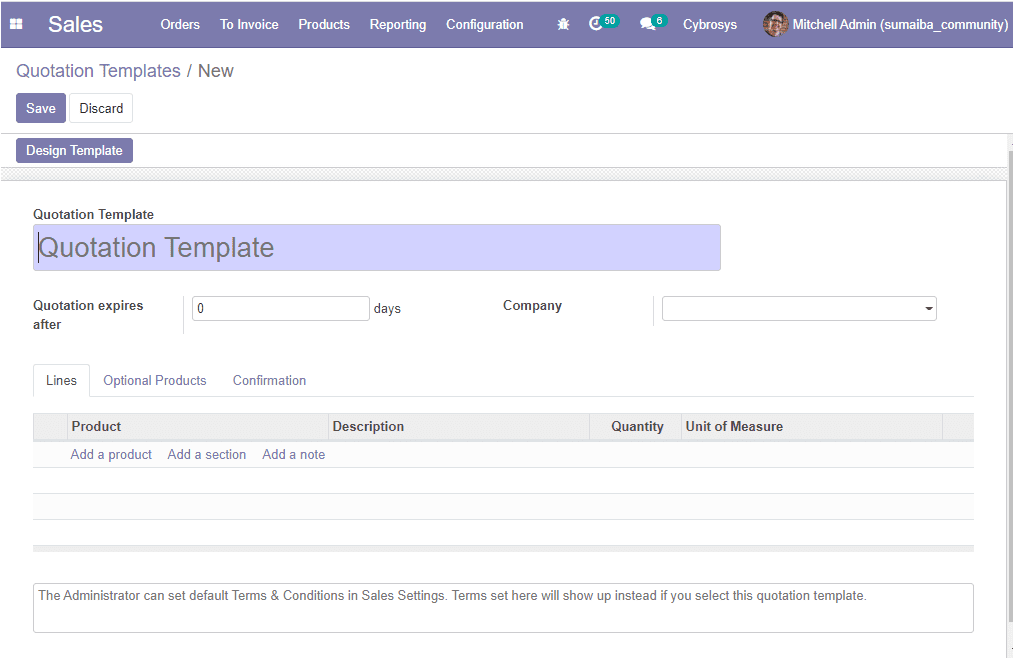
In the quotation template creation form, you can provide a name for the quotation template along with the number of days for the validity date computation of the quotation and the company details.
Under the Lines tab, you will be able to select the product and allocate the quantity, unit of measure along with the description of the product. Moreover, you can add a section and a note by selecting the respective menu.
By selecting the Optional Products tab you can allocate the optional product along with the details such as product description, quantity, and units of measure. This can be conducted by selecting the Add a line option available.

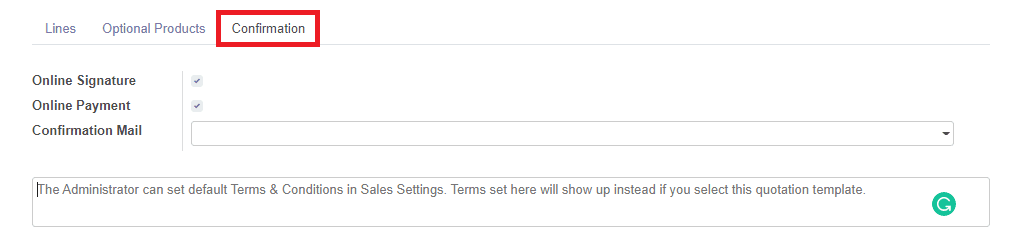
Under the Confirmation tab, you can set the confirmation process. This can be done with the help of the online signature and online payment. Additionally, the administrator can set default terms and conditions in sales settings. The terms set here in the window will show up instead if you select this quotation template.
As we clear on the Quotation templates and now let us discuss how to design quotation templates.
Edit or design quotation template
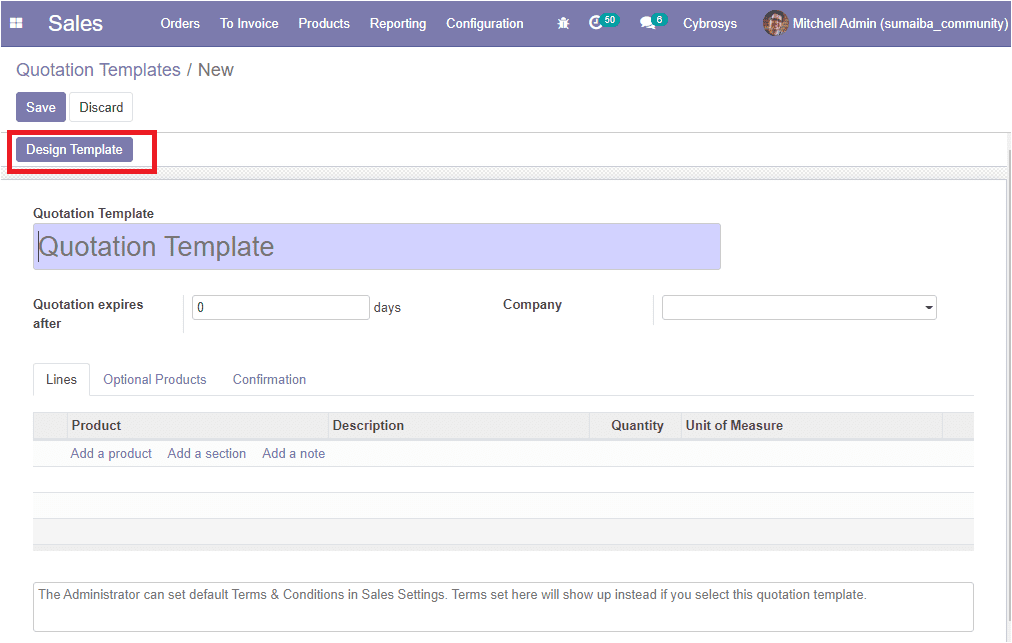
Using the Odoo platform you can easily design your templates in your own way. The advanced feature quotation builder helps you to edit and design your quotation templates. After enabling the option quotation builder what you want to do is to go to the Quotation template menu available under the configuration tab and there you can view an option named Design Template on the left top corner of this window.
By selecting the Design Template button you will be navigated to the website window
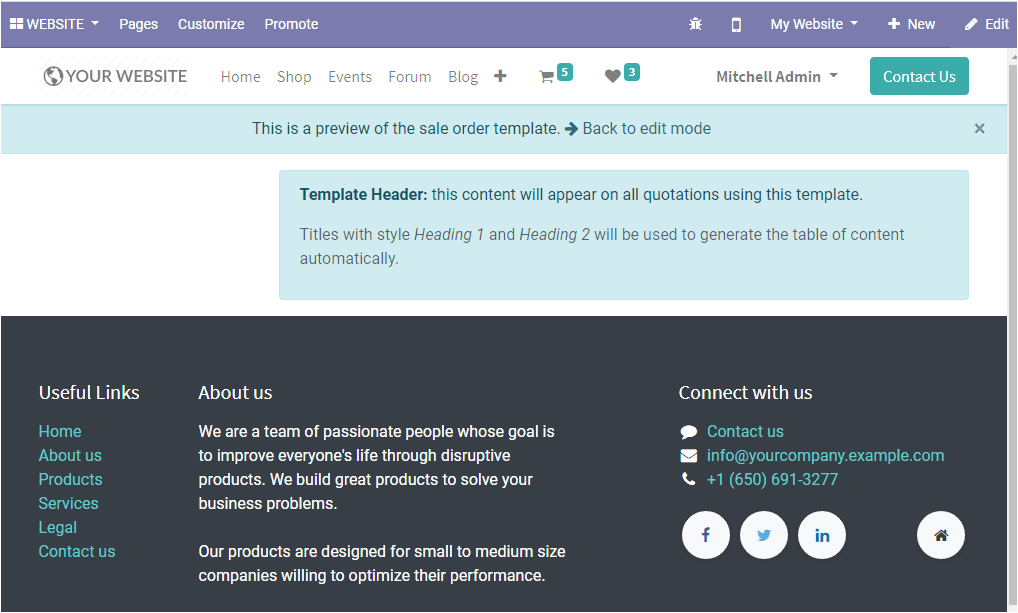
Now you can click on the Edit button available on the top right corner of the window to start designing your quotation template. This can be done by selecting the desired templates. All products that you included in the template will be added to your quotation automatically. The image of the window is depicted below
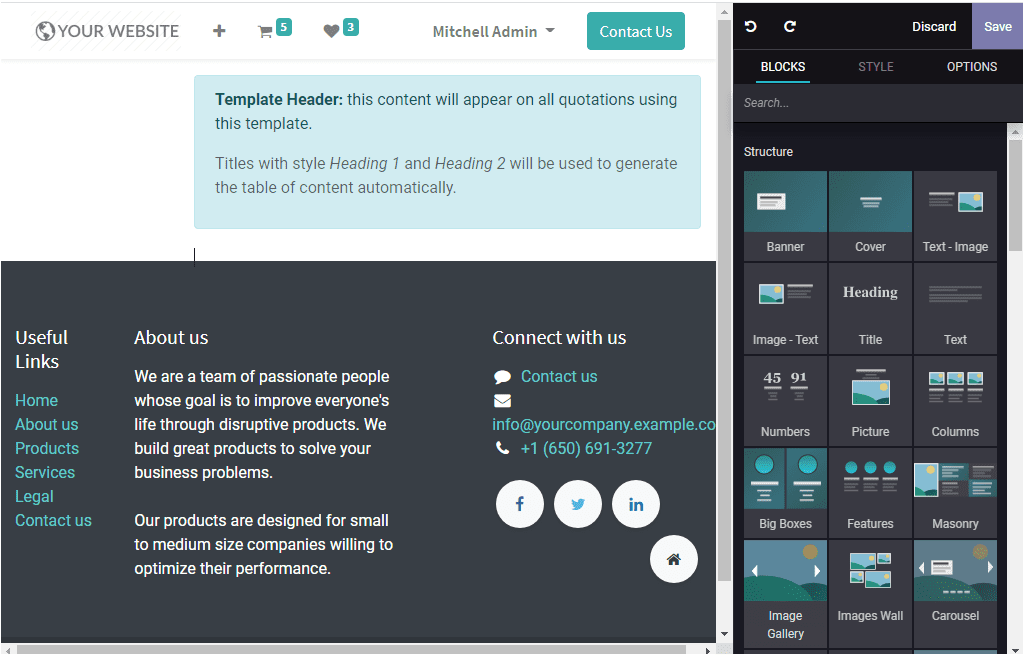
You have the provision to edit or design your content of your template using different building blocks available in the platform by a simple drag and drop functionality.
This advanced feature allows you to create your quotations in an organized, professional manner and it will help you to save more time.
Now let us discuss the Pricelist option available in the platform.
Pricelist
The pricelist is one of the most important statements concerning any type of business. It is the list of current prices offered by you for your products and services to your customer. These pricelists may vary with different occasions and market trends.
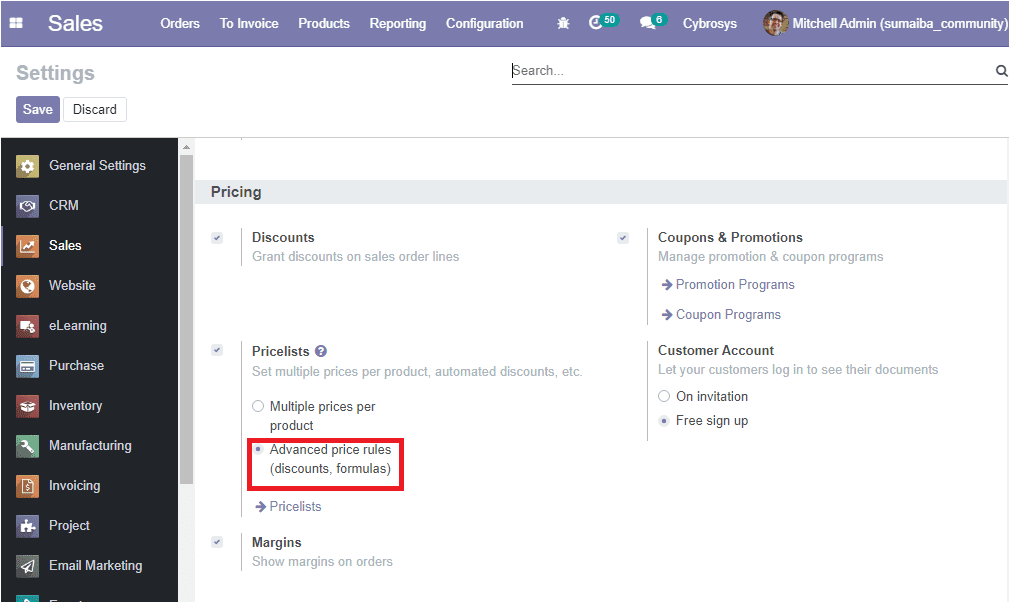
For managing pricelists in Odoo, you should go to Sales -> Configuration -> Settings and activate the feature Pricelists under the Pricing section.
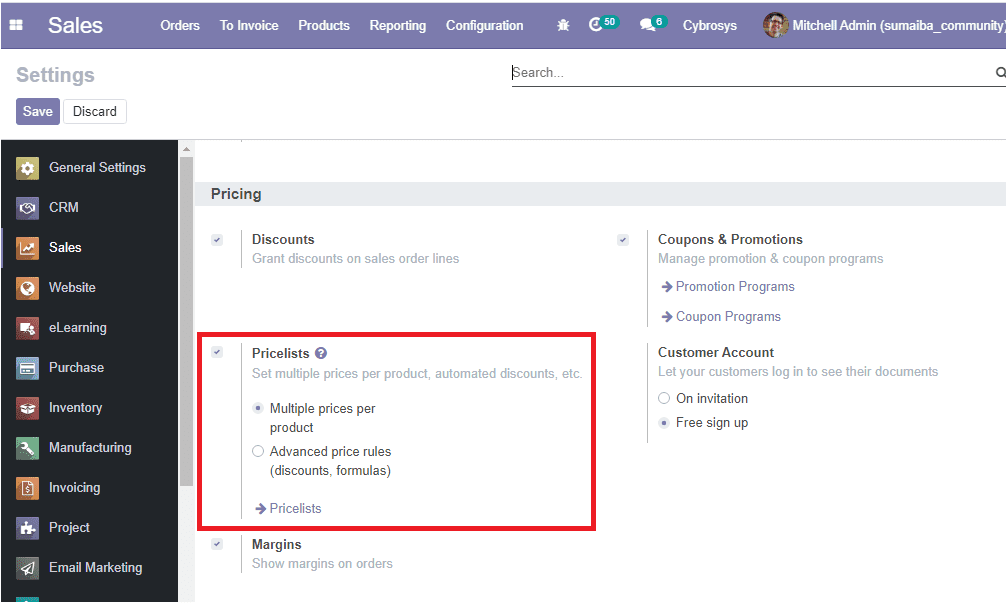
By using this option you can set multiple prices per product or can enable advanced price rules for pricelists. That means in the Odoo platform you can create two types of sales pricelists. The first type is the multiple prices per product and this allows customer segments and the use of different pricelists for different countries having different currencies. The second type the Prices computed from formulas is used for discounts, margins, roundings. It will be helpful for setting price change rules. The changes can be relative to the public price, product cost price, or to another pricelist.
Let us have a look at how to create the pricelists in Odoo.
Here in the Odoo platform, two types of pricelists are available.
1. Multiple prices per product
2. Advanced price rules
Pricelists under multiple prices per product
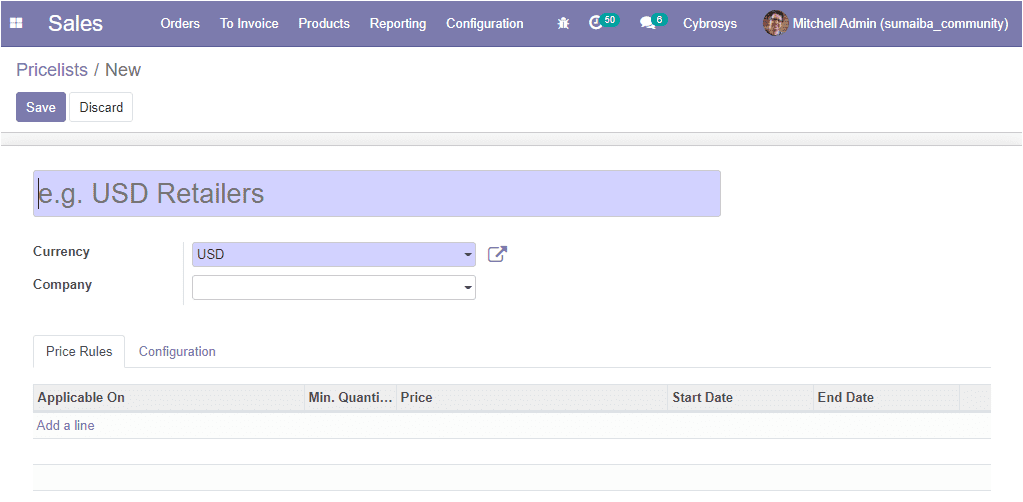
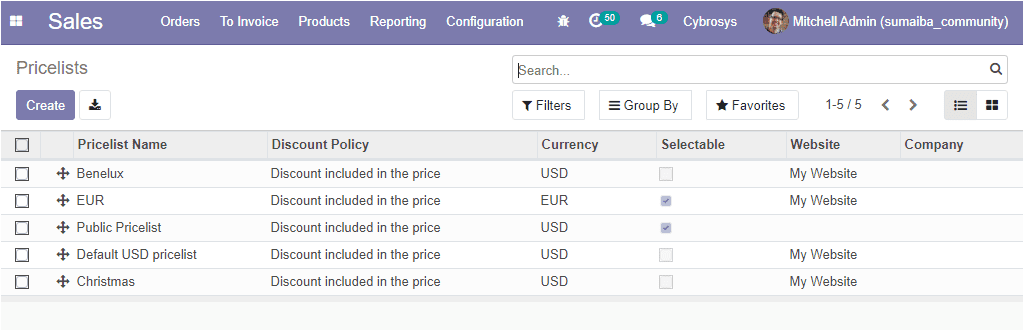
For creating a new pricelist you can select the pricelist arrow available in the settings of the sales module or you can go to Sales -> Products -> Pricelists. The image of the window is depicted below
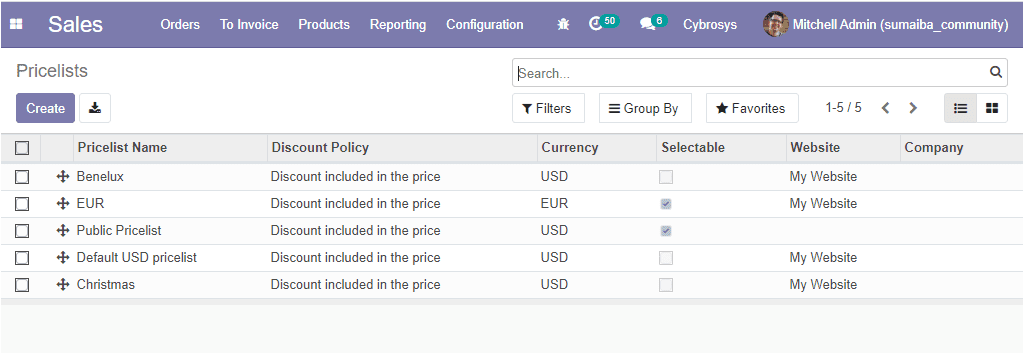
Here in this window, you can view all the pricelists defined in the platform and you can create a new pricelist by selecting the create icon available.
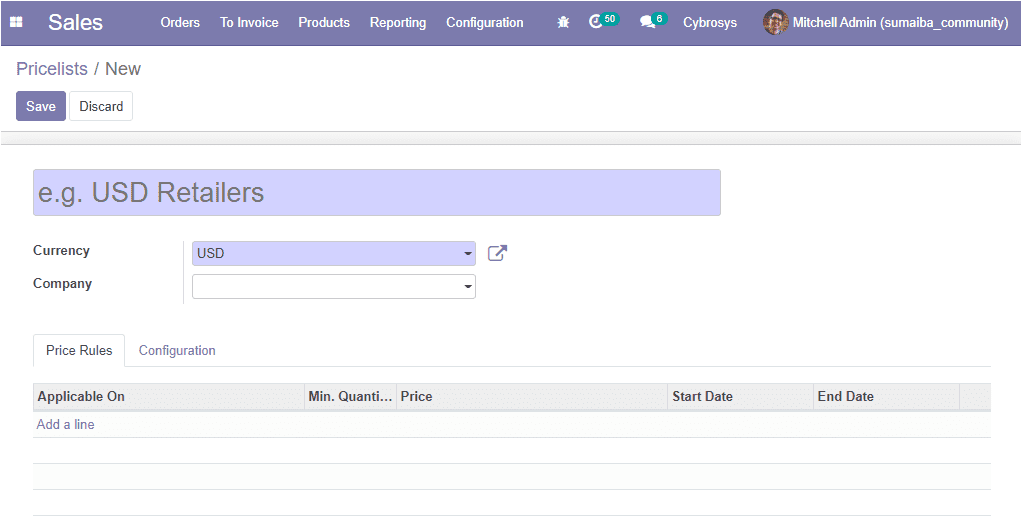
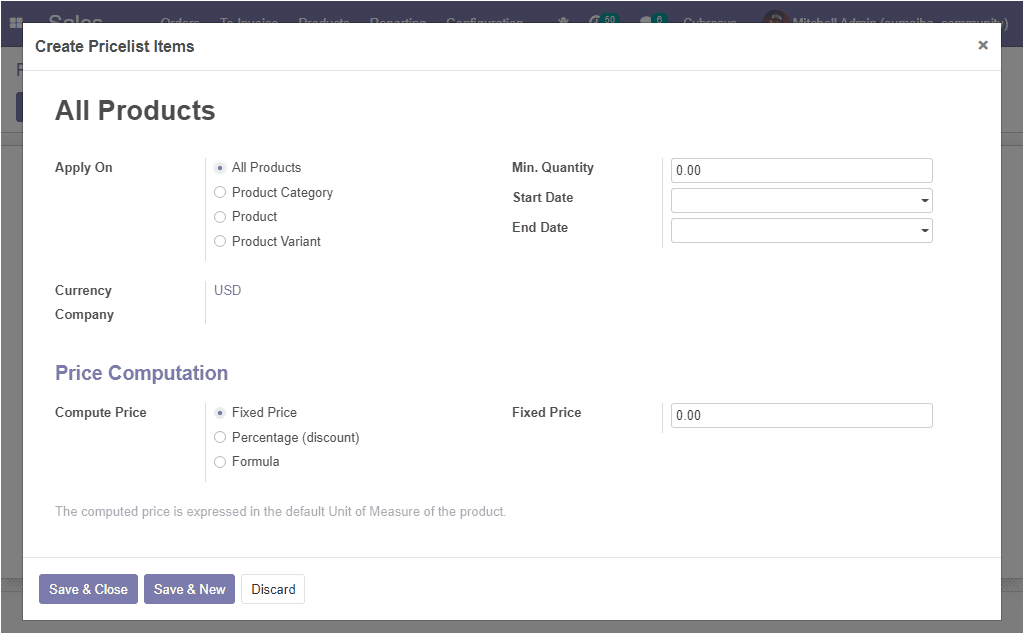
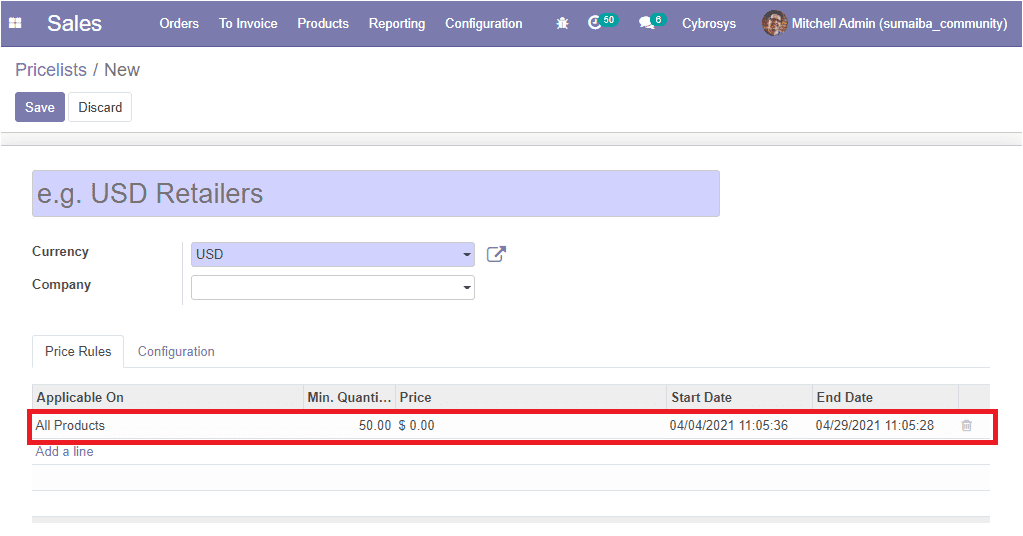
This image depicts the pricelist creation window where you can provide the pricelist name, allocate the currency along with company details. Under the Price Rulestab, you can create pricelist items by selecting the Add a line option available. The pop-up window of the create pricelist item is depicted below.
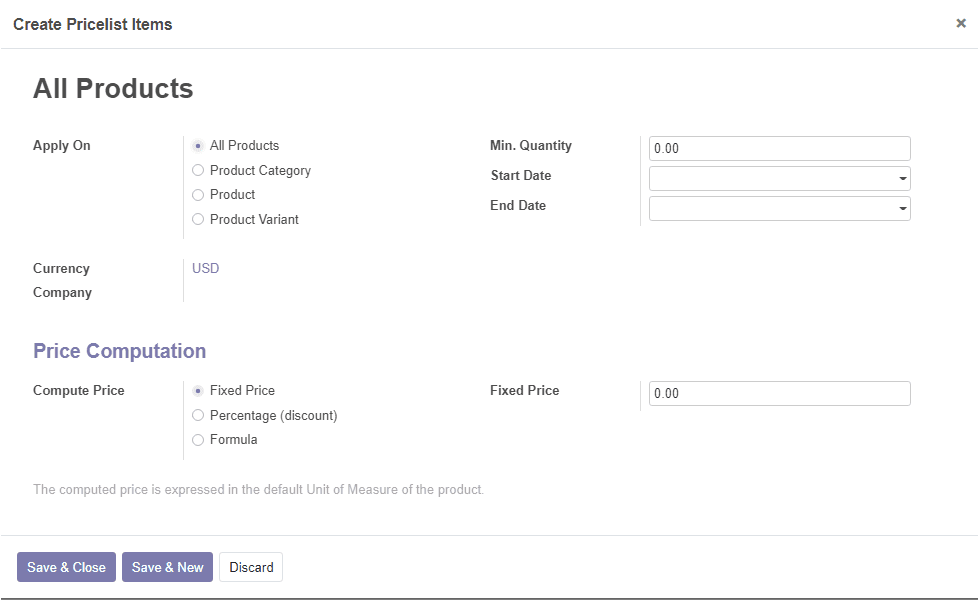
You can give the details such as product details, minimum quantity, start, and end date, currency, compute price rule, and many more. After that, you can click on the Save & Close button available. Now the details are displayed in the pricelists window as shown below.
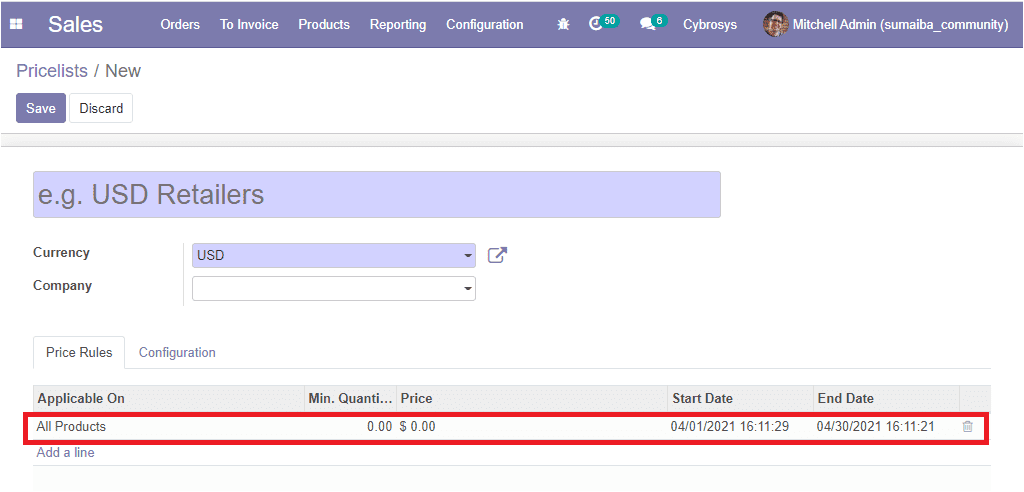
You can add many products likewise.
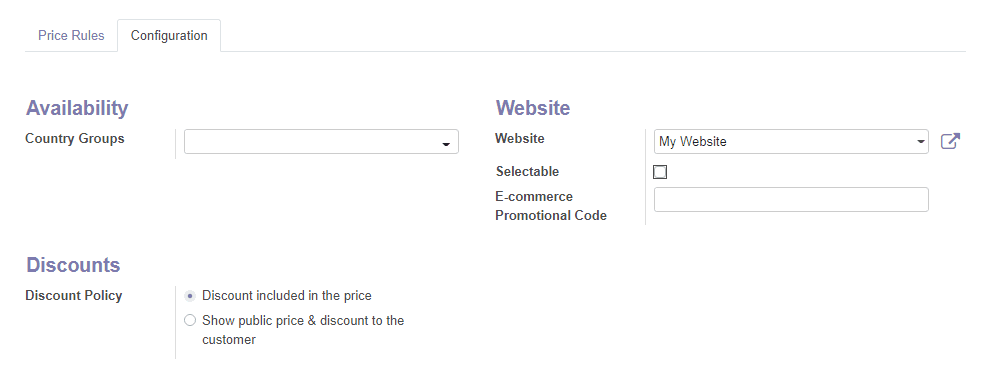
Under the Configuration tab of the pricelist window, you have the other options such as country groups which is the option to allocate the pricelist of a product to a country group in particular. By selecting this option you can restrict the use of a specific pricelist in the selected country group. The discount policy can be allocated in two ways. Discount included in the price or show public prize and discount to the customer. Moreover, you can provide the website details and eCommerce promotional code. Additionally, you can enable the selectable option for allowing the buyer to view the pricelists from the website.
As we clear on the operations of multiple prices per product and now let us have a look at Advanced price rules terminology.
Advanced Price Rules (discounts, formulas)
First of all, you should enable the advanced price rules option from settings and save the changes.
In the Odoo platform, the Advanced price rule based on the formulas feature helps you to set price change rules. Price changes can be relative to the public price, product cost price, product list, catalog price, or to another pricelist. The changes are calculated via discounts or surcharges making it suit with the minimum and maximum margin set by the user.
For creating a new pricelist you can take the following steps Sales -> Products -> Pricelists. The image of the window is depicted below where you can view all the create pricelists.
Here in this window, you can view all the created pricelists and their discount policies along with the currency, website status, website, and company. You also have the provision to create a new one by selecting the Create icon. The image of the window is depicted below.
Here in the pricelist creation window, you can allocate the pricelist name along with currency and company details. You can add the pricelist items under the Price Rules tab available by selecting the Add a line option. The image of the pop-up window is depicted below.
In the window different options for applying pricing rules such as All products, Product Category, Product, Product variant. You can define the currency and company along with the minimum quantity, it is the minimum quantity required to apply pricelist rules. Also, you can allocate the starting date for applying pricelist and the ending date for applying pricelist. Moreover, the price computation is available for calculating the price in different methods. They are described below.
Fixed price: the fixed price method is used to calculate or apply the fixed price for a product or group of products.
Percentage (discount): percentage or discount option is used to determine a percentage discount on the sales price of the product, product variants, product category. In case, if you are planning to give a discount on a product for two days, you can follow this method.
Formula: In the formula, the price of the product is calculated using the formula.
After providing all the required information you can select the Save & Close button available. Now the created pricelist item will be added to the Price rules tab.
Under the Configuration tab, you have so many options such as country groups, options for allocating discount policies. Additionally, you can specify the website and the eCommerce promotional code
As we are clear on the feature Advanced Price Rule in the module and now let us discuss the Optional products in the platform.
Optional Products
In the Odoo platform, the optional product is an advanced cross-selling sales technique used to get a customer to spend more by purchasing a product that is related to what is being bought already. The aim of the profitable marketing strategy is not only to gain profits but also to offer useful and connected products to the customers. For example, if a customer buys a Piano, the optional products could be offered like the piano cover, piano stand, etc.
Adding optional products to your quotations
In the Odoo Sales module, you have the provision to add or modify optional products directly on quotations. The image of the window is depicted below
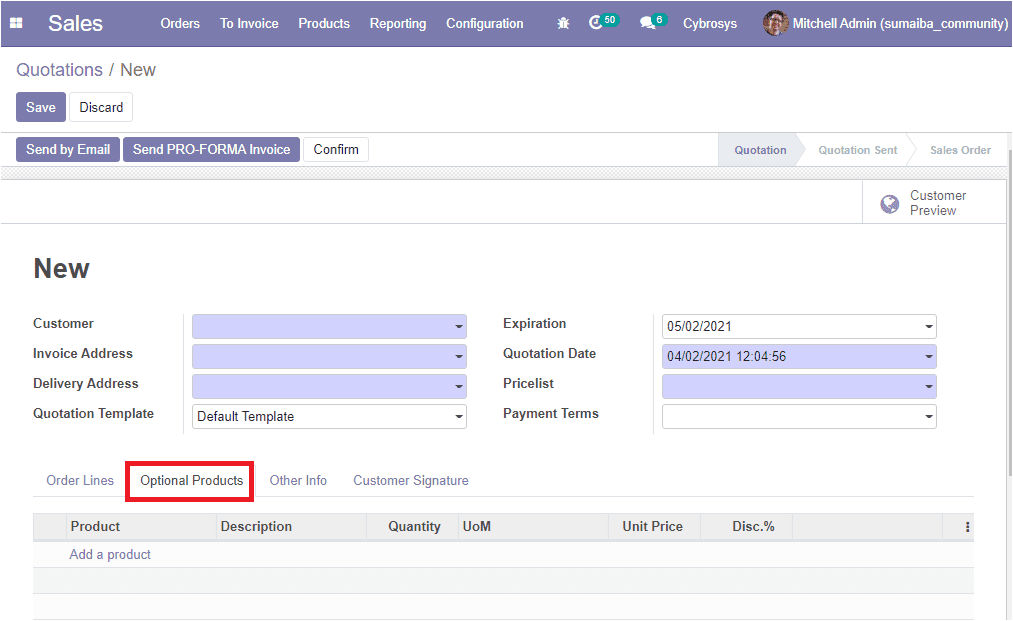
Under the optional products tab, you can allocate the details of the optional products, and also if the customer receives the offer through emails, he can add the offered products to their order by using associated carts.
Now let us discuss the discount policies available in the platform.
Discounts
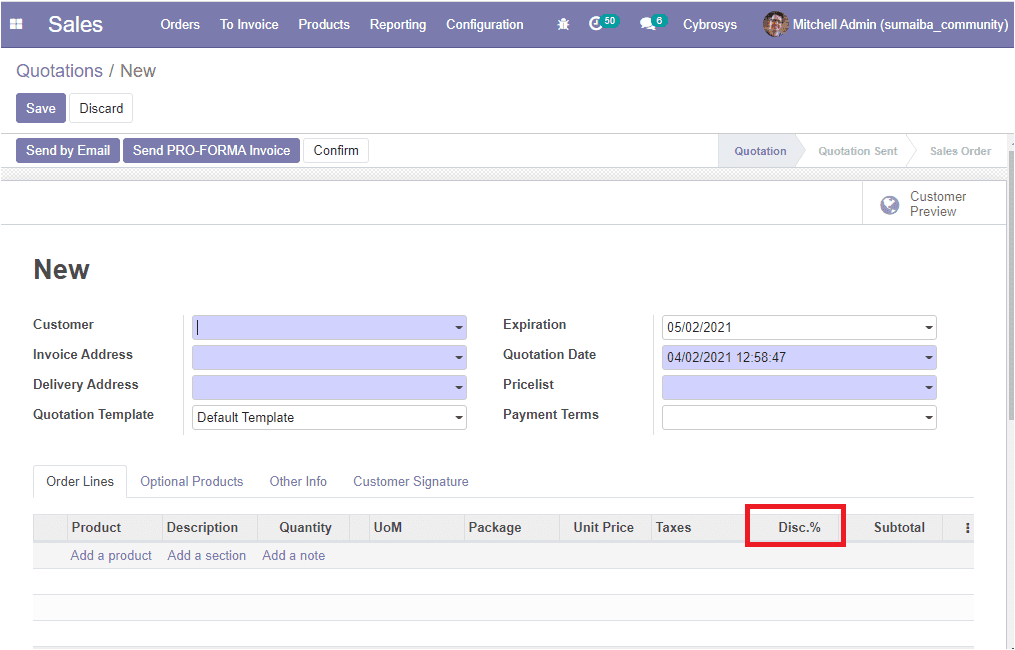
Offering discounts on your products and services is the best way to attract the attention of your customers and make them shopping lovers. In the Odoo platform, you have the provision to manage discounts on each order line of sales.
For accessing the discount feature in the platform, initially, you should activate it from settings. For that, you can go to Sales -> Configuration -> Settings and activate the Discounts option available under the Pricing tab. The image of the window is depicted below.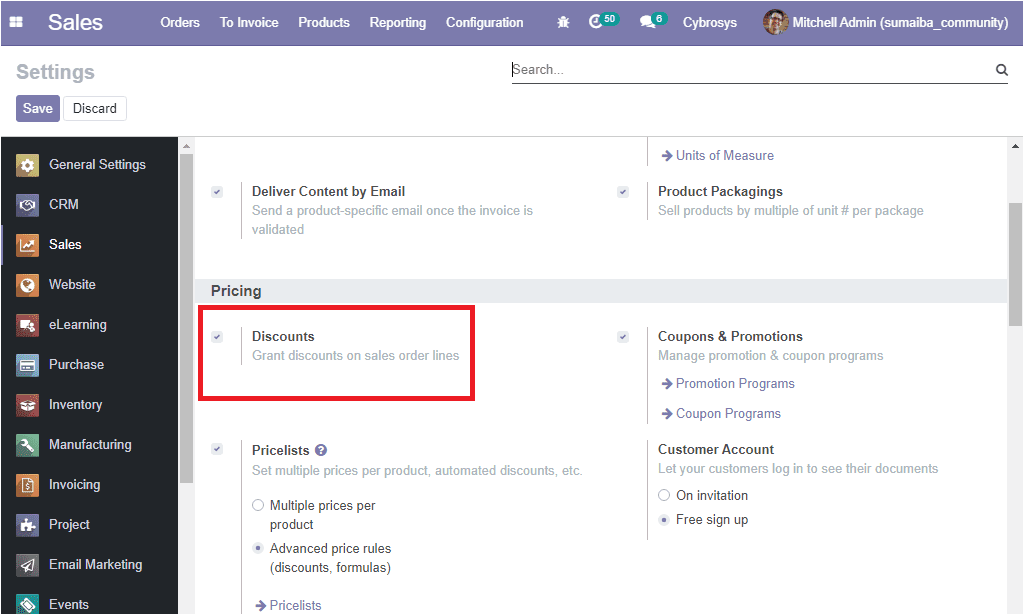
For activating the option you should check the box near the option and click on the Save button to save changes. Now the option will be visible in your quotation window as shown below.
So far we were discussing the feature discounts and now let us discuss the Coupon and Promotions on the platform.
Coupon and Promotions
The coupons and promotions are the best money-saving tools offered by the Odoo sales module. By implementing these tools in your business you will be able to attract more customers and Odoo allows you to manage them effectively. It also supports the end-user to create promotions for their products as per their requirements.
Now let us discuss Promotions first.
Promotions
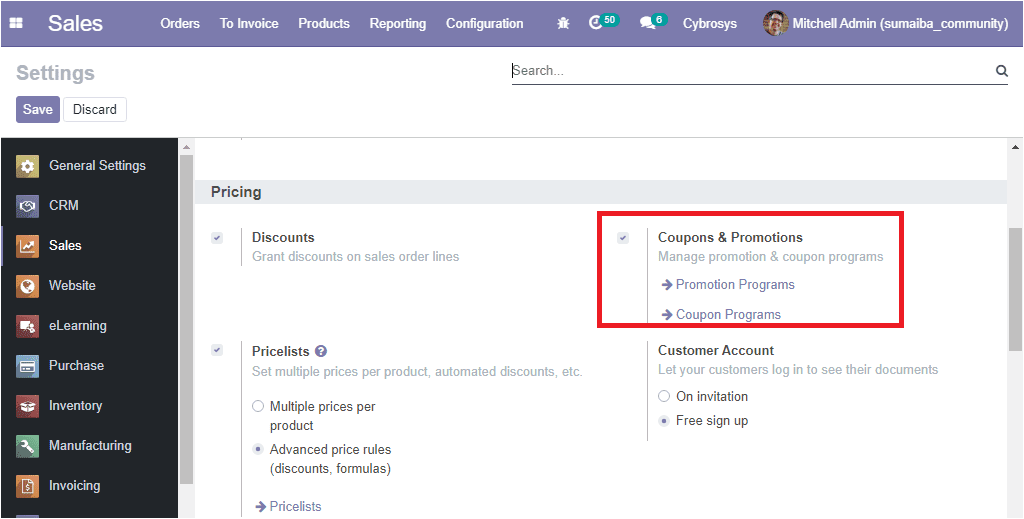
First of all, you should enable the option coupons and promotions from the settings. For that, you can go to Sales -> Configuration -> Settings.
In settings, you can view the Coupons and promotion feature under the Pricing tab as shown below image.
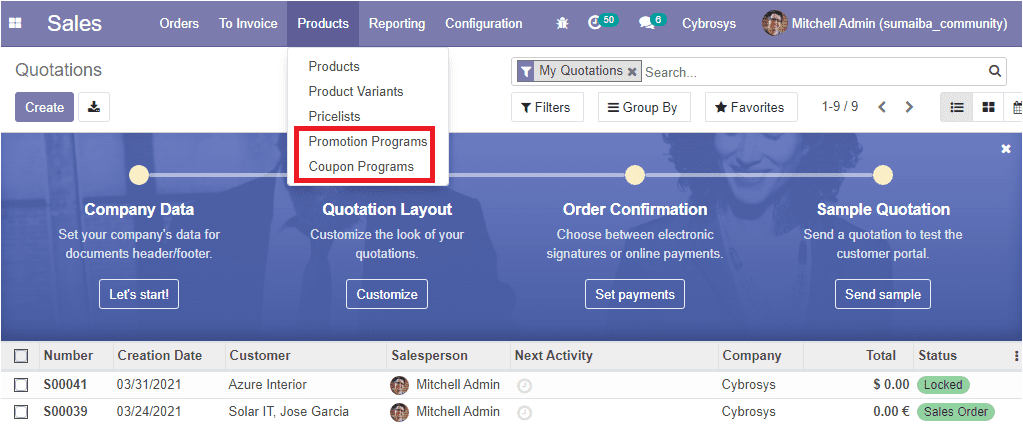
Now, these two features can be viewed under the products tab of the sales module as shown below.
We can discuss how the promotion program works.
For that, we can go to Sales -> Products -> Promotion programs. The image of the window is depicted below.
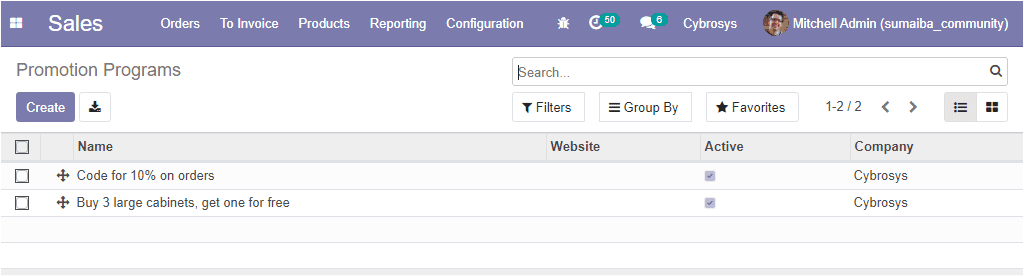
Here in this promotion programs window, you can view all the created promotion programs with details. You have the provision to create new promotion programs. This can be done by selecting the Create icon available. The image of the promotion program creation window is depicted below.
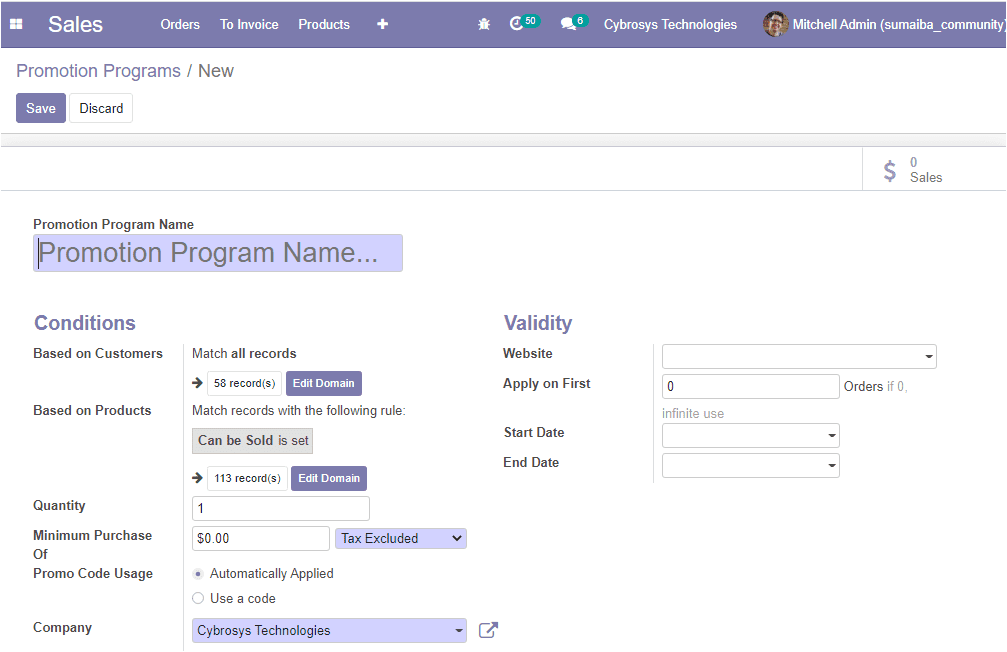
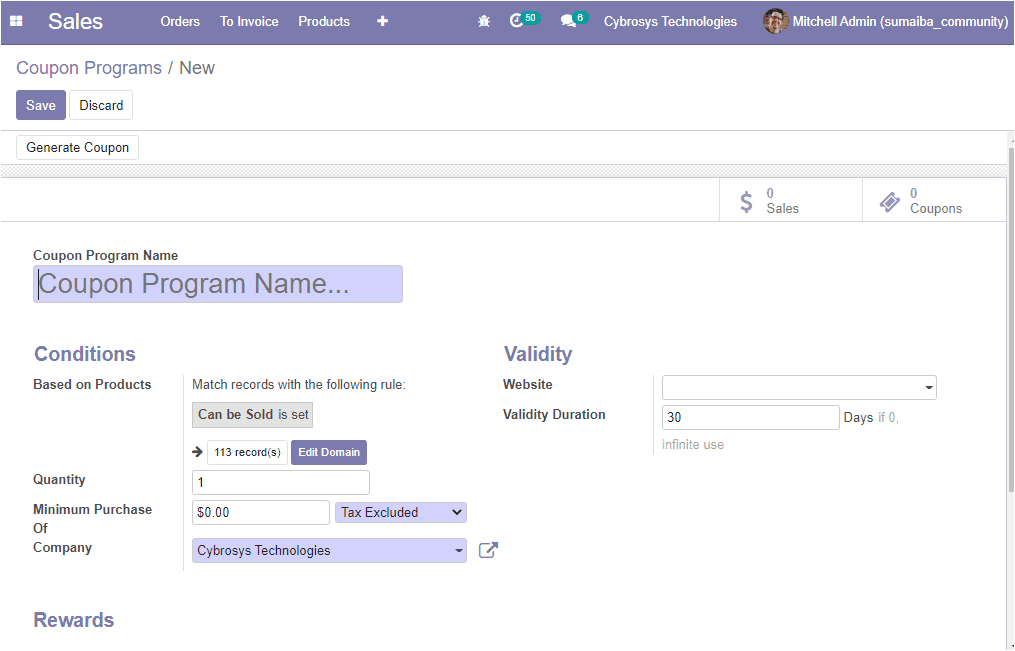
In the creation form, you can allocate the promotion program name. Also, the platform allows you to set some conditions based on customers or products such as:
- Based on customers: By default, all the customers are recorded as suitable for promotion programs, and you have the provision to select the customers for applying for promotion programs. By enabling this option the promotion program only be executed to the selected customers.
- Based on Products: By setting the option based on products, you can allocate the promotion program on the purchase of selected products. Here also all products are chosen by default.
- Quantity: Here in this field you mention the minimum required product quantity to get the reward.
- Minimum Purchase: This is the minimum purchase amount for receiving rewards. You can also define whether the minimum purchase amount is a tax included or tax excluded amount.
- Promo Code Usage: This field allows you to conduct the promotion programs either automatically or using codes. If you select the automatically applied option, the promotion programs will be automatically applied. So when the rules and conditions are acceptable the reward will be applied automatically. If you are selecting the Use a code option, a valid code is mandatory for applying reward. Finally, you can provide the company details.
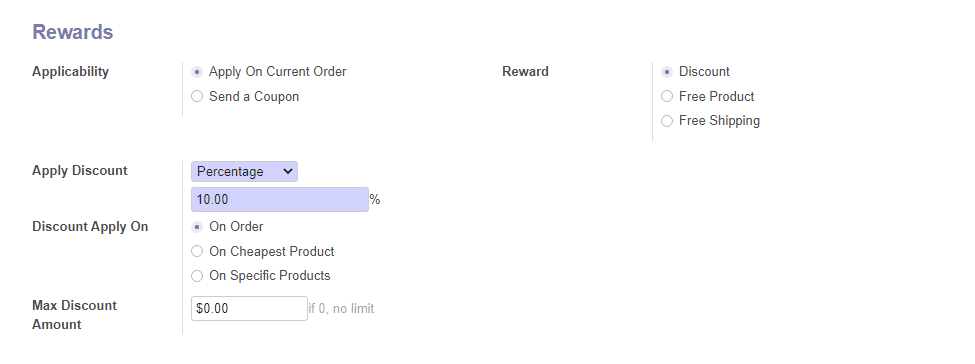
Rewards
- Applicability: The reward can be applied in two ways such as applied on current order or send a coupon.
- Apply discount: Here you can apply a percentage or a fixed amount in the allotted space.
- Discount Apply On: here you have three options as described below.
On Order: In this option, you can apply the discount for the complete order.
On Cheapest Product: Discount applying for the cheapest product of the order.
On Specific Products: For applying discounts on selected specific products. - Maximum Discount Amount: Maximum amount of discount that can be provided.
- Reward: there are three options under the reward field.
Discount: if choosing this option, the reward will be provided as discounts.
Free Product: Free products will be provided as a reward.
Free Shipping: Free shipping will be provided as a reward.
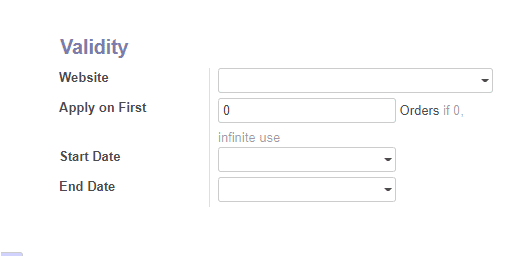
Validity: Under the validity tab you have the following options for defining the validity information of the promotion program.
- Website: restrict publishing to this website.
- Apply on First: Here you can provide the maximum number of sales orders in which reward can be provided.
- Start Date: Coupon program start date.
- End Date: Coupon program end date.
Now let us discuss how Coupons work on the platform.
Coupons
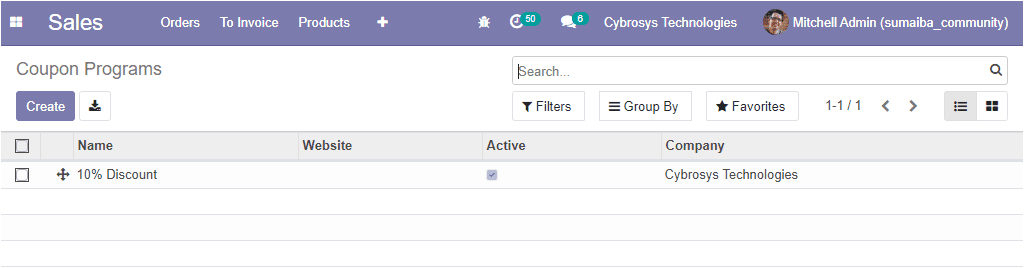
For configuring coupon programs what you want to do is to go to Sales -> Product -> Coupon programs. The image of the window is showcased below where you can view all the created coupon programs in the window and their details. Moreover, you can make desirable changes in the created one by selecting the edit button available. Additionally, you have the various default and customizable options such as filters, group by, favorite search, and much more.
The image of the window is depicted below.
For creating new coupon programs you have to select the Create icon available and the image of the window is depicted below.
Coupons are the one-time use code that will generate a discount for the customers and it is used to provide limited discounts.
As we clear on how Coupons and Promotions work in the platform and now let us discuss the configuration of Shipping methods.
Shipping Cost
Shipping methods are used to describe the price and method of delivering a product to the customer that was ordered by him/ her. It can be any type of transport or carrier of orders from the manufacturer to the customer. Odoo allows you various shipping methods and manages tasks such as transportation mode, conveyance of cost settings, shipment tracking in a simple way.
You can access the Shipping method options by taking the route Sales -> Configuration -> Shipping methods.
The image of the window is depicted below.
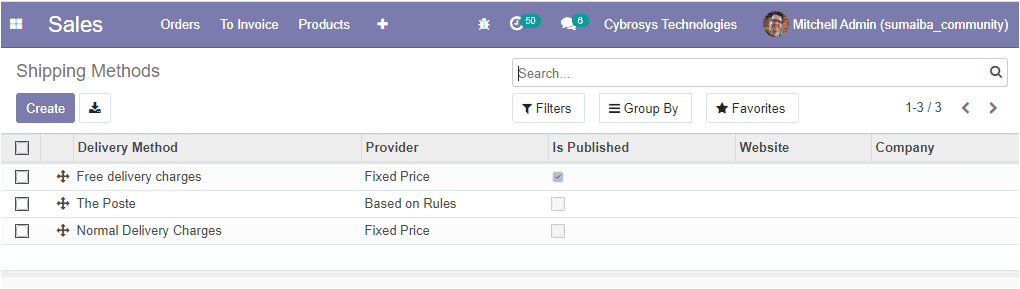
In the window, you can view all the created shipping methods along with the provider. You can set the delivery method in different ways such as Free delivery charges, Normal delivery charges and you can assign whether it is postal or roadway, etc. It is also possible to create new shipping methods by selecting the Create icon. The image of the shipping methods creation window is depicted below.
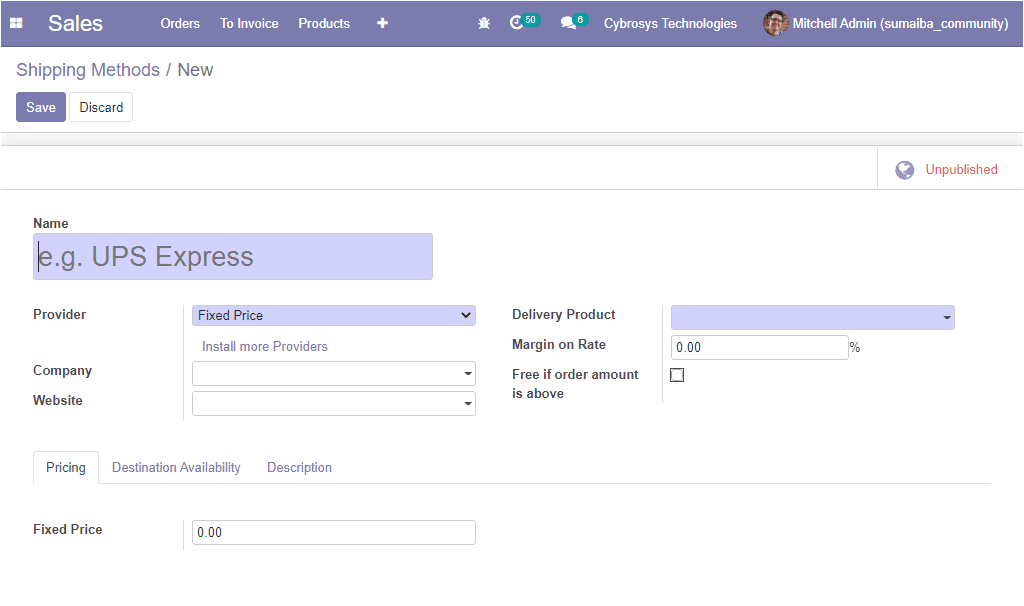
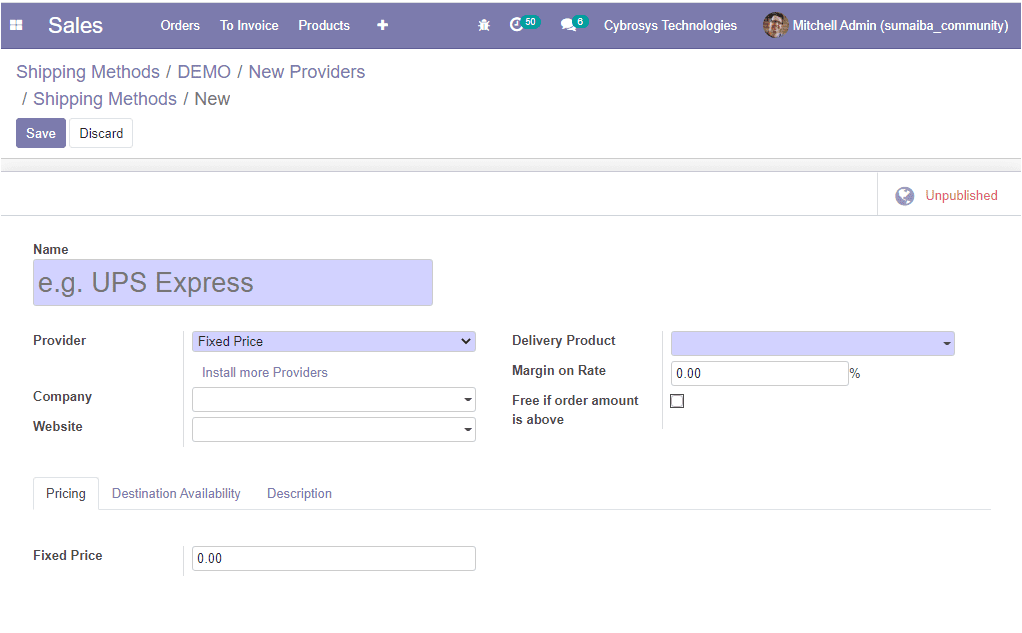
In this creation form, you can provide the name of the shipping method, allocate the provider from the dropdown menu. Which can be either Fixed Price or Based on Rules. If you select the fixed price option the shipping cost will remain fixed at the time of shipping.
In the case of Based on Rules, the point of shipping cost will be based on rules.
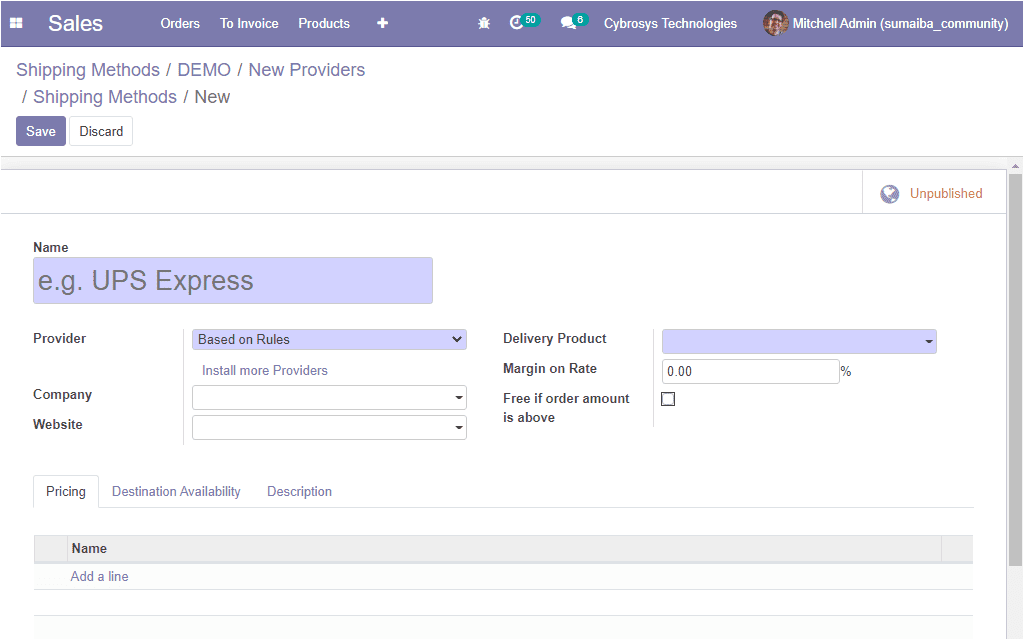
Now the new price rule can be created by selecting the Add a line option available under the pricing tab. The image of the window is shown below.
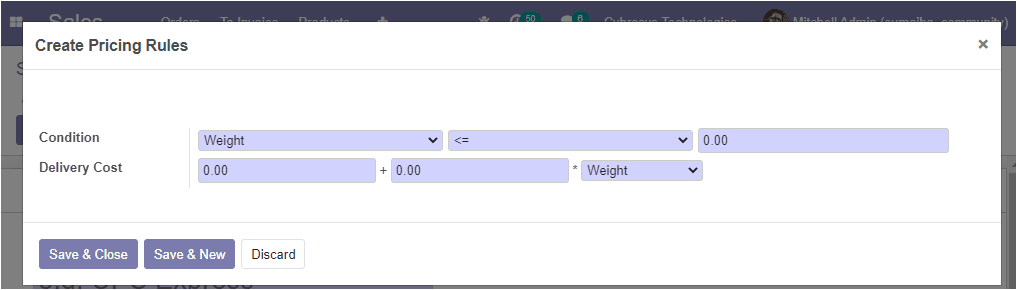
Now the new price rule can be created by selecting the Add a line option available under the pricing tab. The image of the window is shown below.
Now let us discuss how to send Sales quotations and Sales orders on the platform.
Sending Sales Quotations and Sales Orders
Now we can come back to the sales quotation window where we have provided information on each field including customer name, products, quotation templates, pricelist, payment terms, optional products, shipping, coupons, and promotion. Now the coming step is to send the quotation to the customer.
First, you should save the quotation by selecting the save button. After saving the details your window will look like the image depicted below.
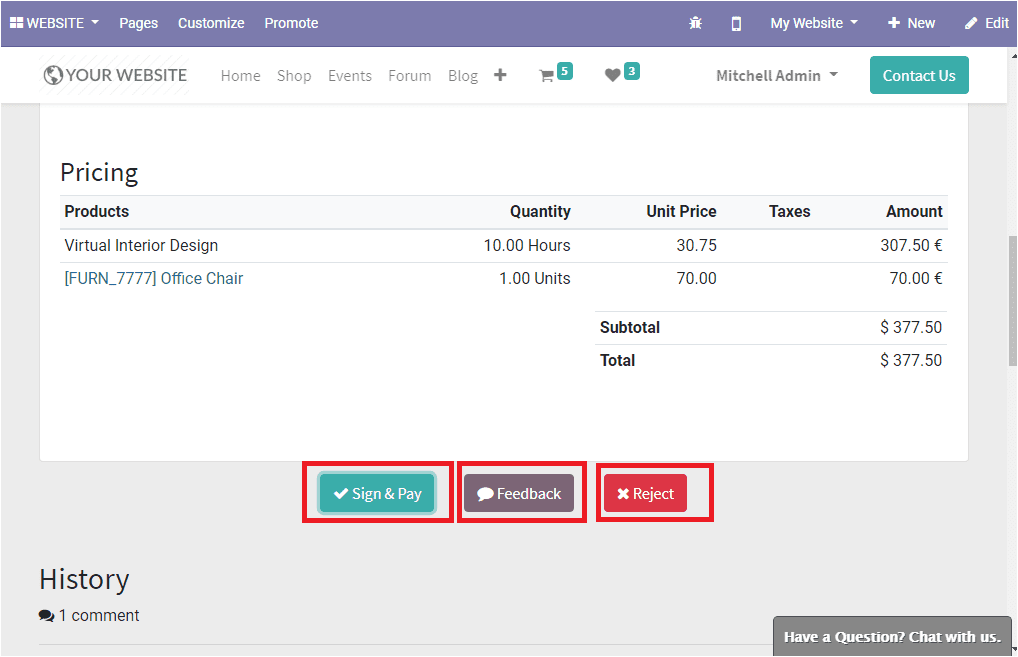
Here in this window, you can find the Customer Preview button on the top right corner. By selecting this icon you can see the website view of the quotation. The customer can also view his quotation from the website. It will be more helpful for them to quickly confirm the quotation through digital signing.

The Sign & Pay button can be used for confirming the quotation
On selecting the Sign & Pay button you will be depicted with a pop-up window for validating the order. The image of the window is depicted below.
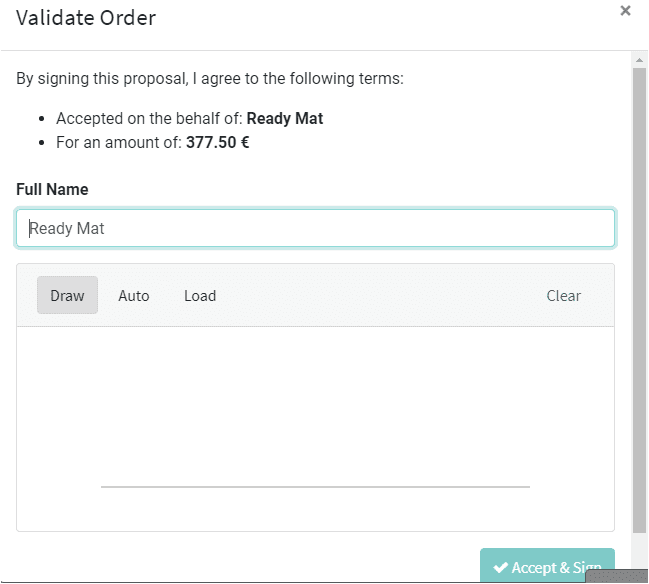
You can provide the full name along with the sign. You have the provision to draw or load the signature from your file.
By selecting the Feedback button, the customer can communicate with the company for seeking or clarifying any modification in the quotation.
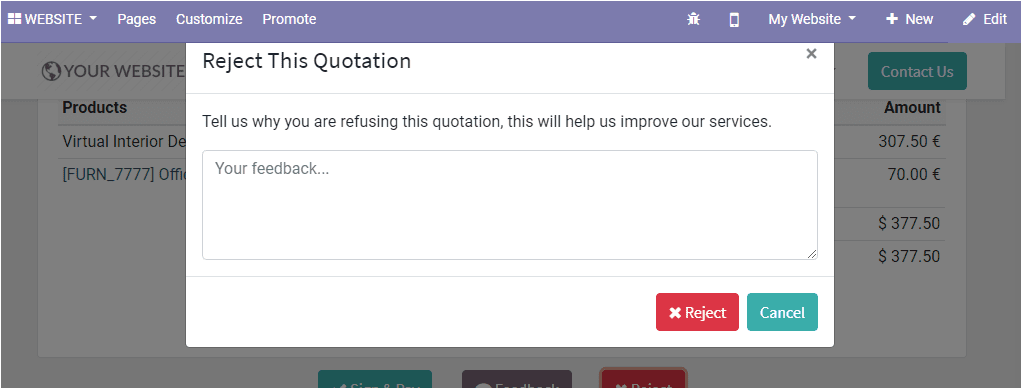
Now it is also possible for the customer to reject the quotation if he/she is not satisfied with the quotation. It can be done by selecting the Reject button. Upon selecting the reject option you will be depicted with a rejection window as shown below where you can provide the reason for rejecting the quotation as your feedback.
As we are clear on how to send Sales quotation and Sales orders on the platform now, let us discuss the Online signature option available.
Online Signature
In this digital world, the importance of digital signing and digital payment is no need to mention. Here Odoo ensures the importance of online signature and online payment.
For activating the online payment and signature option you should go to the settings menu. You can check the boxes near the options online signature and online payment and don’t forget to save the changes. The image of the window is depicted below.
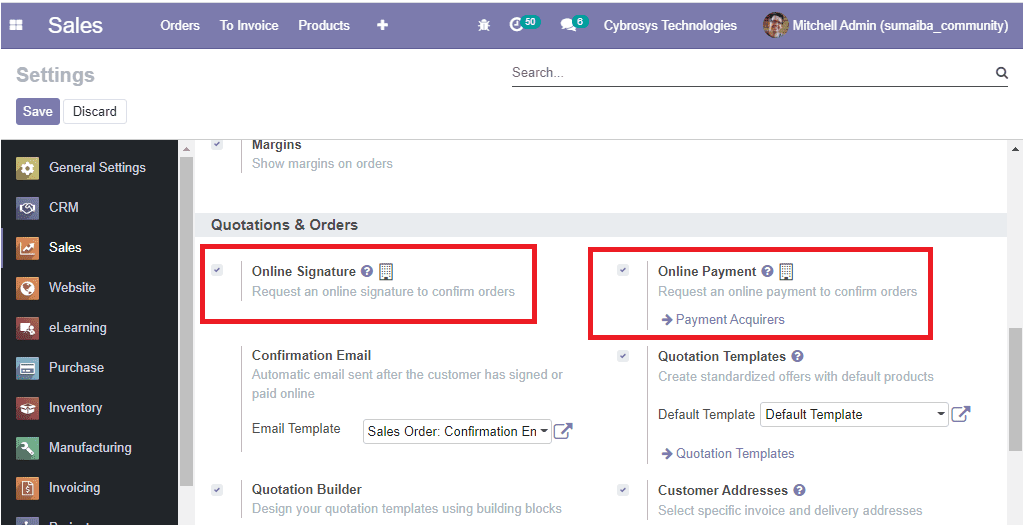
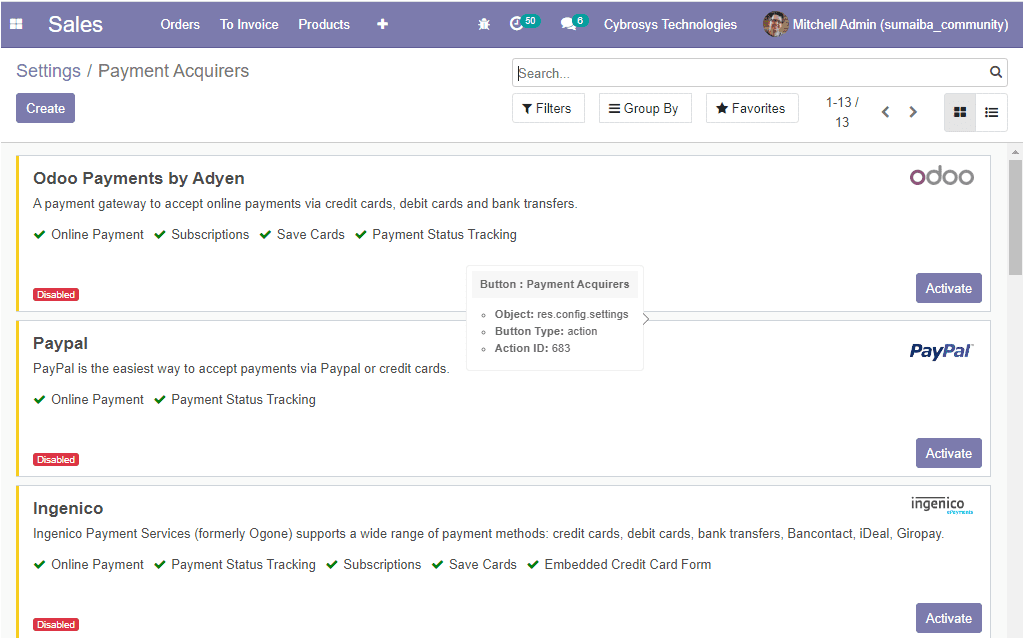
In the online payment option, you have the Payment Acquirers menu.
Now let us discuss how to create Invoices on the platform
Invoices
Invoices are the commercial document sent by a seller of products and services to the customer. In simple words, it is the written agreement between the seller and the buyer. The seller can send an invoice to the customer after confirming the sale order. The invoices include all the information on sales transactions such as product details, quantities, prices, payment terms, and much more.
If you click on the Create Invoice button you will be navigated to a new window as shown below.
Here in this window, you can view the different options for creating invoices such as:
- Regular invoice
- Down payment ( Percentage)
- Down payment (Fixed amount)
When you are selecting the down payment option, you will be available with two options. That is a fixed amount and the percentage of the total amount which allows the customer to pay a percentage of the amount while ordering with the agreement that the remaining amount will pay later. The next field Down payment amount means the percentage of the amount to be invoiced in advance, taxes excluded. Then you can allocate the Income account from the drop-down menu and it is the account used for deposits. Moreover, you can specify the taxes used for deposits under the field Customer taxes.
After providing all the required information you can select the Create and view invoice button available in the left bottom of the window. This action will lead you to the new window as depicted below.
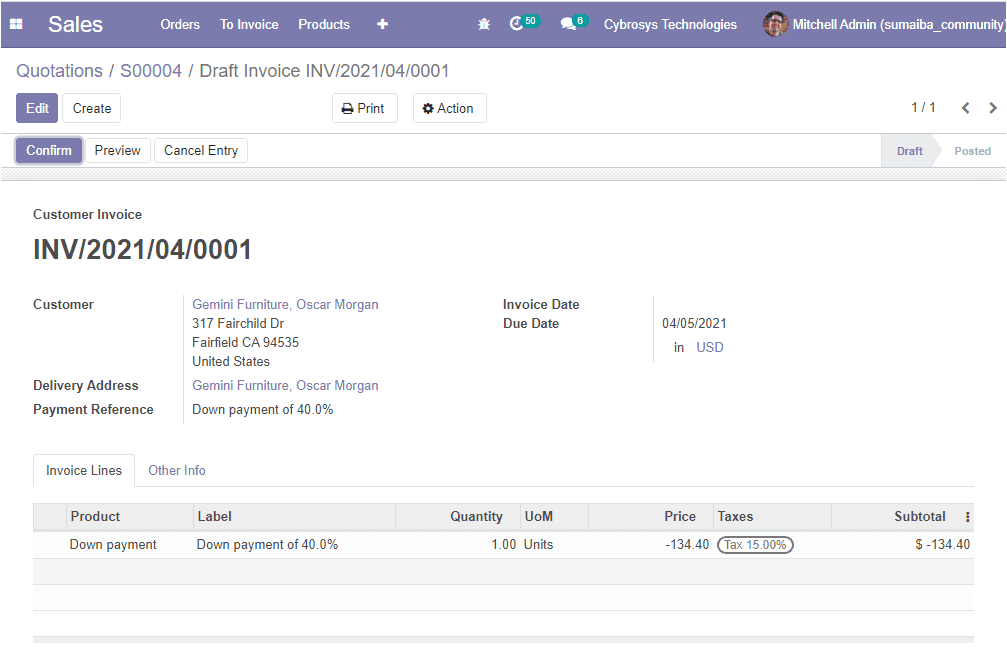
This is the invoice that we created for the down payment and now it is in the Draft state. Here you have the provision to make necessary changes in the invoice by selecting the Edit button available.
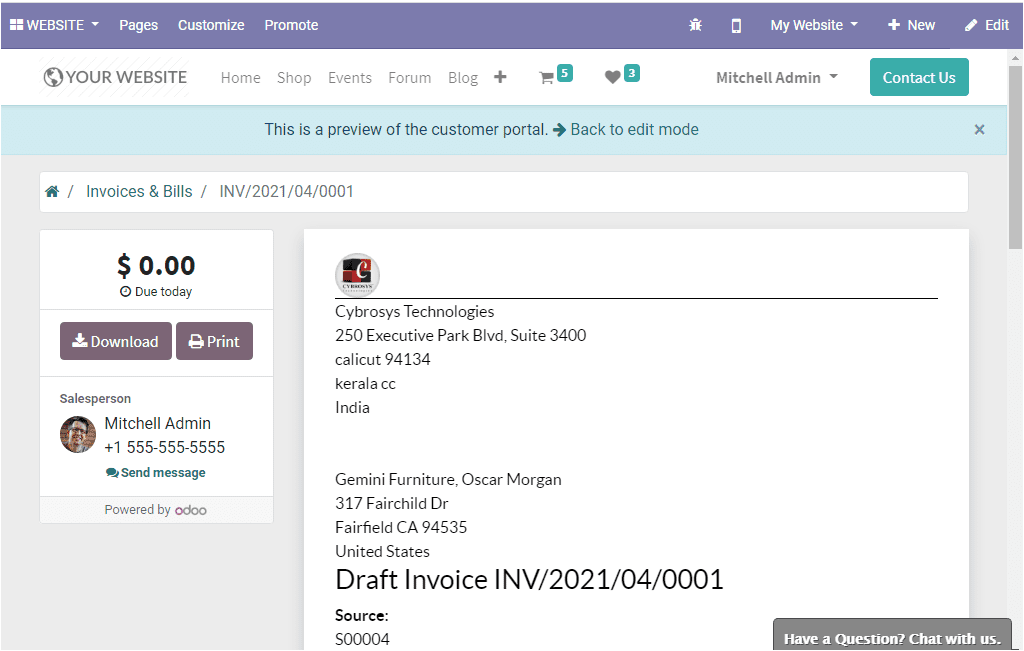
You can also see the website view of the invoice by clicking on the Preview button. The image of the window is depicted below.
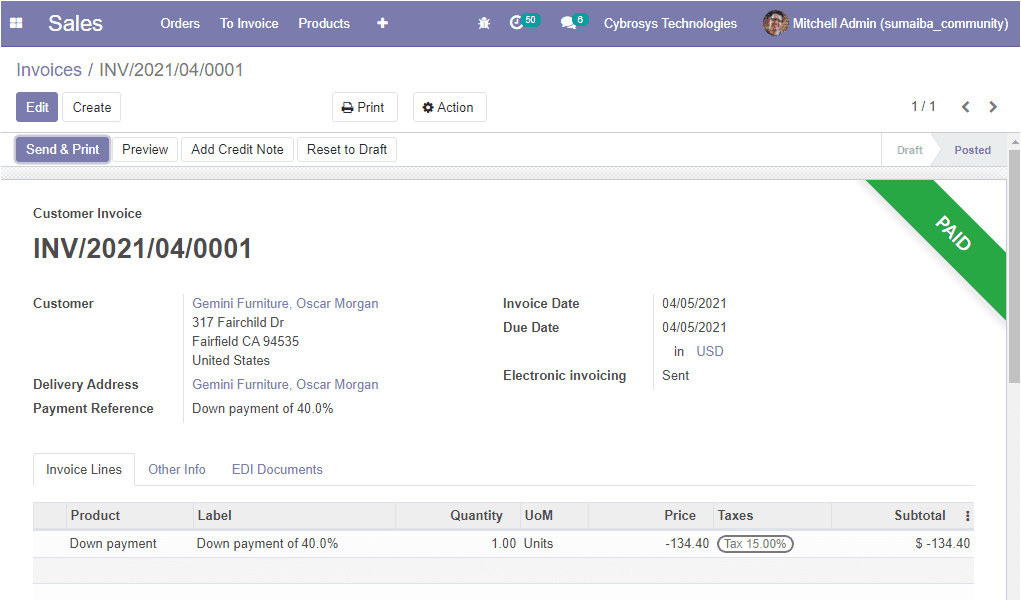
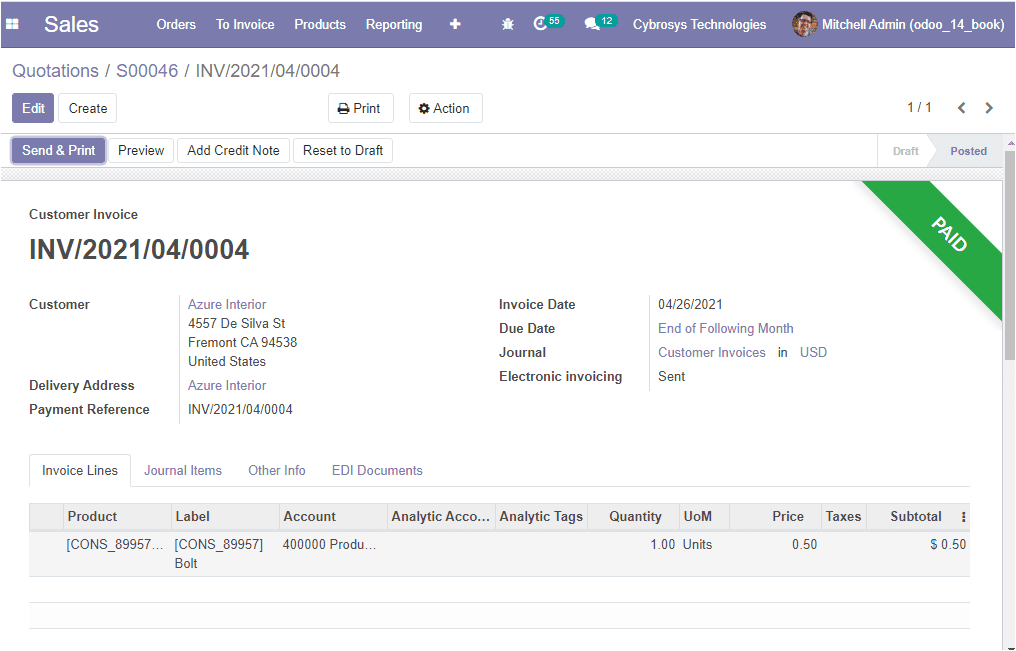
For confirming the invoice, you can click on the Confirm button. This action will lead you to the new window where the invoice is labeled as PAID. The image of the window is depicted below.
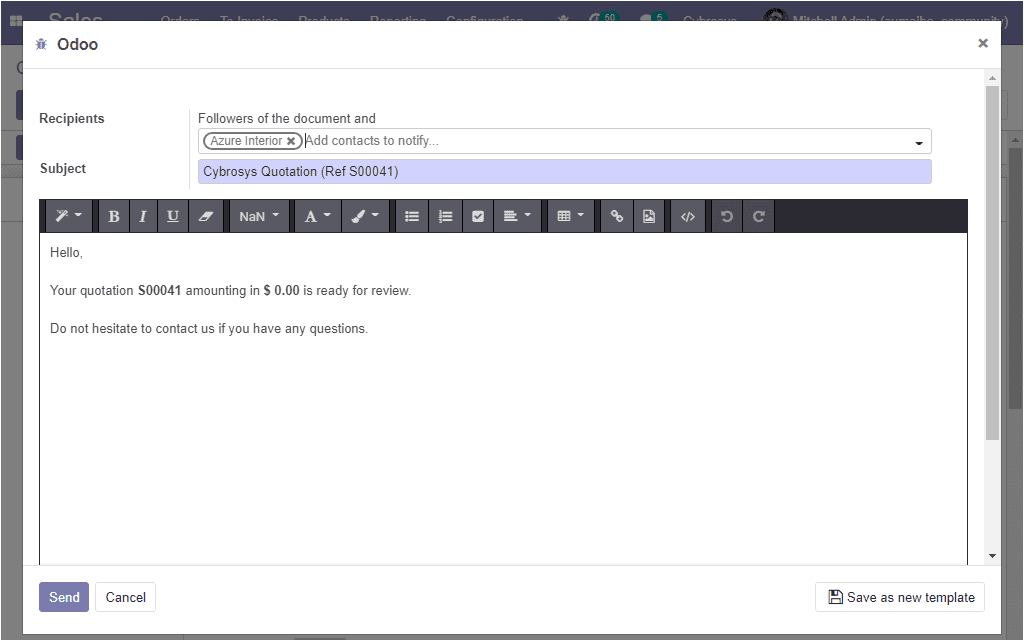
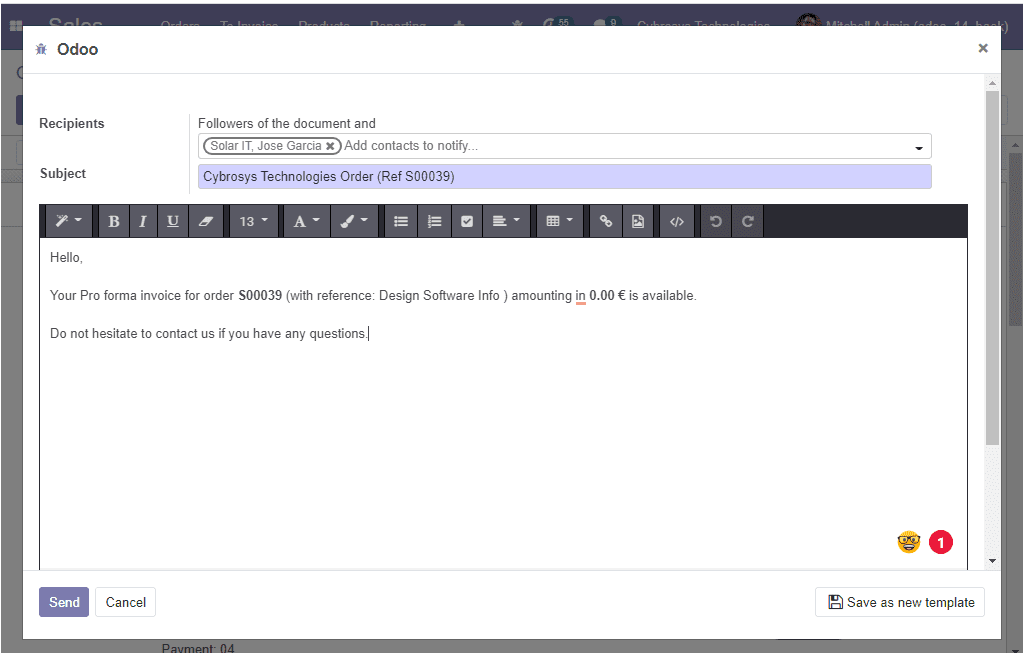
Here in the window you will see a Send & Print button available on the left top corner of the window. By selecting this button you will be directed to the Send invoice window where you will get a default email template as shown below which can be edited.
Now you can register your payment by selecting the Register Payment button available. If you click on this button you will receive a popup window as shown in the below image where you can register the payment.
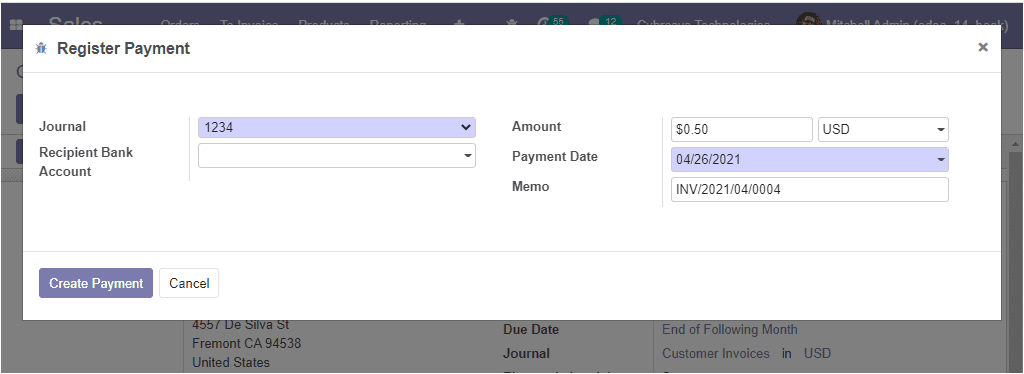
In this window, you can allocate the Journal along with the Recipient Bank Account. Moreover, you can allocate the Amount, Payment Date, and Memo. After filling in all the required fields, click on the Validate button. This action will lead you to the Invoice window which shows that the invoice has been PAID.
The Refund option is also available in the module. Let us discuss the option in detail.
Refund
The Odoo platform allows you to refund the invoice. This can be done by selecting the Add Credit Note button available.

When you click on the Add Credit Note button you will get a pop-up window as shown below.
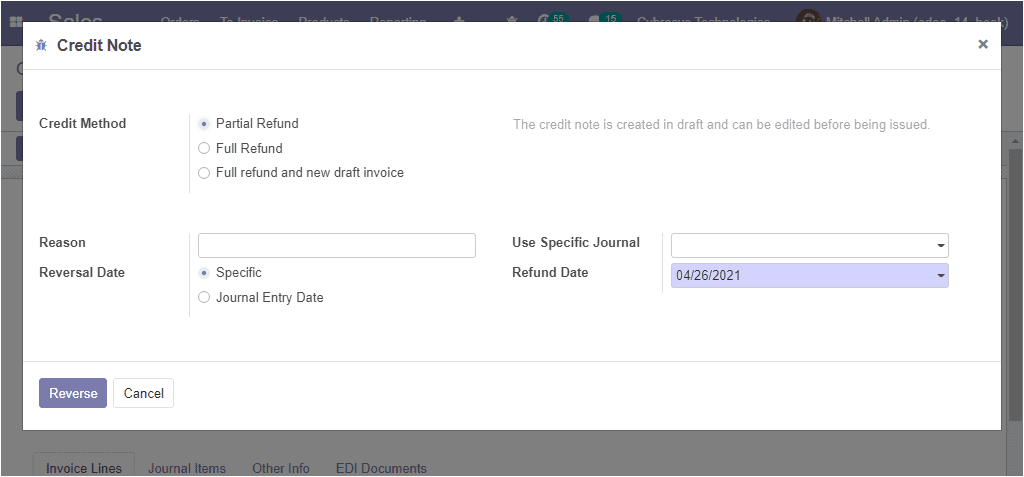
Here in this window you can provide adequate information such as Credit Method, Reason for the refunding, Reversal Date, Use Specific Journal, Refund Date. after allocating all the details you can select the Reverse button. Note that the credit note is created in the draft and can be edited before being issued.
We discussed the Odoo 14 Sales module (community edition) in a detailed manner and it is clear that all the sales activities can be managed in a professional manner with the Odoo sales module. Moreover, this module is integrated with other modules such as CRM, Inventory, Email marketing, Invoicing, and many more.